Eye-catchers #19

An eye-catcher is a person or a thing that attracts the attention

The online sewing community is very visual. So, every day I see heaps of sewing related images on social media and blogs. Some of them catch my eye because they make me think or they give me inspiration. Here, I want to share these eye-catchers with you.

diy wardrobe


Follow below what caught my eye the last months:

Sara’s cape

Sewing a cape for myself is one of my secret wishes. I even don’t know if it would be something that would suit me but I like the shape of it. Also, I think it would very wearable here in Belgium as an in-between-seasons coat. Definitely something my wardrobe is lacking as made clear by Me-Made-May ’18. So I was immediately taken by Sara’s beautiful version of the Woodland Stroll Cape from Oliver + s. This pattern somehow escaped me but it is definitely on my sewing list now.

Martina’s refashioned sweater

refashion sweater

The Annual Restyling Exchange of Amy and Pilar is running to its end. With the big reveal weekend coming the 22nd, 23rd, & 24th of June. The sweater Martina refashioned is not for the restyling exchange but something she made for herself. She made a new Sewhouse 7 Toastersweater #1 out of two old sweaters she didn’t wear anymore. I find this a brilliant idea and very inspiring.
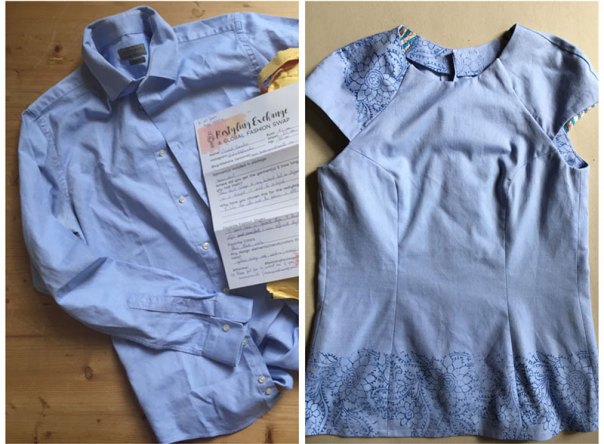
Izzy’s pencil skirt

diy wardrobe

I think we, sewists, all have been there, at least I have. You have some leftover fabric from a sewing project and you have this particular idea of what to sew from it. Then you don’t have enough! Izzy resolved this in a very creative way. For a pencil skirt, she added a lace band and cut out the bottom section the other way. A very clever idea with a stylish result!

The blouse from @fragmentid

Burda blouse tweak

Hacks or tweaks do not have to be complicated. @fragmentid lengthened the sleeves of this Burda blouse and finished the hem with gathers. She said that she didn’t wear it with the original elbow length sleeves. Again a brilliant idea with a stylish outcome. Very inspiring.

Giorgia’s African Wax culottes

African Wax Culottes

Giorgia just combined two of my favourite things: African Wax print and culottes. A golden combination. I already made the Velo Culottes in African Wax but seeing this version of Giorgia makes me want to sew several more.

Tilda Swinton by Tim Walker

Tilda Swinton

Wow! This picture of Tilda Swinton by Tim Walker is a real eye-catcher, isn’t it? When it popped up in my IG-feed (@the_red_list) I couldn’t stop looking at it.  The movement of the fabric is just mesmerizing. I wished I could make garments like that!

Did anything catch your eye lately?


Me-Made-May ’18—It’s a wrap!

I’ve just finished my third Me-Made-May and I’m feeling happy and a little sad at the same time. Happy because I managed to wear me-mades every single day of May 2018. A little sad because it’s over now and I have to wait another year for a new Me-Made-May!

mmmay18
Standing in front of Anish Kapoor’s Sky Mirror on day 30 of Me-Made-May ’18.
Me-Made-May ’18: Day 19-Day 31

I already showed my first 18 wears of MMMay’18 before, below you see my 13 last wears (blog post linked where the me-mades have been blogged).

19. Seamwork Oslo Cardigan.
20. Seamwork Brooklyn skirt and  Sew Much Ado Seafarer top; new combo!
21. Maria Denmark Rachel Wrap dress.
22. In the Folds Rushcutter dress.
23. Newlook 6106 skirt with Burda Turtleneck Top; new combo!
24. Zippy top from See Kate Sew with box pleated skirt from Allemaal Rokjes.

25. New!! Vogue 9075 Jumpsuit; will be blogged soon ;).
26. Schnittchenpatterns Chari dress.
27. True Bias Ogden Cami maxi dress.
28. How to do Fashion n°7. Vanlose trousers and top.
29. New!! Seamwork Mesa dress.
30. Skirt from Knipmode with a 15-year-old rtw top; new combo.
31. In the Folds Rushcutter dress #2

The Me-Made-May challenge

Me-Made-May is all about setting a personal challenge regarding your me-mades, you can read all about this on Zoe’s blog. So the big question is: “Did I reach my challenge?”

  • I wore at least one me-made garment every day.
  • I wore every garment only once; so I had no repeats!
  • I wore 12 garments I didn’t wear last May 2017. So I reached my challenge here as I pledged to wear at least 10 garments I didn’t wear last year. I made 3 new garments this month.
  • All my combinations of two garments were different than the previous years.

Was it hard? No, not really. After nearly 5 years of sewing clothes for myself I have a considerable wardrobe to go through each morning and make a selection. Also, a bonus was the nice weather we had here in Belgium because I have a lot of summery clothes.
So it wasn’t hard, although I have to confess that towards the end of the month I would have loved to wear something I already wore this month.

Reflections

First of all, I am proud of myself because I’m able to wear 31 different garments that were self-made and appropriate to the situation, in a row. I didn’t give this feeling a lot of consideration the previous years.
Still, there are some serious gaps in my me-made wardrobe. Where are thou: solid tops? trousers? bras? in-between-seasons coat?  And I sound like a broken record here.
So, I am going to make that my challenge for the coming year: focus on sewing these types of garments.

See you at Me-Made-May 2019!

PS. An enormous thanks to my husband who took all the photos this month. I love you, baby.

Two versions of the Seamwork Mesa Dress

It started with the fabric. Last January, on a family pizza night, I showed my fabric buys. When E. – my daughter-in-law – held the milk fabric in front of her it suited her perfectly. So I simply had to sew something out of this fabric for her. But what? It had to be a pattern for knit fabric and besides suitable for a pregnant woman. Yes, E. is expecting our first grandchild and we are thrilled about it!  After a thorough pattern search, the Seamwork Mesa Dress became the winner. And I enjoyed sewing E.’s dress so much that I immediately made one for myself too! Hence the story of two Mesa Dresses.

Seamwork mesa dress
Beautiful pregnant E. wearing her Mesa Dress!
Seamwork mesa dress
Future grandmother with her Mesa Dress!
The Mesa Dress pattern

Like all Seamwork patterns, the Mesa Dress has a simple pattern design. It only consists of 4 pattern pieces and, yeah!, it is available in A0 (copy shop) format.
Based on E’s new measurements I traced size M for neck and sleeves and graded to size L for the bodice of the dress. With the baby bump in mind, I lengthened the bodice with 7 cm. These alterations made a perfect fit.

Based on my measurements and based on the given finished measurements I cut out the XL pattern for me. But while cutting the fabric it started to dawn on me that knits always have some negative ease. So I started to worry that my dress was going to be too fitted. Alas, after basting the side seams my worry was confirmed. The fit was exactly right but too showing 🤦🏻‍♀️.
I didn’t have enough seam allowance to broaden the dress so the only solution was to sew in some side panels. Starting from nothing under the armpit and grading to the hem. All in all, I’m satisfied with the ease and the fit now. I deliberately didn’t bother with pattern matching to give it a small effect.

The fabric

The milk fabric, as I call it, is a french terry from See You at Six. This is dream fabric to work with. I used it before for a baby sweater and a sweater for my godson (not photographed yet). So I had a royal leftover of this fabric. Typical for #sewingleftovers is that you mostly have not enough length for the project you want to sew. So you have to be creative! I put a yoke in the back. Again I deliberately didn’t bother with pattern matching to give it a small effect.

Seamwork Mesa Dress
The back yoke and the slightly too wide neckline.


The fabric I used for the second Mesa Dress is a Cotton Jersey Poly Blend from Girl Charlee UK, that I bought in November 2016! So, using this fabric definitely counts for #makeyourstash.  It has some retro vibe and I love how it came out but in hindsight, it’s maybe a little too light. The Mesa Dress needs a heavier knit.

The sewing process

Sewing a Mesa Dress is easy. Also,  because you put in the sleeves first and after that, you close the side seams. I sewed both dresses on my overlocker for the seams and the neck binding. For the hems, I used the 3-step zigzag stitch.
The only minor thing about this pattern is the slightly too wide neckline. I already made the neck binding shorter but it still was a little too loose for both dresses.

Conclusion

Sewing the Seamwork Mesa Dress was fun! It made me happy all the time. Most of all I am very pleased with the dress for my daughter-in-law. Especially that she is able to wear it as a maternity dress.
Will I sew more Mesa Dresses? I think so. I’m already thinking of new version for my daughter-in-law. Wait and see!

18 days of Me-Made-May ’18

We are more than halfway through Me-Made-May ’18 and I wanted to let you know how the first 18 days of the challenge went.

As you can see in this little fragment— where I listen to my husband giving some posing instructions— the challenge is going smoothly. Even though I already wear my me-made clothes all the time throughout the year, I’m enjoying it a lot. Mostly, because I hadn’t worn some of the clothes I wore the last 18 days for a long time. Wearing them again made me happy, and probably (hopefully) these garments will come more in the rotation now.

18 days of Me-Made-May

Here’s what I’ve worn so far (blog post linked where the me-mades have been blogged).

18 days Me-Made-May '18

1. Odette dress – Blue Gingerdoll.
2. Seamwork Brooklyn skirt; new combo with very old RTW blouse and cardigan.
3. Seamwork Wren Dress.
4. New! Seamwork Eliza skirt.
5. True bias Hudson Pants; new combo with very old RTW tunic.
6. Colette Moneta dress.

18 days Me-Made-May '18

7. Daphe Day Dress from Sew This Pattern.
8. Colette Crepe Wrap dress.
9. DKNY Vogue 1349.
10. Telmadress from Vintage en Retronaaipatronen.
11. Megan Nielsen Briar Tee and A-line skirt; new combo!
12. Laneway Dress from Jennifer Lauren Handmade

18 days Me-Made-May '18

13. Festive plissé skirt in Lotte Martens fabric.
14. Veloculottes from Sew This Pattern paired with The Juniper Cardigan from Jennifer Lauren Handmade; a new combo!
15. The Rosa Shirt Dress from Tilly and the Buttons.
1
6. Julia Sweater from Compagnie M. combined with a self-drafted skirt; a new combo!
17. Papercut SJTee with an A-line skirt; new combo!
18. Deer and Doe Sureau Dress.

The Me-Made-May challenge

Did I reach my challenge? So far, yes!

  •  I wore at least one me-made garment every day.
  • I wore every garment only once; so I had no repeats!
  • I wore 7 garments I didn’t wear last May 2017. So I am on track here as I pledged to wear at least 10 garments I didn’t wear last year. Only one skirt came fresh from the machine.
  • All my combinations of two garments were different than the previous years.

When I look back at which garments I wore it strikes me that 10 out of 18 are dresses. And I always thought I was skirt kind of girl.

Was it difficult to select my clothes? No, it wasn’t. Partly because it is only the first half of the challenge and there are still a lot of options. Also, partly because we were blessed with some very sunny weather last week. So I could wear some of my summer clothes.

Overall I am very pleased with how MMMay18 is going and I am really looking forward to the next weeks. Are you too?

Me-Made-May ’18 ◊ I’ve signed up for #MMMay18

It’s the end of April and that means that Me-Made-May ’18 is very near. What is Me-Made-May? It’s a personal challenge to wear and to love your me-made-garments. This year is the ninth edition. If you want to know more about this challenge I suggest listening to the fantastic interview with Zoe, the founder, on the ‘Love to Sew’ podcast. Or read more on Zoe’s blog.

Me-Made-May '18 My Me-Made-May ’18 pledge

I, Wis (from @wis_g and www.whatisew), sign up as a participant of Me-Made-May ’18.

  1. I endeavor to wear at least one me-made garment each day for the duration of May 2018
  2. I will wear every garment only once; so no repeats.
  3. I will wear at least 10 garments I didn’t wear last May 2017.
  4. If I wear a combo of 2 me-mades I will wear a different combination than the previous years.

Me-Made-May '18

My Me-Made-May history

My first became aware of Me-Made-May in 2015. I was reading several sewing blogs and there was some MMMay15 buzz, either in blog posts or in the sidebar widgets. I was intrigued by this and I wondered if I could meet the challenge to wear me-made clothes during a whole month.

In July 2015 I joined Instagram (@wis_g) and made a huge and very inspiring connection with the International Sewing Community. So when Zoe made the announcement on Instagram for MMMay2016 I decided to accept the challenge and make a pledge. More, I made it quite challenging for myself because I endeavored to wear at least one me-made item each day for the duration of May 2016. I had no clue if I could make it but I did. Even more, I was able to wear a different me-made garment for 31 days.

Every day I posted a picture on Instagram.  I know this is not the purpose of Me-Made-May but I wanted to document the challenge for myself. More, this was an opportunity for me to archive my me-mades from earlier years. For this, I use the hashtag #wgsewingXX (where XX refers to the year I sewed the garment; so #wgsewing18 is for all my sewing I do in 2018)

Also, the pictures made it easier to contemplate about my self-made wardrobe and sewing.

These were my observations:

  1. I was able to wear at least one self-made garment every day for 31 days in a row.
  2. No repeats!
  3. While I wore only black clothes in the eighties, I was wearing a lot of colour being 55!
  4. Taking a picture of yourself every day was quite confronting.
  5. My style is very eclectic!
  6. There are only 6 self-made tops.
My Me-Made-May’s from 2016

After my successful first Me-Made-May, I participated again last year in MMMay2017. This time I made the challenge a bit more daring for myself. Not only did I endeavor to wear at least one different me-made garment each day for the duration of May 2017. I would also wear at least 10 garments I didn’t wear during May 2016.

For the second time I succeeded and I enjoyed it enormously. To be able to wear a different self-made garment for 31 days in a row made me happy. On top of that, I was really pleased that half of them were recent makes. Though I must confess that I didn’t wear some of the older makes since May 2016, I was happy with the excuse to wear them again.

For MMMay17 I documented on Instagram and wrote three blog posts about it. (I started this blog in December 2016). Again this made it easier to reflect on my wardrobe and sewing.

These were my observations:

  1. A LOT of prints! I definitely have to sew some solids.
  2. A variety of colours.
  3. No repeats, at all.
  4. An eclectic style.
  5. At that time we had some ‘tropical’ weather in Belgium so I was happy to wear my summer clothes.
  6. Two old rtw-tops. The others I made myself.
  7. Taking a picture of yourself every day is still quite confronting.
  8. I enjoy the challenge to search my wardrobe every day to look for a new me-made!

Wardrobe-wise I made some progress on self-made tops but I’m still lacking some garments in solid colours to combine with all my prints clothes.

MMMay17
My Me-Made-May’s from 2017
Me-Made-May preparations

How do I prepare for Me-Made-May? I don’t! That’s not exactly true but I mean I don’t sew any new garments especially in advance, or even during the month of May. Of course, when I finish something for myself I will probably wear it. This happened three times in MMMay16 and only once in MMMay17.

How do I then prepare? Instead of grabbing the first garment that comes to my mind in the morning I sort of plan my outfit in advance.

  1. I go through my agenda and look if there are some special activities or parties planned. If so then I know already which clothes I am going to wear for them.
  2. How many days do I have to teach or go to school. I try to picture in my head the work appropriate garments I have and that I could wear.
  3. Are there some vacation days? Again, I make a selection for these days.
  4. I check the weather forecast as the weather in Belgium is unpredictable. I am hoping for some sunny days because then I can prepare (in my head) my summer clothes.

Be aware that this planning is not on paper. These are only some thoughts in my head and they are not fixed. It is possible that at the end of May I didn’t wear that skirt that I thought of in the beginning.  After all participating in Me-Made-May is fun and shouldn’t be a stressy business.

I am really looking forward to MMMay2018. I’m definitely aiming to wear a different me-made garment every day. Also, if I wear two pieces I am going to try to make different combinations from the previous years.

See you at MMMay2018!


Fashion Revolution Week: restyling or ‘New Lease’

Every year between the 23rd and 28th of April the Fashion Revolution Week takes place. This is an awareness campaign to remember the victims of Rana Plaza in Bangladesh. Sadly, today 5 years ago on 24th April 2013, the Rana Plaza factory collapsed, which killed 1138 people and injured many more. To raise awareness that the fashion industry also has to be a clean industry—fashion can’t come at the cost of people or our planet—there are several campaigns and challenges this week on social media.

On Instagram, we have the ‘Makers for Fashion Revolution’ campaign hosted by Emily from ‘In the Folds’. Today’s prompt is ‘New Lease’.
Besides sewing your own new clothes there are also a lot of ways to changes old clothes to new ones. You can upcycle, recycle, restyle, refashion, embellish… them and so create new dazzling garments.

In this spirit, I want to draw attention to the annual restyling exchange of Amy and Pilar. This exchange fits perfectly with the Makers for Fashion Revolution action. I participated last year I want to share my experience with restyling a garment.

Fashion Revolution Week
Restylingexchange2017: look at this beautiful top Linda, @listokap restyled for me! I sent her an old dress that I only wore once!
My first experience with restyling:  a ‘New Lease’

*** This post was previously posted on June 17, 2017. ***

When Amy and Pilar announced the first annual restyling exchange I immediately jumped on board. Those who read my blog know that I am always in for a challenge!
What is this restyling challenge? You receive a garment from someone to restyle it. Meanwhile, you send a garment from yourself to someone else, also to restyle it. So I received a men’s shirt from Elisabete and sent an old dress to Linda. A simple and beautiful concept. To make it more easy to sew something a questionnaire with measurements, colour and style wishes was sent with the garment.

restyle men's shirt
From a men’s shirt to a women’s top.
Restyling: how do you start?

I have never restyled or refashioned an existing garment before. So I started with unpicking the main seams of the shirt. In the meantime, I thoroughly went through Elisabete’s IG-feed and read her blog. This gave me an insight into her style, but it was also a little intimidating because she is a very skilled seamstress and ‘refashionista’!
Looking through her pictures I got the idea of sewing the Kastrup top from ‘How To Do Fashion’. I have this pattern in my pattern collection but I didn’t use it so far. So no extra costs were made.

Fitting the new pattern on the shirt

Once I decided to sew the Kastrup top I stuck to it. This top has a vintage vibe and also nice sleeves. And, Elisabete has a thing for particular sleeves.
It was quite a puzzle to get the top out of the shirt. This was also the hardest work of the restyling.

restyle men's shirt
Fitting in all the pieces and cut them single layer.

restyle men's shirt

It was not possible to get the back pieces out in one piece. So I made a yoke for the back and used the original closure of the front for the rest of the back.

restyle men's shirt

I unpicked a little of the sleeve placket to be able to cut the new sleeve pattern.

restyling
The largest use of the old shirt!
Making my own border print

woodblock stamp printing

After cutting the pattern I was not satisfied. I wanted to give this restyling a more personal touch. So I decided to make my own border print. Also prompted by the recent positive experience I had with a border print.
My husband, who is an editor of artists books, has these Indian woodblock stamps, that would be perfect. I bought some blue textile ink and together we gave it a go!

woodblock stamp printing
The Indian woodblock stamp.
woodblock stamp printing
First test on a rest of the shirt.

restyle men's shirt

It is easy to print your border after your pattern pieces are cut. Then pattern matching is not difficult.

woodblock stamp printing

I was able to give one sleeve a non-conventional placing of the print. Which I adore.

Kastrup top - How to do Fashion

restyle men's shirt

Later on, I needed the test pieces to cut out the arm facings.

The Kastrup Top

Kastrup Top - How to do Fashion

Here is the result: «insert drumroll» the Kastrup Top! I adore how it came out. There are several features that I am proud of:
– The back with the yoke and the original front button placket.
– The sleeve with the non-conventional placing of the border.
– The vintage fabric used for the lining of the sleeves.

Conclusion
Kastrup Top - How to do Fashion
This is how I look after a full day of sewing.

I am super satisfied with my first restyle project ever. Now I hope that Elisabete likes what I’ve done with her husband’s shirt. I want to thank Amy and Pilar for this great challenge. I enjoyed every minute of it. More restyling projects will definitely follow.

When I was finishing this post, the message came through that Elisabete finally received my restyled top. She liked it and, moreover, the top fits! I am a happy woman now.

restyling Kastrup Top - How to do Fashion
©photos: Elisabete Carvallo
Sign up for the Second Annual Restyling Exchange

To sign up for the Second Annual Restyling Exchange go to Amy’s or Pilar’s blog and fill in the form. Simple as that. Maybe we meet as restyling exchangers!

Burda Turtleneck Top

Saturday 17 March I woke up to snow and a weather forecast that predicted it was going to be the coldest 17 March since 1909. I wanted to crawl back into my bed and snuggle under the covers for the day. Then I saw that Hila from Saturdaynightstitch posted some photos from a Burda Turtleneck Top and I immediately wanted to sew one for myself. Especially after I read that it was the easiest BurdaStyle pattern there was according to Hila, whom I consider to be a Burda pattern specialist.

Burda Turtleneck Top

The Burda Turtleneck Top pattern

The Burda Turtleneck Top comes from the 2010/09 issue. I found and ordered the pdf-pattern at the BurdaStyle website. Luckily it has only 21 pages to print because there is no A0 format. Even so, I wasn’t going to brave the cold to go out to the print shop and print this pattern.
The pattern only has 3 pieces: front, back, and sleeve. The coolest feature of this top is that the turtleneck is not a separate pattern piece. It is designed with a smooth line on the front and back piece.

Burda Turtleneck Top 09/2010 #121B

Based on the measurements on the size chart, I cut out a 44 and widened the pattern on the waistline with 1 cm. I also lengthened the bodice with 4 cm. This top comes already with extra long sleeves so I didn’t lengthen them.

Burda Turtleneck Top
I love the turtleneck and the long sleeves.


The fabric

I had this gorgeous rust-gray melange knit in my stash that was perfect for this top. It’s a 95 % organic cotton, 5 % spandex jersey from Lillestoff, that I bought online at Bellelien last January. The fabric has a nice two-way stretch which is essential for a turtleneck. For once the fabric gods were with me because the amount I had was big enough for this top.

Burda Turtleneck Top

The sewing process

Could this Turtleneck Top be the easiest to sew Burda pattern? I guess it could. At least, I found it an easy sew.
As is characteristic for Burda patterns the instructions were brief and without illustrations. For this pattern, this was not even a downside. I sewed all the seams on the overlocker. After easing I basted the sleeves on the sewing machine with a stitch length 5. This makes it easy to sew them with the overlocker with a minimal risk for unwanted tucks. Finally, I hemmed the top and the sleeves with a twin-needle.

Burda Turtleneck Top

Conclusion

I am ‘sew’ happy with this Burda Turtleneck Top. It’s a type of garment that I wanted to sew for ages. I am particularly in love with the design of the turtleneck and the long sleeves. I’ve worn it all the time since I finished it. It’s perfect for layering now with this extreme cold. But I guess it will be also an ideal wear for the in-between seasons.
Will I sew some more of these tops? I definitely will. It’s a great wardrobe staple.
So thank you Hila to bring my attention to this pattern.

The Burda Turtleneck Top perfectly layered with the Jennifer Lauren Juniper Cardigan.

The Juniper Cardigan from Jennifer Lauren Handmade

Juniper Cardigan

In July 2017 Jennifer Lauren called out for pattern reviewers. She is the driving force behind Jennifer Lauren Handmade, a New Zealand Indie Pattern company. One of her goals is to show people with a variety of body types wearing her designs. Hence her call for reviewers. I volunteered and I have already had the pleasure of reviewing the Laneway Dress.
Today I’m thrilled to present you a review of another Jennifer Lauren pattern: the Juniper Cardigan.

The Juniper Cardigan pattern

The Juniper Cardigan comes in two views: a cropped one and a long-line. Just like the Laneway Dress, the pdf-pattern has a print shop version. This is always a bonus for me. A minor thing for the A0 print: there is no possibility to select only one of the versions to print. I only want to sew the cropped version but now I have also a print of the long version.
Based on my measurements I graded the pattern from a 20 for the bust to a 22 for the waist, considering the small amount of negative ease that is necessary for a good fit. Jennifer explains this very well in her instructions. Being a tall girl, I lengthened the bodice with 3,5 cm and thus also the neckband and the interfacing for the neckband. On all these pattern pieces there is a shorthen/lengthen line so that makes it easy!
I appreciated that there was a separate pattern piece for the interfacing so that you didn’t have to trace it from the neckband.

 The Fabric
Juniper Cardigan
Plaid matching like a boss!

I received the pattern from Jennifer Lauren at the beginning of January and a few days later Girl Charlee UK had a sale. When I saw this ‘Brown Black Plaid Jersey‘ and the ‘Dusty Marsala Knit‘ I knew this would be the perfect pair for the Juniper Cardigan. The design of this cardigan just asked for a combination of two fabrics. I was even more convinced when the fabric arrived.
Jenifer recommends using knit fabric with a minimum of 30% stretch and a minimum weight of 180gsm. Both of my fabrics met these requirements so I could get started right away!

The sewing process

My previous experience with a Jennifer Lauren Handmade pattern was very satisfying so my hopes were high for a smooth sailing.  And it was! Sewing the Juniper Cardigan is a joyful ride. The accompanying instructions are detailed and illustrated with clear designs. More, if you can’t find your way with these instructions there is an extensive sew along on the website. Some lesser known techniques like sewing in the saddle sleeves and attaching the neckband are explained here with a step-by-step photo guide.

Juniper Cardigan
To attach the neckband I used a lot of pins and basted it first on the machine with a stitch length of 5. Then, after removing the pins I sewed the neckband on with the overlock for a nice finish.
Overal the Juniper Cardigan comes together easily and I am pleased with the fit and the look.

Juniper Cardigan
I love the saddle sleeves.
Conclusion

The Juniper Cardigan is my first ever sewed cardigan and I am totally in love with it. The design with the saddle sleeves gives it a unique vibe. The combination of two fabrics only intensifies this vibe. If you are looking for this style sew a Juniper Cardigan!
Thank you, Jennifer Lauren, for letting me review this pleasant pattern.

Juniper Cardigan
Totally in love with my Juniper Cardigan.

Sewing for babies: some free patterns

A new baby is born into our family! Hey, I’m a great-aunt now and it fills me with joy. To welcome this little boy I just had to sew some clothes for him. I sewed for my own children when they were babies but this was 30 years ago and I no longer have these patterns. So I went to Mrs. Google and I found some cute free baby sewing patterns. Which I sewed immediately after I went to the fabric store for some fun fabric.

free baby sewing patterns


Oliver Pants

free baby sewing patterns

The Oliver Pants is a free baby-pants pattern designed by Griet and Annick. Both are outstanding sewists with young children, hence this pattern is eminently tested!
The joy of sewing for babies is that the patterns are small. You only have to tape together two pieces of the pdf-pattern. The pattern and the instructions for the Oliver Pants are in Dutch but that should not be a problem for non-Dutch speakers as the instructions are illustrated with clear pictures.
I sewed the pants in a light sweater knit from QjuTie Kids and it came together easily. One thing you have to consider though is to enlarge the border pieces for the cuffs and the waistband, depending on the stretch % of the fabric you use.
This pattern is also great for using up your fabric scraps.

Long sleeve with envelope neckline

free baby sewing patterns

I love envelope necklines. Not only for babies but also for myself. That’s why the Bronte Top has been on my sewing list for ages. I really should sew one soon, but the baby came first.
This long sleeve with envelope neckline is a free pattern from ‘De Dromenfabriek’, (Small Dreamfactory). This is also a Dutch pattern, but again the instructions are illustrated with clear designs and they are generally easy to follow. For the neckline though, I found the instructions from Oon more enlightening.
The fabric, from QjuTie Kids, is a light sweater knit with adorable animals wearing copper cat-eye glasses and masks. I loved it at first sight.

Mare Sweater

free baby sewing patterns

This is also a free pattern from a sewist, Spoetniksels, who designed it for her own baby daughter. This sweater has a button closure on the shoulder. A plus for this pattern is that the pdf is layered so you have only the lines of the size you want on the pattern. Again this is a Dutch pattern and again the instructions are illustrated with clear pictures. Just like the other garments, I sewed it totally on the serger. The fabric is a soft French Terry from the See You at Six fabric collection.

Teeny Beanie – Patterns for Pirates

Only a few weeks ago Patterns for Pirates launched four new free baby patterns and one of them is this cute Teeny Beanie.  It comes in different styles like with little bear ears and a knot but I opted for the plain beany. The pdf-pattern is layered and has clear step by step instructions. It makes sewing this beanie easy and quick. I added a lining to cover the inside seams. This beanie is also an ideal stash buster project.

Conclusion

I loved sewing all these little baby garments. They are all sewed with knit fabric and easily put together. I sewed each one on the serger. That makes them all easy and quick projects that give you instant gratification. And aren’t all these little garments sweet?
Will I sew more baby clothes? For sure, and I already did, because there are more babies announced in our family.

Sewing tip: How to thread elastic through a casing

When you thread elastic through a casing—could be in boxers, leggings, dresses, skirts, etc.—it often twists in the casing. At least, this happened to me several times. More, often I didn’t notice it and I would sew the elastic together, even close the casing sometimes and only feel it when the garment was finished. Bummer! A lot of unpicking and sighing as a result and having to redo the whole process. To avoid this I came up with a trick: the double arrow trick. I show you in the pictures below how it works.

1. Place and mark the elastic

thread elastic through a casing

  • Place the elastic piece you want to insert on the garment.
  • Place it the way how it will sit in the tunnel.

thread elastic through a casing

  • Mark the beginning and the end with two arrows.
  • The beginning is the side of the elastic that doesn’t go in the tunnel. It is marked with an arrow that points up. The end is the side of the elastic that goes in the tunnel. It is marked with an arrow that points down.
2. Thread the elastic through the casing

thread elastic through a casing

  • I always use two safety pins. Pin the beginning of the elastic—with the arrow that points up—on the fabric. This prevents that the elastic disappears in the tunnel.
  • Pin a safety pin at the end of the elastic—with the arrow that points down.
  • Push this safety pin, with the elastic attached, through the tunnel.
3. Close the elastic

thread elastic through a casing

  • The end of the elastic piece comes out of the tunnel. You see the mark with the arrow that points down.

thread elastic through a casing

  • Remove the safety pin that keeps the elastic on the garment.
  • Check the directions of the arrows.
  • If they match the elastic hasn’t twisted.
  • Now you can sew the elastic together. I always use a zig-zag stitch for this.

thread elastic through a casing

Et voila, you have a smooth inserted elastic without twists!