Tag Archives: restylingexchange2018

How to restyle a summer dress in a kimono

When Amy and Pilar launched the second annual restyling exchange I was very excited. Last year, my first restyling project was such a fun and challenging project that I didn’t hesitate signing on again.
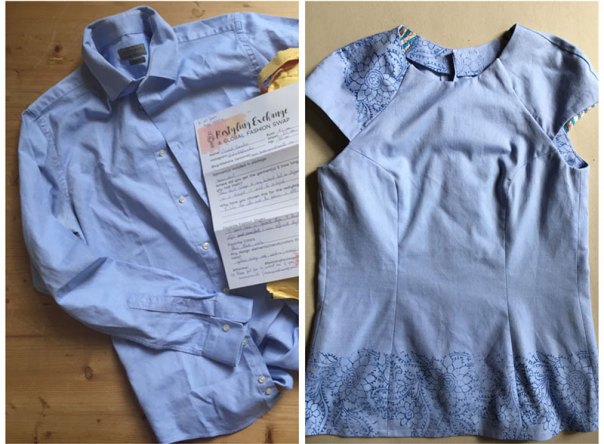
What is the annual restyling exchange? In short, you get a garment from someone to restyle and you send a garment to someone to restyle! So I received this summer dress from Rebecca and restyled it into a kimono.

restyle
Restyling a summer dress in a kimono.
Restyling: the start

When I opened the package that I received from Rebecca I was pleasantly surprised that it contained this bright summer dress with the floral embroidery. It was still new, barely worn, and it had gathered skirts. So I had a significant piece of fabric for my restyling project but not an idea yet. Initially, I wanted to go for the Kastrup top again because that pattern has several smaller pattern pieces. More, I could play with the placement of the embroidered border, which is something I like a lot. It was not until Diane, from ‘Dream. Cut. Sew.‘, posted her kimono made out of two scarfs that I had a lightbulb moment. I could restyle this dress in a kimono. I even had already the Venus Kimono pattern from ‘Sew This Pattern‘, so no extra costs were made for this challenge!

The Venus Kimono pattern

The Venus Kimono consists of 2 pattern pieces: the front and the back piece. I had the pattern already printed on A0 format so that was a huge timesaver. Although this kimono comes as a one size pattern with a relaxed fit you want to check the finished measurements. For Rebecca, the Venus kimono would have been far too big the way it is designed. So I shortened it with 14 cm and took about 1,5 cm off from the center front. These alterations were also necessary to make the pattern fit on the fabric I had available. I traced the customized pattern on to tissue paper because I wanted to keep the original pattern for a future kimono for myself.

Restyle: fitting the pattern on the dress

The first thing you do when you begin your recycle project is unpicking the seams. I started with the gathered skirt because this would give me the biggest fabric pieces. I also unpicked the hems as I needed every mm of fabric I could get. It takes a while to unpick all the overlocked seams and I was a surprised how much thread it gave.

After unpicking I gave the big pieces a good press to smooth the gathers. Then the most challenging part started, the pattern Tetris!

I put the pattern piece of the back, center back to fold line, on the front piece of the skirt. The pattern is designed with a center back seam but I cut off the 1,5 cm seam allowance. The arms were not covered but I marked this on the tissue paper and cut the pattern on this line. Also, you can see that the curve of the hem did not fit; so I adjusted that later when I hemmed it.


The front piece of the pattern went on the back piece of the skirt. Here, the length of piece fitted but for the arm, I had again to make a mark and cut the pattern piece.


To cut out the rest of the arm I lengthed the back and the front piece with other fabric fragments. Herefore I unpicked the bodice of the dress; also the shoulder straps.

restyle
Lengthen the front piece with the unpicked shoulder straps.

After lengthening the front piece with two fragment pieces of fabric the arm I was able to cut the arm piece of the front.

For the back, I worked the same way. First, I lengthened the pattern with fragments of the dress bodice. Here I kept the side seams of the bodice.

Then I put the pattern piece of the arm on the assembled fabric. You will notice that it didn’t fit totally. As I didn’t have any substantial piece of fabric anymore I shortened the front piece to make it match.

restyle
The assembled front piece with the shoulder straps and fragments of the bodice.
Restyle
Finished back sleeves.
The sewing process

After putting together the pieces of the kimono, sewing it was a piece of cake. Annie, from Sew this Pattern, has a very good sewalong on the website with clear instructions and pictures.
For the french seams, I used my 1/4 inch foot to have a guide and this helped a lot.

I finished the back neck line with bias binding because that is easier than a rolled hem.


Conclusion

I am super satisfied with this restyle project. It gave me a taste for more. I loved sewing a kimono, my first ever, and that also gave me a taste for more.
Thank you Amy and Pilar, for organizing this great challenge.


Fashion Revolution Week: restyling or ‘New Lease’

Every year between the 23rd and 28th of April the Fashion Revolution Week takes place. This is an awareness campaign to remember the victims of Rana Plaza in Bangladesh. Sadly, today 5 years ago on 24th April 2013, the Rana Plaza factory collapsed, which killed 1138 people and injured many more. To raise awareness that the fashion industry also has to be a clean industry—fashion can’t come at the cost of people or our planet—there are several campaigns and challenges this week on social media.

On Instagram, we have the ‘Makers for Fashion Revolution’ campaign hosted by Emily from ‘In the Folds’. Today’s prompt is ‘New Lease’.
Besides sewing your own new clothes there are also a lot of ways to changes old clothes to new ones. You can upcycle, recycle, restyle, refashion, embellish… them and so create new dazzling garments.

In this spirit, I want to draw attention to the annual restyling exchange of Amy and Pilar. This exchange fits perfectly with the Makers for Fashion Revolution action. I participated last year I want to share my experience with restyling a garment.

Fashion Revolution Week
Restylingexchange2017: look at this beautiful top Linda, @listokap restyled for me! I sent her an old dress that I only wore once!
My first experience with restyling:  a ‘New Lease’

*** This post was previously posted on June 17, 2017. ***

When Amy and Pilar announced the first annual restyling exchange I immediately jumped on board. Those who read my blog know that I am always in for a challenge!
What is this restyling challenge? You receive a garment from someone to restyle it. Meanwhile, you send a garment from yourself to someone else, also to restyle it. So I received a men’s shirt from Elisabete and sent an old dress to Linda. A simple and beautiful concept. To make it more easy to sew something a questionnaire with measurements, colour and style wishes was sent with the garment.

restyle men's shirt
From a men’s shirt to a women’s top.
Restyling: how do you start?

I have never restyled or refashioned an existing garment before. So I started with unpicking the main seams of the shirt. In the meantime, I thoroughly went through Elisabete’s IG-feed and read her blog. This gave me an insight into her style, but it was also a little intimidating because she is a very skilled seamstress and ‘refashionista’!
Looking through her pictures I got the idea of sewing the Kastrup top from ‘How To Do Fashion’. I have this pattern in my pattern collection but I didn’t use it so far. So no extra costs were made.

Fitting the new pattern on the shirt

Once I decided to sew the Kastrup top I stuck to it. This top has a vintage vibe and also nice sleeves. And, Elisabete has a thing for particular sleeves.
It was quite a puzzle to get the top out of the shirt. This was also the hardest work of the restyling.

restyle men's shirt
Fitting in all the pieces and cut them single layer.

restyle men's shirt

It was not possible to get the back pieces out in one piece. So I made a yoke for the back and used the original closure of the front for the rest of the back.

restyle men's shirt

I unpicked a little of the sleeve placket to be able to cut the new sleeve pattern.

restyling
The largest use of the old shirt!
Making my own border print

woodblock stamp printing

After cutting the pattern I was not satisfied. I wanted to give this restyling a more personal touch. So I decided to make my own border print. Also prompted by the recent positive experience I had with a border print.
My husband, who is an editor of artists books, has these Indian woodblock stamps, that would be perfect. I bought some blue textile ink and together we gave it a go!

woodblock stamp printing
The Indian woodblock stamp.
woodblock stamp printing
First test on a rest of the shirt.

restyle men's shirt

It is easy to print your border after your pattern pieces are cut. Then pattern matching is not difficult.

woodblock stamp printing

I was able to give one sleeve a non-conventional placing of the print. Which I adore.

Kastrup top - How to do Fashion

restyle men's shirt

Later on, I needed the test pieces to cut out the arm facings.

The Kastrup Top

Kastrup Top - How to do Fashion

Here is the result: «insert drumroll» the Kastrup Top! I adore how it came out. There are several features that I am proud of:
– The back with the yoke and the original front button placket.
– The sleeve with the non-conventional placing of the border.
– The vintage fabric used for the lining of the sleeves.

Conclusion
Kastrup Top - How to do Fashion
This is how I look after a full day of sewing.

I am super satisfied with my first restyle project ever. Now I hope that Elisabete likes what I’ve done with her husband’s shirt. I want to thank Amy and Pilar for this great challenge. I enjoyed every minute of it. More restyling projects will definitely follow.

When I was finishing this post, the message came through that Elisabete finally received my restyled top. She liked it and, moreover, the top fits! I am a happy woman now.

restyling Kastrup Top - How to do Fashion
©photos: Elisabete Carvallo
Sign up for the Second Annual Restyling Exchange

To sign up for the Second Annual Restyling Exchange go to Amy’s or Pilar’s blog and fill in the form. Simple as that. Maybe we meet as restyling exchangers!