Tag Archives: dress

The Green Perth Dress

Sometimes you see a pattern, you buy it and you sew it up in a blink of an eye. Well, this did not happen with the Perth dress. It only took me 7 months from buying the pattern to finish it.
I can’t remember when I saw the Perth dress for the first time but I remember that I was immediately intrigued by the design of it. Especially by the front closure. A search through my pattern files learnt me that I bought the pattern last March. I intended to sew it for my late spring wardrobe but other projects interfered with that plan!

Perth dress


Eventually, I cut out the pattern in June. I took the pieces with me to the Sewingweekender at the end of August and I nearly finished it there; except for the collar and front closure. During the mid-term break at the beginning of November, I could finally finish this beautiful dress. Alas, we are in Autumn now, therefore, I have to wear it with a layer underneath. But I don’t care because I love my green Perth dress.

Perth Dress

The Perth dress pattern

The Perth dress is a Carolyn & Cassie pattern. It’s an unlined, loose-fitting dress with some nice design features: the folded front, inset sleeves, a close-fitting collar on a collar stand, a back yoke AND inseam pockets! All these features tick my boxes. There’s also a blouse version.

Perth Dress

The Perth dress has 9 pattern pieces. Luckily the pattern is available in A0 format so I could let it print by Paternsy.

Based on the finished garment measurements I cut out size 44. Except for the neckline as I didn’t want it to be too tight, so I used size 46 and graded to size 44 on the shoulder line. The fit of the collar is now perfect for me.

The green fabric

This radiant green fabric was a gift from my sister-in-law so I don’t know exactly what it’s composition is. I guess it’s 100% cotton. It has medium weight and a little structure which is ideal to hold the pleats.
Plus! It is solid which is not my standard as “print” is my middle name. But I love it! Even more so because it is green, which is my favourite colour.

The sewing process

Along with the pattern of the Perth dress comes a booklet with instructions. There’s one page with “quicky instructions”: a list of the order of construction. Very handy for the more experienced sewists. I followed these quickies until I reached the part of the collar construction. Then I jumped to the more detailed instructions which are sufficiently illustrated with designs.
The collar and collar stand need interfacing. To avoid bulky seams I cut out the interfacing without seam allowance. This also makes it easier to turn the collar and form the pointed tips.

Perth Dreess

Following the steps, I didn’t bump into difficulties. Even the unusual front closure with the tap is not difficult. Just take care of copying all the notches on your pattern pieces. In fact, while sewing the Perth dress I never had to unpick any seams. It was pure sewing joy.

Conclusion

Do I love my green Perth dress? I do! Even though it is a short-sleeved dress I already wore it several times with this colder weather. And I got a lot of compliments.
Will I sew another one? I would love to because I love everything about this pattern.

Perth Dress

A black linen Vogue V9253 dress*

* Yes, the one with the deep V!

The first V9253 I wowed about was the stunning version of Catherine from Thread Snips. I featured her in my eye-catchers. Although I loved the pattern I thought it would never be something for me because ‘Yes, that real deep V!’

Vogue V9253
Then, at the beginning of June, I saw Nikki G’s absolute breathtaking version and I was sold! More, doing some research I read somewhere that the pattern was sold out. So it became a dare to find it which wasn’t difficult at all! One-click at naaipatronen.nl and it was mine. That’s how I found myself sewing the legendary V9253 dress with the deep V!

Vogue V9253


The V9253 pattern

The V9253 dress pattern has only four main pattern pieces. The sleeves are cut from the same piece as the body. Further, there are pattern pieces for the pockets and the belt.

Vogue V9253

Based on the finished garment measurements—which you find on the pattern pieces of Vogue patterns—I cut out the L for the upper bust part and graded to XL for the waist and XXL for the hips. Traditionally I lengthened the bodice with 4,5 cm.  Which I reduced with 1,5 cm after I basted the bodice to the skirt and I could try it out.

Vogue V9253

Further, I eliminated the centre back seam of the bodice. I wasn’t going to put a zipper in when the dress has this huge front opening.
Don’t forget to fold over the seam allowance of the back bodice pattern when you put it against the foldline of your fabric.


What about the deep V?

This is, of course, the key feature of the design of the dress. And I love this very much. When I pinned the skirt to the bodice and tried it on for the first time I thought the V was doable.  But when the dress was finished and pressed, it was too deep. I also want to be able to wear a bra underneath it because, although the linen is on the soft side, it still would cause nipple burn. So I closed the front with 4 buttons. Once in a while, you see a glimpse of my (fuchsia) bra but I don’t mind.


The black linen

I bought this beautiful black linen in Paris in September 2016 at the Sacrés Coupons, together with the viscose I used for the Rosa Shirt Dress and some other coupons that are still waiting in my fabric closet.
It was a precut coupon from 3 m on a 1,50 m width. This made that for once I could place my pattern pieces on the fabric without playing Tetris. I have a little leftover for the belt which I have omitted for now.

I should say it’s midweight linen with enough fluidity for the skirt. It washes, irons and sews like a dream! I immediately want to drive to Paris and buy this linen in all the colours. But no, Wis, you are on a fabric buying fast this year!!

The sewing process

Vogue itself categorizes the V9253 as ‘Very Easy’. But is it an easy sew? Yes and no!
First, the included instructions are concise and don’t tell you how to finish your pleats, seams, etc. This is not easy for beginning sewists. Also, the followed order is not logical for me. So I ignored the instructions and followed my usual work sequence.

  1. Staystitch the front opening, back neckline and pocket openings.
  2. Prepare and sew all the pleats and darts on the bodice and the skirt. I folded the pleats to the sideseams (which I like more) and stitched them flat.
  3. Stitch the shoulder seams until the seam allowance (1,5 cm) of the neckline. This makes it easier to finish the neckline later.
  4. Sew a narrow hem at the front opening of the bodice. (I confess, here I followed the instructions. But if there will be more V9523s I will finish the bodice with bias binding all around.)
  5. Finish the back neckline with bias tape.
  6. Stitch the side seam and the underarm seam of the bodice.
  7. Hem the sleeves.
  8. Stitch the pockets to the skirt pieces. I used the technique I learned from sewing the Laneway Dress. I want to point out here that the pockets of the V9253 have a strange shape due to the raised skirt pattern.
  9. Sew all the skirt seams.
  10. Pin the bodice and the skirt with right sides together at the waist seam. Stitch the waist seam.
  11. Hem the skirt. Et voilà, the dress is finished!
  12. Optional: close the front opening as you wish. I hand-sewed 4 buttons on the front edges.

As a more experienced sewist, this is an easy construction. Alas, I did some stupidities. I think because I was sewing with black thread on black fabric and with no difference in view between the right side and wrong side. So I managed to sew the side seams of the skirt to the centre back and centre front ?!! No real harm was done here, only the unpicking took some time because of, remember,  black on black!


Conclusion

I am over the moon with my V9253 dress!! It’s a multilevel success: the design, the black linen, the fit, the sexy and glamorous feel. I’m genuinely happy that I sewed it even though there are already more than 1000 versions in the world. But that doesn’t matter because mine is unique!

Will I sew another one or two? I would love to do it if only to reduce the cost of the bought pattern. Which wasn’t cheap. But also because I love this dress so much. So yes, I wouldn’t be surprised if there would come more!

***  We were able to shoot some great pictures at the abandoned train station of Sant’Angelo Scalo***


Blog Tour: The Madrid Dress from Coffee and Thread

Hello, my lovely readers!

Can you believe it? This is my 100th blog post! I never would have thought that I would reach this milestone when I pushed that publish button for the first time in December 2016.
Although it wasn’t intentional, it is kind of fun that this 100th post is part of a blog tour which is a first for me. So reviewing the Madrid Dress from Coffee and Thread is the birthday party for my 100th blog post.

Madrid Dress

The Madrid Dress pattern

The Madrid dress is a Bohemian inspired faux wrap dress or tunic with a tiered skirt. It offers three length options and three sleeve variations and comes in sizes 2-20. It is designed for woven fabrics with drape.
I particularly love the faux wrap bodice of the design and I went for the maxi dress with straight sleeves, not the flared ones.

For the maxi dress, there are 5 pattern pieces and two facing pattern pieces. The pattern is available in A0 format so I let it print by Paternsy.

Based on the finished garment measurements I cut out size 18 and didn’t grade between sizes. Being a tall girl I lengthened the bodice with 3,5 cm. There’s a line on the front and back pattern piece to indicate the best place to lengthen (or shorten) your pattern. But don’t forget you have to lengthen the front facing too, for which there is no line indicated. You can draw it yourself by putting it on the front piece.
To be absolutely sure the maxi dress was a maxi dress I lengthened every tier with 1 cm.

Madrid Dress
Why does it always start to rain when you want to take pictures?

The fabric

I bought this special African Wax fabric at Goldhawk Road in April 2017. Last year I tried to make a maxi skirt out of it but this went wrong completely. So I’m glad I could recuperate this fabric for the bodice and I had enough left for the tiers. Because, boy you need a lot of fabric for these.

The sewing process

Sewing the Madrid Dress is not difficult. The instructions are concise and clear. Every step is illustrated with crisp designs. I never had to scratch my head to figure out how to go on.
After sewing the bodice I tried it on and I was able to get it over my head although I accidentally closed both side seams. So I decided to omit the blind zipper.

Madrid Dress
Yes, you can go grocery shopping wearing the Madrid Dress!

One thing that takes time is the gathering and the sewing of the tiers. Like I said hereabove these tiers are magnum!! You stitch two rows of gathering stitches, one inside and one outside the seam allowances. I use a different colour in my bobbin when I stitch gathering stitches. This makes it easy to know which thread to pull to make the gathers, always the bobbin thread!


Conclusion

I’m SEW happy with my Madrid Dress! It’s the first time in my life that I have a dress with a tiered skirt. And I love it! I wore it already and the width and the fluidity of the skirt make it a dream to whirl. I’m convinced this dress is going to see a lot of wear this summer.


One thing though to be careful about is when you descend stairs to be aware that your husband isn’t close behind you because he already stepped twice on the third tier!!

If you are looking for a Bohemian inspired faux wrap dress or tunic with a tiered skirt go for the Madrid Dress from Coffee & Thread.

So thank you, Olga and Claudia, for taking me in on this blog tour.

During the tour, Olga offers 25% off on any of the
Coffee & Thread patterns with the code ‘madridtour’

The Snowball high neck dress from Waffle Patterns

The Snowball high neck dress from Waffle Patterns was already on my 2017MakeNine and my 2018MakeNine sewing wish list. When I first saw this pattern back in August 2016, I was charmed by the lines and the shape. I immediately bought the pattern and then it got pushed to the back of my mind… like so many things.
I don’t know how your sewing mind works—hmm, I don’t even know how mine works!— but it was the sew frosting challenge that made me think about this pattern again. In fact, I wanted to sew it out of the piece of Mahlia Kent fabric I have (one hundred percent frosting!) but I didn’t have enough fabric. Then I thought I could make a wearable muslin out of this metallic fabric to see how the fit went. Maybe I had to take in some seams and then I still could use the Mahlia Kent fabric. As you can see, that didn’t happen.

snowball high neck dress waffle patterns


The Snowball high neck dress pattern

It’s the first time I sewed a garment from Waffle Patterns and I liked all of it. As the idea of sewing this dress came up on a Saturday night I hadn’t the time to use Patternsy to print an A0 format. So I printed 24 pages of the pattern and glued them together. There were very clear marks so it didn’t take long.
The Snowball high neck dress consists of 10 pieces: 7 pieces for the dress and 3 pieces for the facing. To give the facing a smooth fit the back facing has shoulder darts with curved dart legs. This is a classy tailoring technique that I like.

snowball high neck dress waffle patterns
The first fit with machine basted seams

Based on the finished garment measurements I cut out size  48. I made no alterations on the bodice and lengthened the hem with 5 cm.
After the first fit—I machine basted al the seams with a stitch length 5 and hand basted the zipper— I slightly narrowed the upper front bodice above the bust.

snowball high neck dress waffle patterns


The fabric

I bought this fabric last Summer at the market in Castel del Piano. As with all the fabrics I buy there I don’t know what the exact composition of this fabric is.  Probably a poly combo. It has this metallic shine and depending on the light it varies from colour. It’s more beige-ish than greyish though!
This fabric has a medium weight but for this pattern, a more sturdy fabric might have been better.

snowball high neck dress waffle patterns

I didn’t have enough fabric for the facings so I used some blue gingham from my stash.snowball high neck dress waffle patterns


The sewing process

The sewing was plain sailing. I enjoyed every bit of it. The instructions were spot on and illustrated with clear drawings. I loved the drawing of the little iron to indicate which seams should be pressed!
For inserting the blind zipper I followed my own method which is rather simple. First, I hand-basted the zipper and then I stitch it with my blind zipper foot.

snowball high neck dress waffle patterns

snowball high neck dress waffle patterns

Conclusion

I’m very happy with my Snowball high neck dress! I don’t consider it a muslin any longer but a perfect wearable dress.  Though I particularly like the design of the high neck it takes some time to get used to it. Probably I should have interfaced the facings—which I didn’t🤦🏻‍♀️—so the collar would stand more.
Will I sew another Snowball dress? Maybe! But then I surely would use a fabric with more body.

snowball high neck dress waffle patterns


The Beryl Bomber Dress from Named Clothing

The seed for sewing the Beryl Bomber Dress was planted during Sew My Style 2017. The chosen pattern for  December 2017 was a pattern from the then not yet launched Named Clothing AW17 New Collection. Although I gave up the Sew My Style challenge,  I kept following it on IG and blogs. So, when Named Clothing launched their AW17 Collection, it was the Beryl Bomber Dress that caught my attention. I love the design of a bomber jacket and I find it very clever of Named Clothing to use this design and turn it into a dress! Then it only took me nearly a year to sew one for myself!

Beryl Bomber Dress


Bomber Jackets

Whenever I think about bomber jackets this photo of ca. 1944 comes to mind. It’s a group of Women Airforce Service Pilots leaving their B-17. Look at their cool bomber jackets! And they named their B-17 “Pistol-Packin’ Mama”!Beryl Bomber Dress


The Beryl Bomber Dress pattern

The Beryl Bomber Dress pattern consists of 9 pieces. As I planned to sew the dress I ordered a printed A0 pdf-pattern at Patternsy. This was my first time I used this platform and I was 100% satisfied. You upload your pattern, they email you the price and if you agree, they print your pattern on very usable tissue paper. And it only takes a few days!

Beryl Bomber dress
I love the decorative loop at the back.

Based on the finished measurements I cut out size 46. I lengthened the sleeves with 4 cm (2 cm under the biceps line and 2 cm under the elbow line).  Further, I lengthed the hem and the facing with 4  cm.

Beryl Bomber Dress


The Fabric

I bought this fabric at my small local fabric store. It’s a knit of medium weight with an unknown composition. The fabric salesman in this store is a man of few words. So when I asked about it he just shrugged. I was attracted to the combination of the colours and the black design lines.
Somehow I thought that I needed a knit for the Beryl Bomber dress but after reading the instructions thoroughly I discovered this wasn’t the case. Luckily this fabric has only a minor stretch percentage so it worked out well.
One downside of this fabric is that threads are easily caught on desks and chairs. So I don’t know if the dress is going to lead a long life???

Beryl Bomber DressFor the collar and sleeve cuffs, I used a strong black rib knit with small golden speckles.

When I started to cut out the pattern pieces I became aware that I had to do some stripe matching! You wouldn’t say it at first glance when you see the fabric. But when the seams were a little askew it disturbed me a lot. So, I cut out the pieces on a single layer of fabric.

Beryl Bomber Dress

The sewing process

The sewing of the Beryl Bomber dress was fun. Sewing the collar and the zipper were a bit challenging but I liked it. The instructions are clear with crisp designs. I followed them for about 90%.

As I worked with a knit fabric I used my overlocker for all the seams. I machine basted (stitch length 5) the collar and finished it too with the overlocker. To reach a perfect fabric matching I hand basted the zipper and the pockets.

Beryl Bomber Dress


Conclusion

I’m very, very happy with my Beryl Bomber Dress. I wore it a lot already for several occasions. It’s extremely comfortable, due to the knit fabric I guess. I wore it during a two-hour flight and it never felt uneasy.
Will I sew more? I hope to. Also because my daughter and daughter-in-law expressed their enthusiasm for this model and design. Now, I just have to find some time (an old story I know!).

Beryl Bomber Dress

The Statement Dress: the Zéphyr dress from Deer&Doe in Black Red Buffalo Plaid

On an afternoon a few months ago my daughter and I were browsing the internet in search of a dress pattern that she would love. We came across the Zéphyr dress from Deer&Doe and my daughter immediately liked the design of it. Because of a fitted bodice, a v-neck, a loose-fitting skirt and a sexy vibe, it ticked all of her boxes. When I saw the pattern was designed for knits I said to my daughter: “If we make it out of the Black Red Buffalo Plaid we have then it is a statement dress!” As we both are never shy about making a statement we went for it and we are both super excited about it!

Zéphyr Dress

The Zéphyr Dress pattern

The Zéphyr Dress pattern from Deer&Doe, version B, consists of 7 pieces. Based on the finished garment measurements in the instructions, I cut out the biggest size. I found it a pity though that in the English instructions the measurements are only in inches as I’m using the metric system. After conversion, I noticed I had to expand the waist with 16 cm. First,  I divided this width evenly on the waist hem of every piece of the bodice and graded to the bust or arm. Second, I broadened the skirt pattern by 4 cm in the middle of the pattern.
Further, I lengthened the bodice with 1 cm and the skirt with 5 cm. That was the maximum the length of my fabric allowed. All of the adjustments were perfect!

Zéphyr Dress
Perfect body length, perfect skirt length and perfect fit of the waist! And look at that pattern matching at the centre of the bodice and the skirt!

The Black Red Buffalo Plaid fabric

The Black Red Buffalo Plaid fabric is a cotton spandex knit from Girl Charlee. My daughter chose it a few months ago because she wanted some garment of plaid. It’s a nice fabric to work with. It has some body, good recovery, and the needed 40% elasticity.
Though two things made the cutting of the pattern a little tricky, being a knit fabric and the lines of the plaid. I solved this by cutting open, with a single layer of fabric. It’s the same technique I used for my striped Nanöo Top.

Zephyr Dress
Cutting open in a single layer of fabric.

Zephyr Dress
I’m using the already cut pattern piece of the skirt to cut out the second. The slightly visible black lines on the back of the fabric help to make the pattern match.

One of the perks of this black red plaid is that you can create chevrons! The fabric asks for a single layer cutting so you can place your pattern pieces meticulous to make these chevrons.

The sewing process

The Zephyr Dress comes together easily. Deer&Doe wrote clear instructions with crisp designs.  Though I didn’t follow them for 100%.
As my daughter was going to fit the bodice several times I first staystitched the neckline to prevent stretching. I didn’t make a muslin but I basted, with a large stitch on the sewing machine, the bodice with an extra 1 cm seam allowance on al the seams. I once read this and remembered it as a tip for sewing for curvy women. Probably it was a tip from Jenny from Cashmerette.
After the first fit, it was clear that the extra seam allowance was not necessary. So I finished the bodice on my overlocker using a 2 cm seam allowance and rainbow thread!


Zephyr Dress
The neckline is staystitched and I reinforced the v-neck with some lightweight interface.

Because a single bodice is easier to handle than a complete dress I first sewed the armholes and the neckline. For the armhole and neck binding, I used some of the extra red fabric that was on the selvedge side. It was my first v-neckline in a knit fabric and therefore the instructions of Deer&Doe were not extensive enough. So I searched on the web and found a good tutorial from Grainline Studio and it worked out fine!
The last thing to do was matching the skirt with the bodice and tadaa! The statement dress was ready!

Conclusion

Do I still have to say that we are over the moon with this Zéphyr Dress? I think the pictures speak for themselves. Will I sew more Zéphyr Dresses? I probably will. I’m so glad I could adjust this pattern for a perfect fit that I absolutely want to sew it again.

Bonus!

It is totally a coincidence that the three patterns from Deer&Doe I sewed so far are all red!

Zephyr Dress
Zéphyr Dress                                     Sureau Dress                                     Givre Matternity Dress

A sewing secret

We all have secrets, don’t we?  These secrets can also be sewing secrets. I am going to reveal you a small sewing secret about the dress I am wearing today: the Rushcutter from In the Folds.

Rushcutter In the Folds


The Rushcutter from In the Folds

Last summer I sewed two Rushcutter dresses from ‘In the Folds’ because I like this pattern a lot. The design is ingenious: the A-line shape, the raglan with the front insert, the side panels, and it has pockets!

The grey one with the colour streaks was the first one I sewed. Because I loved it so much I immediately sewed another one. The two contrasting pieces of this black & white fabric I had were ideal for this pattern. I love both versions and they are in my top 5 of last year’s sewing.

wear both dresses a lot, both at work and on holiday when the weather is hot. Below are some pictures that were taken in the Tuscan city San Gimignano last summer.

Rushcutter In the Folds
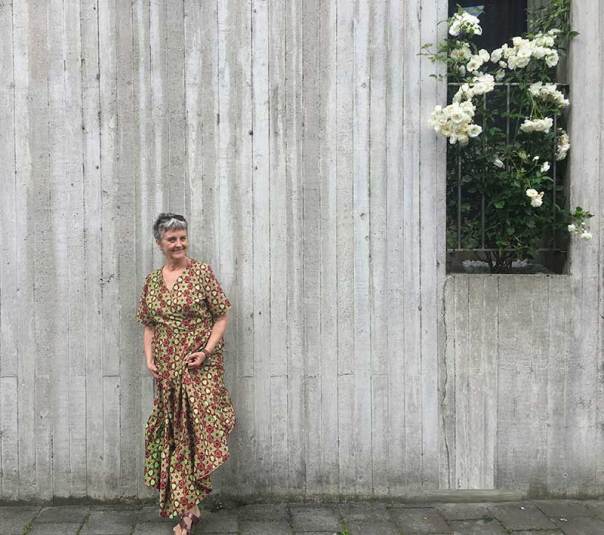
Here I am standing in front of a work of Ilya & Emilia Kabakov in Galeria Continua in San Gimignano.

At the Palazzo Comunale, San Gimignano.

The sewing secret

What is now my sewing secret about this dress? Well, I am a little ashamed but I never finished the back closure. I never sewed the buttonholes. I put in a pin and every time I wore it I closed it with the same pin. There is no specific reason why I didn’t do it. I started to wear it with the pin and I never came to finish it. Every time I put it on I think that I should finally sew these buttonholes, if only for my husband because he did hurt himself a few times when he hugged me.  And again I didn’t do it today.

Rushcutter It doesn’t show that the closure isn’t properly finished, does it?

Do you have sewing secrets? I would love to know what they are.