Monthly Archives: June 2019

Blog Tour: The Madrid Dress from Coffee and Thread

Hello, my lovely readers!

Can you believe it? This is my 100th blog post! I never would have thought that I would reach this milestone when I pushed that publish button for the first time in December 2016.
Although it wasn’t intentional, it is kind of fun that this 100th post is part of a blog tour which is a first for me. So reviewing the Madrid Dress from Coffee and Thread is the birthday party for my 100th blog post.

Madrid Dress

The Madrid Dress pattern

The Madrid dress is a Bohemian inspired faux wrap dress or tunic with a tiered skirt. It offers three length options and three sleeve variations and comes in sizes 2-20. It is designed for woven fabrics with drape.
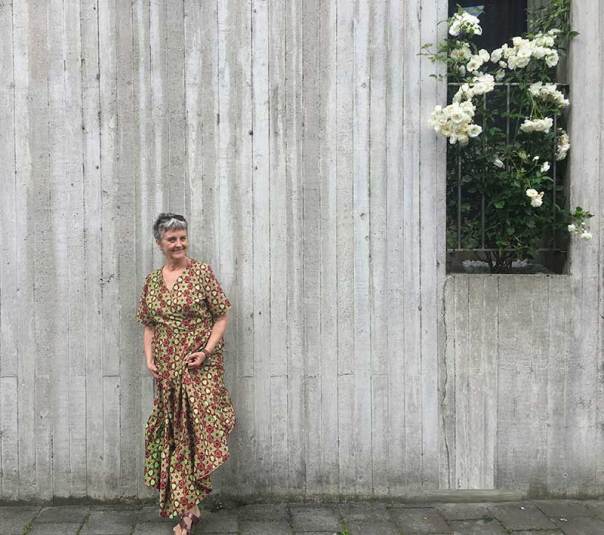
I particularly love the faux wrap bodice of the design and I went for the maxi dress with straight sleeves, not the flared ones.

For the maxi dress, there are 5 pattern pieces and two facing pattern pieces. The pattern is available in A0 format so I let it print by Paternsy.

Based on the finished garment measurements I cut out size 18 and didn’t grade between sizes. Being a tall girl I lengthened the bodice with 3,5 cm. There’s a line on the front and back pattern piece to indicate the best place to lengthen (or shorten) your pattern. But don’t forget you have to lengthen the front facing too, for which there is no line indicated. You can draw it yourself by putting it on the front piece.
To be absolutely sure the maxi dress was a maxi dress I lengthened every tier with 1 cm.

Madrid Dress
Why does it always start to rain when you want to take pictures?
The fabric

I bought this special African Wax fabric at Goldhawk Road in April 2017. Last year I tried to make a maxi skirt out of it but this went wrong completely. So I’m glad I could recuperate this fabric for the bodice and I had enough left for the tiers. Because, boy you need a lot of fabric for these.

The sewing process

Sewing the Madrid Dress is not difficult. The instructions are concise and clear. Every step is illustrated with crisp designs. I never had to scratch my head to figure out how to go on.
After sewing the bodice I tried it on and I was able to get it over my head although I accidentally closed both side seams. So I decided to omit the blind zipper.

Madrid Dress
Yes, you can go grocery shopping wearing the Madrid Dress!

One thing that takes time is the gathering and the sewing of the tiers. Like I said hereabove these tiers are magnum!! You stitch two rows of gathering stitches, one inside and one outside the seam allowances. I use a different colour in my bobbin when I stitch gathering stitches. This makes it easy to know which thread to pull to make the gathers, always the bobbin thread!


Conclusion

I’m SEW happy with my Madrid Dress! It’s the first time in my life that I have a dress with a tiered skirt. And I love it! I wore it already and the width and the fluidity of the skirt make it a dream to whirl. I’m convinced this dress is going to see a lot of wear this summer.


One thing though to be careful about is when you descend stairs to be aware that your husband isn’t close behind you because he already stepped twice on the third tier!!
If you are looking for a Bohemian inspired faux wrap dress or tunic with a tiered skirt go for the Madrid Dress from Coffee & Thread.

So thank you, Olga and Claudia, for taking me in on this blog tour.

During the tour, Olga offers 25% off on any of the
Coffee & Thread patterns with the code ‘madridtour’

The story of the Mashup Skirt

Many many moons ago, somewhere in 2013, I pinned a picture of a skirt on Pinterest. I loved it so much that I made it the front picture of my ‘Skirts Board’. Also many moons ago, in March 2014, I bought two pieces of fabric to recreate this skirt. And then this project got buried in my sewing queue…. until two weeks ago.
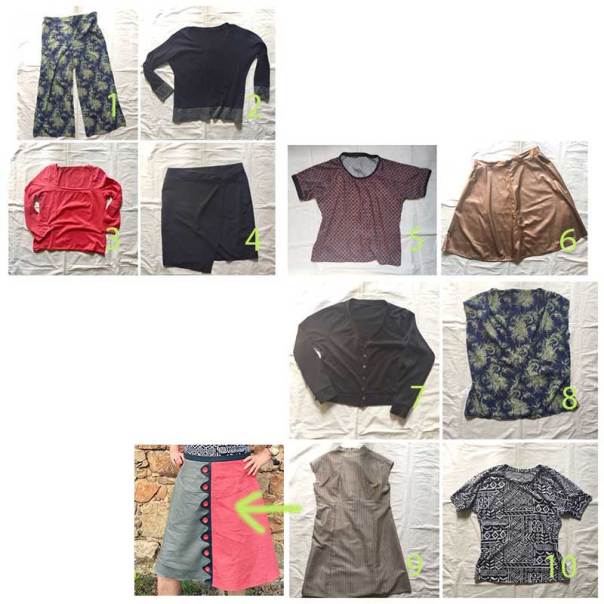
Then Me-Made-May 2019 came along and I created three wardrobe capsules. With my third wardrobe capsule, I gave myself a bonus: “I could replace any of the selected garments with a freshly sewed garment.” And boom! Out came the idea of sewing this Mashup Skirt out of the depths of my sewing queue!

Mashup Skirt

The Mashup Skirt pattern

Although the example skirt is an A-line I decided to make a flared skirt because I  love flared skirts just a tiny bit more. I used one of my oldest flare skirt patterns that I sewed already a zillion times!

The original skirt that inspired me.

The only adjustments I had to do to the pattern was to divide the front and back pattern piece in two to be able to get it out of the limited fabric I had. Only 0,5 m of each colour!!

The divided pattern pieces of the front and the back.

I cut the pieces out the two fabrics to achieve an even coloured left and right side.Mashup Skirt

A scallop button placket

The one thing I had to draw myself—and alas drawing is not my strongest feature—was the scallop button placket. How did I do it?  I drew a template of one scallop and used this to compose a string of scallops on tracing paper. I included an 0,75 cm (presser foot width) seam allowance. Then I had a scallop button placket pattern!

Mashup Skirt
The model of the scallop button placket on tracing paper.
mashup skirt
Positioning the button placket on the front piece.


The Mashup Skirt fabric

Like I said hereabove I bought this midweight linen at the Stoff Schnäppchenmarkt in Cologne in March 2014! So this project definitely counts as a stash buster project! I bought two pieces of the same quality in two different colours. I think this helped with the success of this project. But what was I thinking when I bought only 0,5m of each colour!?!

Mashup Skirt
The wrinkles in the fabric after a 2-hour flight and a 2-hour drive. I find this one of the charms of working with linen.

For the button placket and waistband, I used a leftover from the curtain fabric of my Seamwork Brooklyn skirt. For the back of the button placket, I took some black lining. This reduced the thickness.

mashup skirt

The Sewing Process

Sewing a flared skirt is rather easy. The new thing and the feature to focus on here is the scalloped button placket.
I cut out two plackets: one in fabric and one in black lining. I stitched them together using my presser foot as a guide.
scallop button placket

scallop button placket

Before turning the scallops I clipped and notched the curves. Then I placed the button placket between the two centre front seams. So you stitch through 4 layers of fabric. Here you experience the advantage of using lining for the back of the placket. At the inside, I graded the seams and pressed them open (two seams at each side).

The buttons have a vintage vibe but I bought them new at my local haberdashery shop. I sewed them on with my machine after stabilizing them with wonder tape at the placket.

mashup skirt

Some sewing hickups

When you’re sewing not everything always goes as planned. Sometimes it’s the sewing gods that let you down. Sometimes you just make stupid mistakes. Both happened during sewing this rather simple skirt.

After perfectly putting in the new blind zipper it broke when I closed it for the first time!! This never happened to me before. The only thing you can do then is rip it out and put a new one in!

When I serged the hem the last scallop got to the wrong side. Totally my own fault! Not enough focus.

mashup skirt

At first, I hemmed the skirt as narrow as I could. Remember the small pieces of fabric I had. Then, when I saw the pictures I found it a bit ridiculous to hem through half a scallop. So I cut off about 3 cm and rehemmed the skirt. This gave a much better look.

Mashup Skirt
Do you spot the difference?
Conclusion

I’m SEW  happy with my Mashup Skirt! I’m a little proud of myself f I or realising a design today that I had in my mind since 2014! And it came out just as I imagined. It’s been two weeks now since I finished the skirt and I already wore it a lot. It’s a pleasure wearing it and it’s suitable for many occasions.
Will I make another one? Maybe? I don’t know if I want a second or more Mashup Skirts in my wardrobe.

***  We were able to shoot some great pictures at the Pieve di San Giovanni in Campiglia Marittima.  ***

mashup skirt

mashup skirt

mashup skirt

mashup skirt mashup skirt

Me-Made-May 2019 | It’s a wrap!

Hello, my lovely readers!

It’s the first of June today so Me-Made-May 2019 is officially finished. If you read my blog regularly then you know that I approached MMMAY19 differently this year: I made three wardrobe capsules with 30 me-made garments.

So at the end of May, it means that not only I did I finish my third wardrobe capsule but I finished my total wardrobe capsule experience.  Below, you can read how it went.
Spoiler: I loved it!

Me-Made-May 2019 Wrap


My third capsule: ‘Everything goes’

The only parameter for the ‘Everything goes’ capsule was that it had to be me-made. The previous capsules contained also some rtw clothes, so this time I wanted it to be 100% me-made.
I gave myself a bonus: ‘If I would finish a new garment within these 10 days I could change with a previously selected one’.

I documented every outfit with a photo on Instagram. Click on the links of the days. Below you see my overview starting with day 1 in the left upper corner.

Me-Made-May 2019 Wrap


How did I feel about the-everything-goes-wardrobe capsule?

I must admit that when I selected these 10 garments that I was a bit skeptical that I would manage to make 10 different combinations. But I did! More, I am very pleased with the result. Of course, the new skirt— which I wore 3 times—gave me more combinable options than the Snowball high neck dress.
A second reason why it went so well is that 5 of the 10 garments were solids. That really expands the possible combinations.

New combinations?

Again there were a lot! I think it had been a year since I wore the Seafarer top and the Julia Sweater. So all these pairings were new and I renewed my love for both tops. I will definitely grab them more out of my closet in the future.

Me-Made-May 2019 Wrap

Me-Made-May 2019 Wrap

I told you already I so loved my approach to Me-Made-May this year. Not only did I wear at least one me-made garment each day of May but these all belonged to one of the three wardrobe capsules I created. Creating wardrobe capsules was new for me and I followed the guidelines of the 10 x 10 style challenge. I recommend these if you thinking about creating one for yourself.
I’m particularly proud that I was able to dress fit for all the occasions of life for 30 days and I never changed outfits during the day. There were even 4 flights last month.
Another benefit is that I discovered several new combinations I could make with my garments.

Me-Made-May 2019 Wrap
Very difficult to choose but here is my Top9 for Me-Made-May 2019. Three from every wardrobe capsule.
Conclusion

I’m a happy sewist who has a fond memory of Me-Made-May 2019!