Tag Archives: handmade gift

How to sew 7 Hudson Pants and a mini-one!

I got this idea—sewing matching Hudson Pants for my family—from Emma (@emmas_atelier). For the ‘Fun prompt’ of the #bpSewvember photo challenge, she posted a picture of the set Hudson Pants she made for Christmas. I found this very inspiring as I love sewing gifts and I love the Hudson pant.
You can read below how I did it!

Hudson pant True Bias

The Hudson Pant pattern

The Hudson Pant is a pattern for very comfortable sweatpants and there is a female, male and mini version of it. At that time I already sewed 5 Hudson pants—for my daughter, for my husband and for myself— so the pattern had no more secrets for me. I already made the necessary adjustments on these patterns: lengthening of the crotch line for my daughter and lengthening of the legs for all of us.
I traced new pattern pieces for the pants for my daughters-in-law. For my sons, I used the pattern of my husband with some extra length on the hems of the legs.

Hudson pant True Bias


The Hudson Pant Fabric

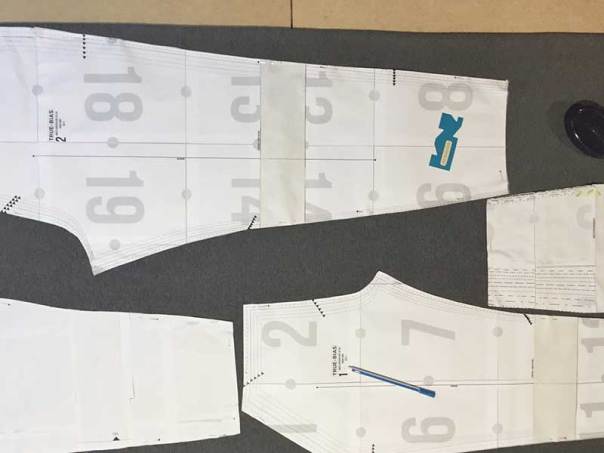
I bought 7 m of grey melée ‘sweatshirt fleece’ with a soft brushed inside at my local fabric shop. It’s a blend of cotton/polyester. Luckily for me, it was the end of the bolt so I got some more than 7 m and I needed it.
Hudson pant True Bias

The advantage of using the same fabric for all the Hudson pants is that you can really place your pattern pieces very economical. More, you can easily fit the smaller pieces in the leftover fabric after you’ve cut out the bigger pieces

Hudson pant True Bias


Sewing 7 Hudson Pants in a row

I had already the different measurements of everybody so I could cut out the pattern pieces. To make sure I didn’t forget any of them (8 pieces per pants makes 56 pieces in total!) I made a graph and I gave every pant a different colour. Because there was an obvious difference between the men’s and women’s pants I could use the same colour for the marks twice.

Hudson pant True Bias

I also put these marks on the wrong side of the pattern pieces.

Hudson pant True Bias

Then I followed the successive stages of the sewing instructions but I did each of them 7 times. I kept sure I always put the several “pants-in-construction” in the same order.

Hudson pant True Bias

I sewed everything with the overlocker. As I sewed already 5 Hudson pants before I had no problem at all with putting everything together.

Hudson PantA pile of “pants-in-construction” after sewing all the pocket pieces. You can see some of the pink and yellow marks.

Hudson pant True BiasAll the Hudson pants are the same except for my husband’s. He didn’t want leg cuffs.

The gift

When I gave the presents I was nervous of course but they were all surprised and happy. They all tried the pants immediately and alas one of the pants for my daughter-in-law was too small on the legs! I widened them with a black strap and now they are good. Unfortunately for her, it took me more than a year to do so.  I gave the too small pants to my godson and made a new one for my daughter-in-law. Can you imagine my horror when she tried it on it was again too small, although I adjusted the pattern. That’s why I fixed it with the black straps.

Hudson pant True Bias

Hudson pant True BiasThe ‘kids’ looking cool in their Hudson pant!

The mini-one

This whole story took place in 2017 but we never got together to make a picture with all of us wearing our Hudson pant. In the meanwhile, our grandson was born so I had to make matching pants for him! There is no Hudson pant pattern for babies so I took the Oliver pants pattern that I used before. But I used leftovers from the grey fabric and from the fabric that I used for the dress for his mama when she was still pregnant with him.

Hudson pant True Bias

Conclusion

My family and I, we love our matching Hudson pants. We all think they are very comfortable and we love wearing them.
Will I sew more Hudson Pants? I guess so because after the photoshoot my son asked me to sew him another one!

Bonus: the Hudson pant Photoshoot

Hudson pant True Bias

Hudson pant True Bias Hudson pant True Bias Hudson pant True Bias

Do the Hudson Dance!

Hudson Pant True Bias

I ❤️ the Bombazine oven mitt

It started with a joke. On a family pizza night, our daughter exclaimed that she would give us some oven mitts as a Christmas present. Because she burned herself by pulling out the pizza’s and we didn’t have mitts. “That’s not necessary” my husband answered out of the blue, “because your mom—that would be me— just sewed one for everybody!” I sighed: “Oh baby, now you’ve spoilt the surprise.” Everybody laughed of course, little did they know I hadn’t sewed any oven mitts at that point. A few days later I discovered the Bombazine oven mitt on their site. Now I laughed too because no longer I had to search for my Christmas gifts. So that’s why I sewed 11 Bombazine oven mitts.

Bombazine oven mitt

The Bombazine oven mitt pattern

The Bombazine mitt pattern is a free downloadable pdf-pattern. It only has four pages: two with instructions and two for the pattern. So you print and tape together the pattern in a blink of an eye! You use the same pattern piece for the three layers of the mitt. Simple and easy!

Bombazine oven mitt


The fabric

The Bombazine mitt is THE project to use up your leftovers. I used a combination of leftovers from sewing projects, pieces of old jeans of the kids, and pieces of fabric from the thrift shop. I sewed together some of the scraps with a medium weight and then I cut out the outer pieces.

Bombazine oven mitt

For the heat insulation layer, I used an old woollen blanket. Bombazine oven mitt

For the inner lining, I used leftovers from cotton fabric.Bombazine oven mitt

The sewing process

Sewing the Bombazine mitt is a joy! The instructions, with designs, are very clear and easy to follow.
New for me was hand quilting the layers together with sashiko stitches. I have never done this before but I love learning new techniques. The stitches are still wonky but I like doing it.
Bombazine oven mitt


After sewing the outside of the mitt, you sew together the lining but you leave a gap near the top. Later you pull the outside layer of the mitt through this gap.
Sewing together the three layers can be a little difficult. When an opening of a pattern piece is small I always sew on the inside. This prevents sewing accidentally wrong layers together.Bombazine oven mitt


According to the instructions, the trickiest step would be bagging the mitt (or ‘mitt birthing’). I found this not so difficult. The woollen layer is easy to handle and pull through the gap.
After the birth, you finish with topstitching the edge of the mitt and a good press.

bombazine oven mitt
‘mitt birthing”
Bombazine oven mitt
These mitts need only the finishing topstitch of the edge.


Conclusion

I enjoyed myself tremendously sewing these mitts. Due to the great design and the easiness of the sewing process, they came out fantastic. And giving them as a Christmas present was pure fun. Everybody had a laugh and they were very happy with them.

Will I sew more Bombazine mitts? Definitely! They will also make a perfect 2018 Secret Valentine gift.
So thank you Bombazine ladies for this cute free pattern.

Bombazine oven mitt Bombazine oven mitt Bombazine oven mitt


4 reasons to participate in the 2018 Secret Valentine Exchange

Woohoo!! The 2018 Secret Valentine Exchange is back. I love this “sewing-community- handmade-gift-swap” so much that I give you—again—4 reasons to participate. I wrote this blog post exactly one year ago for the 2017 Secret Valentine Exchange but everything is still true!

2018 Secret Valentine Exchange
Design made by Sanae

The  Valentine Exchange is a non-conventional handmade gift swap that occurs worldwide. It’s the fifth time it takes place and it is organized by two very creative and inspirational women: Sanae from Seattle (US) and Ute from Berlin (Germany). You can read more about the exchange on Sanae’s blog.
In 2016 I participated for the first time and it really was a heart-warming experience.

Here are my 4 reasons why you should participate as well!

1 You get to know new people

  • Like I said before, the hosts, Sanae and Ute, are amazing people to meet.
  • Then you meet your assignment: the person you have to make a gift for, in my case, that was Elle from the UK. I received an email from the organizers with some information and her IG-account for inspiration.
  •  And of course, at the end, you get to meet the person who made something for you. Last year Angela from Oakland was my Secret Valentine.

2 You get challenged

The purpose of the SVE is to make something yourself with barely any costs, to use materials from your stash. I learned that Elle’s favourite colours were: grey, navy, gold, and mustard. Luckily I had some scraps in my stash of these colours.

Grey and mustard scraps from my fabric stash

Then you have to let your creativity work. Elle is a great sewist, so I decided to make some pattern weights and a bag for putting them in. I used the open wide zippered pouch pattern from Noodlehead for it.

The pattern weights are filled with lentils
The open wide zippered pouch from noodlehead

I pimped it with some cuberdons, a famous sweet from Ghent, my hometown.

3 You get thrilled twice

  • It is very exciting to send a gift to someone and have to wait to receive their response, whether they liked it or not. Elle expressed her thanks extensively and still does, and every time I get warm and fuzzy all over again.
  • It is also very exciting to receive your gift, especially when it comes from overseas and when it is beautifully wrapped gift containing a block print of David Bowie on a white canvas bag. I use it all the time because I love it so much.

4 It is very easy to sign up
Just fill in the Google form. The deadline is  Wednesday, January 10th, so you have still a few days. You don’t need to have an online presence to participate. You just have to let your creativity work!

Are you participating?

** I also posted about my 2017 Secret Valentine Exchange **

How I made my #2017sve

My 2017 Secret Valentine, a reversible tote bag.

Now that my Secret Valentine has received the gift I made for her I can tell you something about how I made it.

secret valentine reversible tote bag
The reversible tote bag
What to make?

I wrote before how exciting it is to participate in the Secret Valentine Exchange. The first thing you do after you receive your valentine is a search of what to make.
I have a board of suitable handmade gifts on Pinterest and there I found a pin of a tote bag and one of a coin purse. My mind was immediately made up as my valentine likes useful things. Also, because I really wanted to make both things for a long time. Win-win!

The very popular pin of the tote bag on Pinterest—with the measurements

In my stash, I found some leftovers of upholstery fabric reflecting the favourite colours of my valentine: raspberry and rose gold. So I was all set!

How to make the tote bag?
  1. Drawing the pattern

    First, I copied the measurements of the design to tracing paper and as I was staying at our holiday home at that time—where I don’t have garment rulers— I used a plate to form the circle line.
    The dimensions of the bag are good so I didn’t make any alterations.

  2. Cutting the pattern pieces

    I have cut four pieces—two out of both fabrics. Unfortunately, the board on the board fabric did not have the same position on both sides so that is why it is rather low. 1 cm of seam allowance is included.

  3. Stitching the bag

    The bag comes easily together. To do so I followed the directions of the scheme I found on Pinterest.
    1)  stitch all the side seams
    2)  stitch the bottom seam minus one opening for turning the bag to the right side
    3)  stitch the curves of the handles minus 5 cm on each side
    4)  measure 8 cm for the boxed corners, stitch and trim

    5) turn the bag inside out through the opening on the bottom
    6) stitch the inside bottom seam

    7) pin and stitch the handles in both layers—work very strict here


    8) Voilà, tote bag is finished

    9) Take pictures

I also made a matching coin purse but here I had some difficulties with gluing the frame to the fabric. So there are some imperfections but isn’t that the charm of hand made gifts?

9 inspirations from the sewing community

Do you lack sewing inspiration?

The sewing community provides you with a lot of sew-alongs, sewing challenges, giveaways and even a sewing party! I give you 9 online sewing festivities that maybe could give you some needed inspiration.

  • Project Sew My Style

    Alex from Bluebird Fabrics launched this year-long project last December 2016 and it is such a challenging project that I immediately signed up.Project #SewMyStyleSewMyStyle is all about raising awareness about the slow fashion movement and about encouraging young women to take up sewing. I’m not young but I felt spoken to. They want to show you that sewing your own wardrobe isn’t an unachievable dream.
    The goal is to create a wardrobe by sewing 12 garments in 12 months, with the entire community.  We’ll post photos of our makes on Instagram on the last Sunday of every month. In the end, we’ll all have a nice little capsule wardrobe of handmade clothes. To make the project achievable, the patterns that are chosen are relaxed in fit and most are accompanied by instructions.
    The first pattern on the list is The Toaster Sweater #2 from Sew House Seven. Currently, I am in the phase of choosing my fabric.

    Patterns for SewMyStyle
    The 11 patterns for SewMyStyle. The 12th pattern is yet to be released.


  • 2017 Secret Valentine Exchange

    The 2017 Secret Valentine Exchange is a non-conventional handmade gift swap that occurs worldwide, hosted by Ute and Shanae. I already gave you 4 reasons why you should participate.
    Sign-ups are closed now but you can follow all the makes on Instagram with the #2017SVE hashtag. At this moment I’m racking my brains to find something to sew for my Secret Valentine.

    2017 secret valentine exchange

  • Dressmakers52

    After a very successful MakeItYourself March 16, co-hosted with Wendy from WendyWard, Emma from Dressmakers Social started a year-long project: #Dressmakers52.
    Every Sunday, she picks a new theme from her deck of cards with prompts, to use as inspiration for posting a picture on Instagram. It started the first week of April 2016 and we are now in week 43 with the theme: dresses. I really love this challenge, it gave me a lot of sewing inspiration so far.


  • Moneta Party

    Moneta Party
    A real sewing party hosted by The Triple Stitchers: Abigail, Elle and Rachel.
    This is fun! It’s a party held on Instagram! Everybody can participate, no matter where you live—simply post a picture of your handmade ‘Colette Moneta dress’ on your Instagram feed between Friday, February  24th 18.00 GMT and Sunday, February 26th 18.00 GMT 2017 using the hashtag #Monetaparty. And there are prizes to win!
    I am really looking forward to this party because I am planning to sew a Moneta for my daughter for more than a year already.

    The Triple Stitchers
    © The Tripple Stitchers


  • Le défi dentelle
    Le défi dentelle
    A lingerie sewing party hosted by Marion, Eugénie and Barbara.

    Do you fancy sewing your own lingerie?  When you do, post a picture of it on Instagram and you receive a lingerie pattern from Barbara—Je fais mes dessous. You can post until Valentine (of course!). Wow! Don’t these beautiful pictures give you inspiration?


  • Jungle January

    Anne from Pretty Grievances started it 5 years ago: sew anything you want using an animal print fabric. Check it out on Instagram and Twitter with the #junglejanuary hashtag.

    Jungle January
    Teaser for last years Jungle January © Pretty Grievances

    I never used an animal print before and at this moment I don’t have an animal print in my stash but I do love all the Jungle January sewing! And you still have 10 days to sew something with an animal print! If you have an animal print in your stash—sew it!

  • Sew Japanese (patterns) in January

    Launched by Blogless Anna on Instagram. So far I didn’t sew any Japanese patterns, although I like a lot of them, especially the coats. Unfortunately, I will not have some spare time to sew Japanese this January (due to 2017SVE, SewMyStyle and the upcoming MonetaParty). But you can!

    Japanese sewing inspiration
    RepostBy @bloglessanna: “My #sewjapaneseinjanuary plans are underway. I’m hoping to sew two items from two of my newest books (inc. this top). Are you joining in?” )


  • Blusen Sew-Along

    No, it is not impossible to sew your own shirt! You just have to start. That’s why Elke —a German sewist is organising a Blusen Sew-along.Blusen Sew Along

    This is the schedule of the sew-along:
    * January 22: Choosing of the pattern and fabric, what inspires you?
    * January 29: Do you have to make changes? Are there hurdles?
    * February 5: Work in progress. Did you learn tips and tricks or do you need help with your project?
    * February 9 (Thursday): Presentation of the finished blouse. FINALE!
    You can follow all the makes on Instagram and social media with the #blusenSA2017

  • 2017 sewing book challenge

    Do have a lot of sewing books with patterns in it and you never sewed one these patterns? With the 2017sewingbookchallenge you can solve this.2017 Sewing Book Challenge

    Carla Peicheff looked at her sewing book library and realised she nearly didn’t use one of the patterns in it. That’s why she launched the 2017sewingbookchallenge: make at least one project a month from your stash of sewing books.
    I only have one sewing book and sewing something from it is already on my #2017MakeNine list.

4 reasons to participate in the 2017 Secret Valentine Exchange

Design made by Sanae

The 2017 Secret Valentine Exchange is a non-conventional handmade gift swap that occurs worldwide. It’s the fourth time it takes place and it is organised by two very creative and inspirational women: Sanae from Seattle (US) and Ute from Berlin (Germany). You can read more about the exchange on Sanae’s blog.
Last year I participated for the first time and it really was a heart-warming experience.

Here are my 4 reasons why you should participate as well!

1 You get to know new people

  • Like I said before, the hosts, Sanae and Ute, are amazing people to meet.
  • Then you meet your assignment: the person you have to make a gift for, in my case that was Elle from the UK. I received an email from the organisers with some information and her IG-account for inspiration.
  •  And of course, at the end, you get to meet the person who made something for you. Last year Angela from Oakland was my Secret Valentine.

2 You get challenged

The purpose of the SVE is to make something yourself with barely any costs, to use materials from your stash. I learned that Elle’s favourite colours were: grey, navy, gold and mustard. Luckily I had some scraps in my stash with these colours.

Grey and mustard scraps from my fabric stash

Then you have to let your creativity work. Elle is a great sewist, so I decided to make some pattern weights and a bag for putting them in. I used the open wide zippered pouch pattern from noodlehead for it.

The pattern weights are filled with lentils
The open wide zippered pouch from noodlehead

I pimped it with some cuberdons, a famous sweet from Ghent, my hometown.

3 You get thrilled twice

  • It is very exciting to send a gift to someone and have to wait to receive their response, whether they liked it or not. Elle expressed her thanks extensively and still does, and every time I get warm and fuzzy all over again.
  • It is also very exciting to receive your gift, especially when it comes from overseas and when it is beautifully wrapped gift containing a block print of David Bowie on a white canvas bag. I use it all the time, because I love it so much.


4 It is very easy to sign up
Just fill in the google form. The deadline is Friday, January 6th, so you have to hurry a little bit. You don’t need to have an online presence to participate. You just have to let your creativity work!

Are you participating?

Sanae also drew some tags to use with your gift

2017-01-05 1:11 GMT+01:00 Wis Geysen <wis.geysen@telenet.be>: