Tag Archives: wgsewing17

How to sew 7 Hudson Pants and a mini-one!

I got this idea—sewing matching Hudson Pants for my family—from Emma (@emmas_atelier). For the ‘Fun prompt’ of the #bpSewvember photo challenge, she posted a picture of the set Hudson Pants she made for Christmas. I found this very inspiring as I love sewing gifts and I love the Hudson pant.
You can read below how I did it!

Hudson pant True Bias

The Hudson Pant pattern

The Hudson Pant is a pattern for very comfortable sweatpants and there is a female, male and mini version of it. At that time I already sewed 5 Hudson pants—for my daughter, for my husband and for myself— so the pattern had no more secrets for me. I already made the necessary adjustments on these patterns: lengthening of the crotch line for my daughter and lengthening of the legs for all of us.
I traced new pattern pieces for the pants for my daughters-in-law. For my sons, I used the pattern of my husband with some extra length on the hems of the legs.

Hudson pant True Bias


The Hudson Pant Fabric

I bought 7 m of grey melée ‘sweatshirt fleece’ with a soft brushed inside at my local fabric shop. It’s a blend of cotton/polyester. Luckily for me, it was the end of the bolt so I got some more than 7 m and I needed it.

Hudson pant True Bias

The advantage of using the same fabric for all the Hudson pants is that you can really place your pattern pieces very economical. More, you can easily fit the smaller pieces in the leftover fabric after you’ve cut out the bigger pieces

Hudson pant True Bias


Sewing 7 Hudson Pants in a row

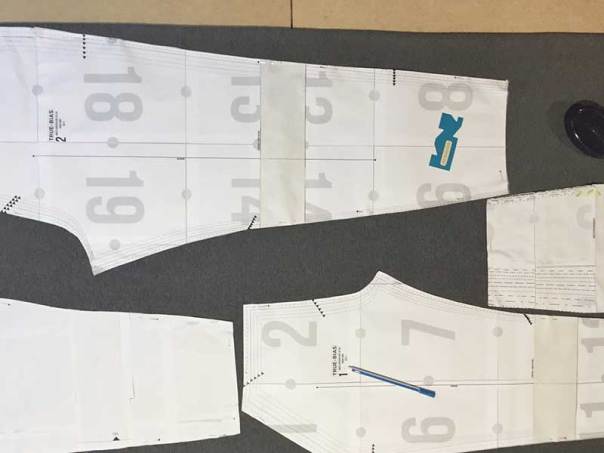
I had already the different measurements of everybody so I could cut out the pattern pieces. To make sure I didn’t forget any of them (8 pieces per pants makes 56 pieces in total!) I made a graph and I gave every pant a different colour. Because there was an obvious difference between the men’s and women’s pants I could use the same colour for the marks twice.

Hudson pant True Bias

I also put these marks on the wrong side of the pattern pieces.

Hudson pant True Bias

Then I followed the successive stages of the sewing instructions but I did each of them 7 times. I kept sure I always put the several “pants-in-construction” in the same order.

Hudson pant True Bias

I sewed everything with the overlocker. As I sewed already 5 Hudson pants before I had no problem at all with putting everything together.

Hudson PantA pile of “pants-in-construction” after sewing all the pocket pieces. You can see some of the pink and yellow marks.

Hudson pant True BiasAll the Hudson pants are the same except for my husband’s. He didn’t want leg cuffs.

The gift

When I gave the presents I was nervous of course but they were all surprised and happy. They all tried the pants immediately and alas one of the pants for my daughter-in-law was too small on the legs! I widened them with a black strap and now they are good. Unfortunately for her, it took me more than a year to do so.  I gave the too small pants to my godson and made a new one for my daughter-in-law. Can you imagine my horror when she tried it on it was again too small, although I adjusted the pattern. That’s why I fixed it with the black straps.

Hudson pant True Bias

Hudson pant True BiasThe ‘kids’ looking cool in their Hudson pant!

The mini-one

This whole story took place in 2017 but we never got together to make a picture with all of us wearing our Hudson pant. In the meanwhile, our grandson was born so I had to make matching pants for him! There is no Hudson pant pattern for babies so I took the Oliver pants pattern that I used before. But I used leftovers from the grey fabric and from the fabric that I used for the dress for his mama when she was still pregnant with him.

Hudson pant True Bias

Conclusion

My family and I, we love our matching Hudson pants. We all think they are very comfortable and we love wearing them.
Will I sew more Hudson Pants? I guess so because after the photoshoot my son asked me to sew him another one!

Bonus: the Hudson pant Photoshoot

Hudson pant True Bias

Hudson pant True Bias Hudson pant True Bias Hudson pant True Bias

Do the Hudson Dance!

Hudson Pant True Bias

Top 5 of 2017: reflections & goals

The final part of the Sewing Top 5 Series: Reflections and Goals

sewing overview reflections goals

Reflections

sewing reflections goals

Some, not 5 though 😉, thoughts about my sewing in 2017.

*Deadlines

The common thread for my sewing last year would be sewing against a deadline and not reaching that deadline. That’s no fun because often it left me with an unsatisfied feeling or even with unfinished projects, like the Carolyn Pajamas Dress.
How did I keep ending up there? Because I want to sew everything for everybody and for myself: birthday presents, Christmas presents, party clothes, … Plus, I love to participate in all these exciting sewing challenges the sewing community launches. This was infeasible and led to situations that I was still finishing the party dress for my daughter 5 minutes before she had to leave. So, I had to stop myself making all these sewing promises. In fact, this happened naturally because I lost my sewing mojo last fall. In hindsight, I think this was the underlying cause. The last part of 2017 I did not make any more promises and I feel more confident about my sewing now.

*Sewing classes

Sewing class

In September 2016 I started a pattern drafting course for a year. Here I learned to draft my own pattern blocks for a skirt and trousers using the method of M. Müller & Sohn, aka the Rundschau method. These lessons are intense but they also taught me a lot. I enjoyed it so much that this September I started the second year: drafting a basic pattern for a dress. More, I also started another sewing course: couture techniques. This year the focus of this course is sewing pockets. So every Monday I have now 7 hours of sewing lessons and I love it.

*Sewing is a verb

This is the most important insight I gained last year. Sewing takes time and when you take your time for it,  you get smashing results. Take your measurements with care, control the finished measurements on your pattern, maybe make a muslin, baste tricky seams, do some fitting and make the needed adjustments, etc….  This year I learned to enjoy doing all these steps and leave the quick-sew road behind.

*Sewing blogger

I started this sewing blog a year ago and I don’t regret it. Okay, it is some work and there are already a lot of sewing blogs but it made my connection with the sewing community stronger. That’s why I am going to keep on blogging. I wrote all this in my one-year anniversary post.


Goals

sewing reflections goals

*Sew 300 times a year

The first criteria for setting goals is: “Be realistic!”. That’s why want to sew 300 days a year instead of every day. I’m lucky to have my own sewing room so I can easily start sewing most of the days, even if it is only for fifteen minutes. To keep the score I mark my sewing days on the Sew DIY sewing calendar. (How nerdy can you be?)Counting my sewing days

*Make no sewing promises

Like I wrote above I will not make sewing promises anymore. This does not imply that I won’t sew for other people. No, I am still going to do that but without outspoken promises. Also, I still am going to participate in some sewing challenges but I will be more selective.

*2018MakeNine

What am I going to sew in 2018?  A variety of garments I hope, but certainly bra’s. The attentive readers of my blog may be a bit skeptical here because I said this also for 2016 and for 2017.  Indeed, the Watson Bra was on my 2016MakeNine and on my 2017MakeNine.
Even though I sewed 40 projects in 2017 I only made two garments of my 2017MakeNine: the Paxson sweater and the Hudson Pants for man.
But I still like the not yet sewed patterns of 2016 and 2017 so I decided to keep them on my 2018MakeNine. The new ones are:
*The V9075 Jumpsuit
*The Ellsworth Coat – Christine Haynes

2018MakeNine
2018MakeNine

I wish you all a very inspiring sew year!

°°°

Read more about The Sewing Top 5 series: Hits, Misses and Highlights!

Top 5 of 2017: the misses & the highlights

Following Gillian in her Sewing Top 5 series, next up are my misses and highlights of 2017.

sewing top 5 misses highlights

It’s a bit strange to make a podium for your misses, isn’t it? You don’t want to honour them but would rather forget them. On the other hand, you learn something from your blunders. That makes them a kind of necessary evil for improving your sewing skills. In no particular order are here 5 of my misses:

1 The Bridgetown backless dress from Sew House SevenThe Bridgetown backless dress from Sew House Seven

What went wrong? First, I cut the sleeves cross grain because I thought the stripes would give a nice effect. On the contrary, this made them pop up instead of falling on the arm. Second, the fabric was somewhat too stiff to give the dress the needed drape. Third, there was not enough ease around the hips. I should have looked better to the given finished measurements. I never wore it.
What can I do with it? Restyling it into another garment will be the only solution for this dress.


2. The Saunio Cardigan from NamedSaunio Cardigan Named

What went wrong? What was I thinking using a woven fabric when the pattern asked for a knit. It could have turned out ok if I’d made the arms a bit wider. Now they are at their narrowest. I wore it a few times but I’m not really comfortable with it.
What can I do with it? Perhaps I should make a belt for it as Jessica did. Otherwise, it is also going to the restyling pile.


3. The Carolyn Pajama DressCarolyn Pajamas Dress

What went wrong? This Carolyn Pajama Dress hack was supposed to be my entry for the ‘Sewtoghetherforsummer challenge.’ Unfortunately, I didn’t reach the deadline of 21st of June to finish it. Now, it is still laying there on my WIP-pile.
What can I do with it? Finish it! It’s cut and I have all the needed notions.


4. The Skeleton PJ’s for my godsonSkeleton Fabric

What went wrong? I promised my godson PJ’s for his new year’s present but I only managed to finish the pants on time. Hence he received a PIP—Present in Progress. He tried them on and they were on the small side. I could solve this by putting a band on the side seams. I had also already cut the pieces for the top so probably these will be on the small side too. In fact, in the rush to get the present ready on time, I used a too small pattern for his measurements. I made some alterations on it but it was a lost cause. Now, almost a year later, he has grown more than 7 cm so the PJ’s are not usable anymore.
What can I do with it? Use the pieces for a PJ for a smaller child.

5. Turning my WIP’s in UFO’s

I started 2017 with 6 WIP’s—finished two— and I ended it with 4 UFO’S.

  • Duffel bag to use for pattern drafting class
    Started in September 2016
    I cut all the pieces and bought a zipper
  • Boxer shorts for my sons
    Started in September 2016
    I cut all the pieces and made a mistake: the front and the back have different colours from the same fabric!
  • Paxson for my son
    Started in December 2016
    Cut all the pieces
    I put the sleeves with the wrong side of the fabric up!
  • Hudson pants for my daughter-in-law
    I made 7 Hudson pants for my family’s New Year’s present. Unfortunately one for my daughter-in-law was too small.

What can I do? Finish all of them!!


sewing top 5 misses highlights

Life isn’t only about sewing! Or, is it? So here are my highlights of 2017.


1 Podere Santa PiaAbout ten years ago we bought a holiday home—Podere Santa Pia— in the South of Tuscany, Italy. It is our heaven on earth. Going there as much as my working schedule allows is truly a highlight of my life! More, I can also sew there and that makes this place even more of a paradise.
Every time we visit Podere Santa Pia, or we have friends or family visiting us we take a goodbye picture. You can see them all on Instagram with #ciaosSantaPia.


2 Spending time with my familyWe have three, now adult, children and I love them and their significant others to pieces. We installed a tradition to make pizza’s on Sundays, when we are at home. These are great nights.


3 Quiet days with friendsEnjoying a “quiet day” at the Martin Creed show at Museum Voorlinden.

We have a more than 35-year long during friendship with another couple. More than 15 years ago we decided to no longer give each other material gifts for birthdays. Instead, we give each other time. We call this “our quiet day”, which we organize for each other several days a year. This can involve visiting an exhibition, or a historical place and have a nice dinner together. When this “quiet day” is in Podere Santa Pia (see highlight 1) the joy is double.


4 City trip to LondonMy husband had a business meeting in London last May and we took advantage of it to stay there for 4 days. It had been 15 years since we visited and we were excited about the renewed acquaintance with this fantastic city. Totally new for me now was the discovery of the famous Goldhawk Road, THE fabric shop street. Strolling around in this street and, of course, buying fabric was the crowning point of this trip.


5 Nick Cave concertI don’t often go to concerts anymore. This year I only went to two: Bob Dylan’s Never-ending Tour and Nick Cave’s Skeleton Tree Tour. Both of these concerts were amazing but I was totally blown away by Nick Cave. This was so heartfelt and moving, and at the same time energetic and diabolic. The best concert I’ve ever experienced.


Next Up in the Sewing Top 5 series are the reflections and the goals.


What I sewed in 2017-Top 5: the hits

There are two reasons why I love a new year. One, you can start a lot of things with a clean slate, and two, you can look back and reflect on the past year.
Like last year I collected all my sewing data in an infographic and here below you see the result of my 2017 sewing!

2017 sewing

What do these numbers say?

In one sentence: I sew for women, using a pdf pattern from an Indie Pattern Designer. No drastic changes here in comparison with last year.

40 sewing projects

These 40 sewing projects are all finished ones. (I may have a few UFOs also). That’s one less than in 2016. Like last year I am a little disappointed with this number because I have this irrational idea in my head that I want to sew something new once a week. I knew I didn’t succeed at this because last September and October I totally lost my sewing-mojo.


Top 5 of 2017

I am joining Gillian from ‘Craftingarainbow’ for the #SewingTop5 of 2017. It’s already the 5th time she launches this annual blog series. Like she says: “It’s a chance to review what worked or didn’t, celebrate the highlights, reflect and get some goals for the next year.”  All the things I like about starting a new year.  So, here I start with my Top 5 Hits.

Top 5 Hits

My hits are sewing projects that gave me the most joy. This joy can be derived from various sources: from the pleasure of wearing it, the challenge of the sewing, the first time of tackling that particular technique, or the gratitude you receive from the person you sewed for…

Here are in random order my 5 Hits of 2017.

1. The Vogue DKNY  V1235 Dress
The Vogue DKNY V1235 Dress1. The Vogue DKNY  V1235 Dress

I sewed this dress for my daughter to attend the wedding of her best friend. I worked very hard on this dress: I made two muslins for it and executed my first FBA—that still sounds like a medical procedure ;). It was also the first time I sewed with border fabric. I love how the placing of the border I had in my head came out. My daughter received a lot of compliments on the dress and she loves wearing it. This makes me sew happy!


Toaster sweater 2 Sew House 72. The Toaster Sweater#2 from Sew House Seven

Thanks to the SewMyStyle project I sewed this Toaster Sweater and I am so glad I did. It was a quick sew with instant gratification. I wore it a lot and I would never have thought that I could pair it with a variety of clothes, old and new ones, like the A-line skirt and the plissé skirt.


Chari Dress Schnittchen Patterns3. The Chari Dress from Schnittchen Patterns

I was a pattern tester for Schnittchen Patterns new collection and though I am not a ruffle kind of girl, I’m glad I picked this pattern. It turned out that ruffles could be stylish for me.
This dress also proved to be the ultimate summer dress when we had temperatures around 40°C last August. So, no surprise here that I wore it A LOT!


restyle refashion4. The restyling of a men’s shirt

Wow! This project had several firsts for me! I never restyled/refashioned something before and I never hand-printed fabric. I succeeded in both new skills and I am very proud of the result. Extra exciting was that this project was for the First Restyling Exchange. So it was not for me but for Elisabete, who sent me her husband’s shirt and received a top for her. It was thrilling to wait whether the top would suit her and if she would like it. I got two yesses!


plissé skirt Lotte Martens5. My Plissé Skirt

I only sewed this skirt on Christmas Eve but it feels like my best sewing project of 2017. The fabric is exquisite and it took only half an hour to transform it into a skirt. More, I feel like a queen when I am wearing it. A fabulous project to finish my 2017 sew year.

Next up are  Misses & Highlights, and Reflections & Goals.


How to make a-made-in-a-blink festive skirt

Plissé Skirt

Two days before Christmas it looked like I wouldn’t have a new garment for the annual family Christmas dinner. That’s nothing new because last year I didn’t sew one either. Then I went to ‘De Stoffenkamer’ to buy some fabric for presents when this lovely black plissé caught my eye. Immediately, the image of a new skirt—a plissé skirt— popped up in my mind. More, this was going to be a very easy sew, so I bought the fabric right away.

A plissé skirt: how did I do it?

A panel of plissé fabric

Lotte Martens Fabric

The black plissé panel is from Lotte Martens, a Belgian fabric designer. In fact, it is a semi-plissé, which means the pleats aren’t as deep as in a regular plissé. The panel is hand printed with a Bremen gold design. This is Lotte Martens’ trademark. She hand prints all of her fabrics and you know that I love hand printing. Since long I yearned to sew something with a Lotte Martens fabric.

This plissé fabric also reminded me of my visit to the Fortuny Palace in Venice for the Biennale 2015. There I learned that the plissé was invented by Mariano Fortuny, a Spanish fashion designer who lived in Venice. He opened a couture house in 1906 and continued until his death in 1946. Fortuny rebelled against the fashionable styles that were popular during his time. Together with his wife, Henriette Negrin, who was an experienced dressmaker, he created the Delphos gown in 1907. The Delphos gown is a shift dress made of finely pleated silk weighed down by glass beads that held its shape and flowed on the body. The pleating was all done by hand and the process was kept secret. Today these dresses are seen as works of art and many survive, still pleated, in museums and personal collections. (Source: Wikipedia)

Delphos gown
On the left: Clarisse Coudert, who married Condé Nast, wearing a Fortuny tea gown. ca. 1909 – On the right: (Isadora) Duncans three adopted daughters (Lisa, Anna, and Margot) in Delphos dresses c.1920
One side-seam

The panel is 70 cm with a 150 cm fabric width. For this type of skirt, you don’t need a pattern. Double the fabric, right sides together, pin and stitch.

The elastic waistband

Measure a piece of broad elastic around your waist. Sew the ends together to create a circular form.

Divide the waistband and the skirt into four even parts and mark them with chalk and/or pins. Now pin the waistband to the skirt. I placed the side of the waistband with the mini ruffles atop the top of the skirt. This makes the stitching of the elastic easier.

The whole sewing process took me about 20 minutes.

Conclusion

We had to leave for the family party at twelve and I finished it at 11 o’clock! I love wearing it and I got a lot of compliments. Who doesn’t like that?!

Will I make more plissé skirts? When I find the right plissé fabric I probably will. Or maybe another type of garment like the Fortuny tea gown. Who knows?

The floral Ogden Cami Dress from True Bias

Wow, this is the Summer of the Ogden Camis. I so enjoy wearing my Cami and my Maxi Cami Dress that I decided to make another one. This time I would go for another hack. I wanted to use the bodice of the Cami and combine it with the skirt part of the Chari dress. I hoped that would give a whirly, summery dress. However, it turned out a little different ;).

Ogden Cami Dress
The floral fabric

Like the fabrics for my other Camis, I also found this one at the market in Castel del Piano. It is soft, silky, and drapey. Normally I’m not a great fan of floral and blue but I liked this piece. It has a bit of an oriental vibe, hasn’t it?

Ogden Cami Dress

All these market fabrics are pre-cut and this one was only 1,60 m with a width of 1,50m. So I knew that I had to cut both the front and back piece in two pieces. I even had to put a seam in the back lining.

Ogden Cami
Stitching two pieces of fabric together to be able to cut out the lining.
The planned dress hack

In one of her latest video posts, Johanna LU from ‘The Last Stitch‘ called for sewists to show more sewing struggles. Well here is my struggle.

First I measured on my Ogden Cami where would be the good spot to put the tunnel for the elastic (about on my natural waist). I put the mark on my pattern pieces, folded them, pinned them on the fabric and cut the fabric.
Next, I cut the skirt pieces as wide and as long as the rest of the fabric allowed. After sewing everything together and only with the first fit, I noticed my mistake. I cut a straight seam on the bodice pieces and not a curved one! I totally forgot that I have boobs. So the desired straight seam was now curved. More, it was not possible to use this seam as a guide for the tunnel for the elastic.

Ogden Cami Dress
Forget to draw a curved seam for the bodice.

Luckily I saw that it was possible to wear the dress as it was. Due to the floral print and after a good press you don’t notice this curved seam.

Ogden Cami Dress

The sewing process

For this Cami I used the construction method from ‘What Katie Sews‘ and it worked well. She has a good tutorial on her blog. Although following True Bias’s instructions was not complicated I found Katie’s way easier. It simplified the attachment of the straps and made it a quick sew.

Ogden Cami Dress

Conclusion

It’s no secret that I, again, love my Ogden Cami Dress. Even if it turned out different than I planned.  I wore it already several times and it is absolutely a much-needed garment for hot weather. I am even more pleased that I can layer it up with a linen jacket or a cardigan. So it will be suitable for colder days.

Ogden Cami Dress

Will I make more Ogden Camis? Not immediately but someday I will.


The Ogden Cami & Ogden Cami Maxi from True Bias

Ever since I featured the Tiffany’s Ogden Cami Maxi in my Eye-catchers I wanted to sew one myself. I only have one maxi dress and I love wearing it, especially when it’s baking outside. So I tried a small pattern hack to turn the Ogden Cami in an Ogden Cami Maxi and I am thrilled with the result. Both of them are going to have a lot of wear!

Ogden Cami

Ogden Cami Maxi

The Ogden Cami pattern

I again enjoyed that I printed the pattern in A0-format at the copy shop. The different lines for the different sizes are very clear. I cut out the 5 pattern pieces after I graded between the bust and the waist. As always I lengthened the front and back pieces with 5 cm. On the front and back pattern piece is a line indicated for lengthening/shortening. I find this a plus for a pattern. The alterations came out perfectly.

Ogden Cami

The fabric

I bought both pieces of fabric at the monthly market in Castel del Piano. There is this cute market stall where you can buy all kind of cut fabric pieces for 5€ per piece and 10€ for 3 pieces. I got these two pieces together with the black knit for my daughter’s swimsuit I sewed in July. The downside is that you can’t decide the length of the pieces; they are all pre-cut. This caused no problem for the camisole but it was for the maxi dress (see below). Also, these pieces have no labels. The olive green is probably viscose and the black & white feels and looks like crêpe.

Ogden Cami Maxi

The sewing process

I sewed a True Bias pattern before,  the Hudson Pants that I love so much. So I knew that the accompanying instructions would be clear and so they were for the Ogden Cami. The successive steps come logically and every step is illustrated with straightforward designs. I had no difficulty putting the top together and the fit was from the first try spot on!
I loved the tip to sew a label at the back neckline to distinguish it from the front because indeed you can’t see it with the naked eye.

Ogden Cami


Making the Maxi Dress

To draft the maxi dress I copied the measures of the maxi dress I have.

  1.  The total length from the underarm to the hem = 130 cm.
  2.  The width of the hem = 200 cm. For me, skirts of a maxi have to be wide because I am not a fan of vents.

I didn’t draft new pattern pieces but I lay the pieces of the cami on the fabric. I folded the side seams and drew with chalk the desired length from the underarm to the hem. Ahem, this is what I wanted to do but my fabric was too short!! (I only had 175 cm of 140 cm width). So I drafted a front and back piece, both on the fold line, as long as I could. To make my desired length I cut two pieces cross grain. Luckily the design of the fabric is very forgiving so you have to look real close to see where the seam is. In the end, I reached a hem width of 180 cm.

Ogden Cami Maxi
Can you spot the seam between the two pattern parts?

To reach the desired length I had to use a back piece with a hole at the side seam. I patched it up!  Again, you have to look real close to see it!

On the left the hole at the side seam. On the right the patching!

Because there was no fabric left for the lining I used some vintage cotton from my collection.

Conclusion

I am over the moon with my Ogden Cami and even more with my Ogden Cami Maxi Dress. What I like in particular about this pattern is the delicate balance between the soft v-neck and the straps. And wow, I can wear them without a bra!
At this moment the sewing world is booming with Ogden Camis. So a lot of you have yet discovered the sublimeness of this pattern. For those who haven’t yet sewed one, do it!

The Chari Dress from Schnittchen Patterns

Last December 2016, Silke from Schnittchen Patterns asked for test-sewers for the Summer ’17 collection. I volunteered, as I am always in for a challenge.  When the different patterns were suggested I noticed that several of them had ruffles. Ruffles are very in-fashion this Summer. Normally it is not my thing but I decided to give it a chance and chose the Chari Dress to test. I am glad I did because the Chari Dress is a charming dress that I love to wear.

Chari Dress Schnittchen Patterns

The Chari Dress Pattern

I received the pattern on A0-format, by mail. I found this a very thoughtful gesture of Silke. The pattern for the sleeveless Chari dress consists out of four major pieces: the front, the back, the ruffle and the tunnel case for the elastic. You can also sew the dress with sleeves and as a shirt.
I cut out a straight 44 based on my measures. Being a tall girl (1,81 m) I put some 5 cm extra above the waistline. It came out perfectly. Furthermore, I took off 1 cm of the armhole at the shoulder point to avoid gaping.

Chari Dress Schnittchen Patterns

The fabric

I used a very soft rayon from my collection. (Yes, I speak of my fabric collection instead of my fabric stash!) I bought it more than a year ago on a big fabric fair ‘Stoffenspektakel‘ in my hometown. The fabric has a nice drape so it is very suitable for the ruffle and the elastic waist.
Unfortunately, I didn’t have enough fabric—which is often the case when I want to use a fabric I own already.  I cut the front piece in two at the waistline where the elastic tunnel is sewed. It is not noticeable because this seam disappears in the gathers.

Chari Dress Schnittchen Patterns


The sewing process

For the testers, the sewing instructions were rather brief. This is not the case for the released patterns. They have detailed instructions with designs.
Overall the sewing went smooth. There are only two less obvious sewing techniques needed to put together this dress.
1) Finishing the armhole with bias binding.
Although I used this technique before I relied on this very clear tutorial of ‘Sew Over It’.
Finishing the armhole with bias binding. Here you see the seam where the front is cut in two pieces.

2) Finishing the v-neck with bias binding.
This was the first time I used this technique. Therefore I relied on this extremely clear tutorial of Sonya Philip.

Sewing a v-neck bias binding with a little dart. I finished the ruffle with a small zig-zag. I like the frayed edge.

The finished v-neck binding.

Is this a quick sew?

Well, so and so. Sewing the Chari sleeveless dress is not that difficult! As mentioned above the finishing of the armhole and the v-neck are two moments you have to take your time for. But it is worth it.

Chari Dress Schnittchen Patterns

Conclusion

I  never thought that I would jump on the ruffle boat but I did. More, I adore it. I finished the Chari Dress mid-May and due to the extremely hot weather in our northern country, I wore it a lot so far. If you want a comfortable dress for hot days; sew a (sleeveless) Chari Dress from Scnhittchen Patterns.

Chari Dress Schnittchen Patterns


How to restyle a men’s shirt in a women’s top

When Amy and Pilar announced the first annual restyling exchange I immediately jumped on board. Those who read my blog know that I am always in for a challenge!
What is this restyling challenge? You receive a garment from someone to restyle it. Meanwhile, you send a garment from yourself to someone else, also to restyle it. So I received a men’s shirt from Elisabete and sent an old dress to Linda. A simple and beautiful concept. To make it more easy to sew something a questionnaire with measurements, colour and style wishes was sent with the garment.

restyle men's shirt
From a men’s shirt to a women’s top.
Restyling: how do you start?

I have never restyled or refashioned an existing garment before. So I started with unpicking the main seams of the shirt. In the meantime, I thoroughly went through Elisabete’s IG-feed and read her blog. This gave me an insight into her style, but it was also a little intimidating because she is a very skilled seamstress and ‘refashionista’!
Looking through her pictures I got the idea of sewing the Kastrup top from ‘How To Do Fashion’. I have this pattern in my pattern collection but I didn’t use it so far. So no extra costs were made.

Fitting the new pattern on the shirt

Once I decided to sew the Kastrup top I stuck to it. This top has a vintage vibe and also nice sleeves. And, Elisabete has a thing for particular sleeves.
It was quite a puzzle to get the top out of the shirt. This was also the hardest work of the restyling.

restyle men's shirt
Fitting in all the pieces and cut them single layer.

restyle men's shirt

It was not possible to get the back pieces out in one piece. So I made a yoke for the back and used the original closure of the front for the rest of the back.

restyle men's shirt

I unpicked a little of the sleeve placket to be able to cut the new sleeve pattern.

restyling
The largest use of the old shirt!
Making my own border print

woodblock stamp printing

After cutting the pattern I was not satisfied. I wanted to give this restyling a more personal touch. So I decided to make my own border print. Also prompted by the recent positive experience I had with a border print.
My husband, who is an editor of artists books, has these Indian woodblock stamps, that would be perfect. I bought some blue textile ink and together we gave it a go!

woodblock stamp printing
The Indian woodblock stamp.
woodblock stamp printing
First test on a rest of the shirt.

restyle men's shirt

It is easy to print your border after your pattern pieces are cut. Then pattern matching is not difficult.

woodblock stamp printing

I was able to give one sleeve a non-conventional placing of the print. Which I adore.

Kastrup top - How to do Fashion

restyle men's shirt

Later on, I needed the test pieces to cut out the arm facings.

The Kastrup Top

Kastrup Top - How to do Fashion

Here is the result: «insert drumroll» the Kastrup Top! I adore how it came out. There are several features that I am proud of:
– The back with the yoke and the original front button placket.
– The sleeve with the non-conventional placing of the border.
– The vintage fabric used for the lining of the sleeves.

Conclusion
Kastrup Top - How to do Fashion
This is how I look after a full day of sewing.

I am super satisfied with my first restyle project ever. Now I hope that Elisabete likes what I’ve done with her husband’s shirt. I want to thank Amy and Pilar for this great challenge. I enjoyed every minute of it. More restyling projects will definitely follow.

*** Update ***

When I was finishing this post, the message came through that Elisabete finally received my restyled top. She liked it and, moreover, the top fits! I am a happy woman now.

restyling Kastrup Top - How to do Fashion
©photos: Elisabete Carvallo


A little cheating for Project SewMyStyle: a pocket skirt

When I saw that the May entry for Project SewMyStyle was a gathered pocket skirt I decided not to buy the pattern from Callie Faye Collection but draft it myself. Why? Because since last September I am following pattern drafting lessons and the scope this year is skirts. I learned to draft a  pattern block for a straight skirt and use this pattern block as a base for all kind of skirt designs. Furthermore, my fabulous teacher stimulates me to draft a skirt pattern myself whenever I see a model that I like.  So I dared myself to do it!

Pocket Skirt

The pocket skirt pattern

Drafting a pattern for a gathered skirt turns out to be rather easy. First I measured the hem of the gathered skirt of a dress that I liked. In this case, my Sureau dress.  To gain the same width I  added 5 cm at the center front and the center back of my pattern blocks. I calculated the proportions of the pockets on the picture. Although they are big enough they tend to look smaller than the ones on the original design. Probably because I lengthened the skirt until the hem was on my knees. So I ended with three pattern pieces: the front, the back and a pocket.

pocket skirt


The sewing process

I used a soft printed cotton chambray from Dress Fabrics. I bought it last September. This fabric worked like a dream.
Because I didn’t buy the pattern I didn’t have instructions for sewing the skirt. So I studied the pictures on the website, relied on my know-how of skirt sewing and made my own instructions!


1. Pockets

Put on the pockets first as they are also slightly gathered. To accentuate the pockets I used the wrong side of the fabric as the right side.

Iron the seam allowances of the pockets and stitch the three seams at 1 cm.

Pin the pockets on the skirt and stitch 2mm from the sides.

Pocket Skirt
The pockets are gathered together with the skirt.


2. Gathers

Make the gathers by stitching two lines in the seam allowance. I use a different thread colour for the front and back to make it easy to pull at the thread.

Mark the center front with a pin and divide the gathers proportional between the two sides.

Stitch with a short stitch length between the two lines to fix the gathers.


3. Waistband

For the waistband I used preformatted interfacing for waistbands. I cut out the length of my waist and here I made an error. The original pattern asks for an elastic in the back waist. So you have to provide the same extra width for the back waist. This I forgot. So I also gathered the back. In hindsight, this made the further construction even easier.

Before sewing on the waistband close the left side seams of the skirt.

Pocket Skirt
View from a strange angle: the back gathers.

4. Blind zipper

Put in a blind zipper. After sewing in one side of the zipper, I close it. Then I make little notches on both sides of the tape at the waistband. This helps to pin the second side of the zipper at the right place.

Pocket Skirt
A perfectly matched waistband

4. Finish

Sew the side seam under the zipper. Finish the waistband and hem the skirt.

Pocket Skirt
Conclusion

I am happy with my pocket skirt. I wore it a lot already. Drafting the pattern myself gave me a lot of satisfaction. It means that I learned something in the pattern drafting lessons. Although I did not buy the pattern suggested by the Project SewMyStyle I sewed the skirt. More, I enjoyed the whole process. That is what SewMyStyle is all about, isn’t it?

Pocket Skirt