Monthly Archives: June 2017

Eye-catchers #14

An eye-catcher is a person or a thing that attracts the attention

The online sewing community is very visual. So, every day I see heaps of sewing related images on social media and blogs. Some of them catch my eye because they make me think or they give me inspiration. Here, I want to share these eye-catchers with you.

Follow below what caught my eye recently:

sewing related images

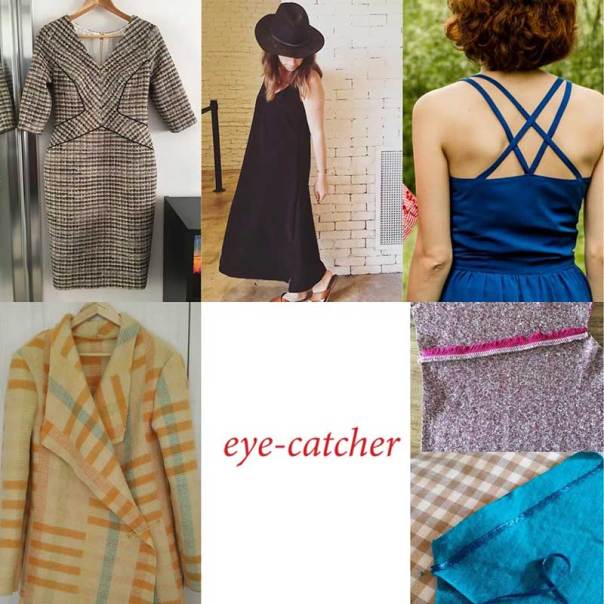
Michelle’s couture dress

couture dress

While the whole of Europe is suffering from a heat wave our friends in the Southern hemisphere are facing winter. Look at this fabulous winter couture dress Michelle sewed. I love everything about it: the gorgeous bouclé, the piping, the central panel on the bias. She sewed it using techniques from Susan Khalje.

Tiffany’s Ogden Cami dress

Ogden Cami Dress

More appropriate for high temperatures is this elegant Ogden Cami dress from Tiffany.  She lengthened the blouse pattern from True Bias and put vents on the side. That is a good idea. At the moment I am wearing my only maxi dress and I feel the comfort it gives for this warm weather. I have the Ogden Cami pattern already, so more maxi dresses will come.

The back straps on Wiebke’s dress

dress with back straps

Wiebke from naezimmerblog, drafted this dress herself. The placing of the straps is just so perfect and stunning. Very inspiring.

Two sewing tips

stabilizing seams

Two ways of using recycled material to stabilize shoulder seams. On the left is the tip from Meg: use strips from your woven selvedge. On the right is Suzy’s tip: use those annoying ribbons you find in RTW clothes. As I am hooked on recycling now I am sure going to use these tips.

Laura’s winter coat

upcycle winter coatThis coat immediately caught my eye. Laura from the Final Stitch did a fantastic job here. Not only did she use an old woolen blanket—speaking of upcycling!—she also used an old Burdastyle lingerie pattern for it. Hats off!

Did anything catch your eye lately?


How to restyle a men’s shirt in a women’s top

When Amy and Pilar announced the first annual restyling exchange I immediately jumped on board. Those who read my blog know that I am always in for a challenge!
What is this restyling challenge? You receive a garment from someone to restyle it. Meanwhile, you send a garment from yourself to someone else, also to restyle it. So I received a men’s shirt from Elisabete and sent an old dress to Linda. A simple and beautiful concept. To make it more easy to sew something a questionnaire with measurements, colour and style wishes was sent with the garment.

restyle men's shirt
From a men’s shirt to a women’s top.
Restyling: how do you start?

I have never restyled or refashioned an existing garment before. So I started with unpicking the main seams of the shirt. In the meantime, I thoroughly went through Elisabete’s IG-feed and read her blog. This gave me an insight into her style, but it was also a little intimidating because she is a very skilled seamstress and ‘refashionista’!
Looking through her pictures I got the idea of sewing the Kastrup top from ‘How To Do Fashion’. I have this pattern in my pattern collection but I didn’t use it so far. So no extra costs were made.

Fitting the new pattern on the shirt

Once I decided to sew the Kastrup top I stuck to it. This top has a vintage vibe and also nice sleeves. And, Elisabete has a thing for particular sleeves.
It was quite a puzzle to get the top out of the shirt. This was also the hardest work of the restyling.

restyle men's shirt
Fitting in all the pieces and cut them single layer.

restyle men's shirt

It was not possible to get the back pieces out in one piece. So I made a yoke for the back and used the original closure of the front for the rest of the back.

restyle men's shirt

I unpicked a little of the sleeve placket to be able to cut the new sleeve pattern.

restyling
The largest use of the old shirt!
Making my own border print

woodblock stamp printing

After cutting the pattern I was not satisfied. I wanted to give this restyling a more personal touch. So I decided to make my own border print. Also prompted by the recent positive experience I had with a border print.
My husband, who is an editor of artists books, has these Indian woodblock stamps, that would be perfect. I bought some blue textile ink and together we gave it a go!

woodblock stamp printing
The Indian woodblock stamp.
woodblock stamp printing
First test on a rest of the shirt.

restyle men's shirt

It is easy to print your border after your pattern pieces are cut. Then pattern matching is not difficult.

woodblock stamp printing

I was able to give one sleeve a non-conventional placing of the print. Which I adore.

Kastrup top - How to do Fashion

restyle men's shirt

Later on, I needed the test pieces to cut out the arm facings.

The Kastrup Top

Kastrup Top - How to do Fashion

Here is the result: «insert drumroll» the Kastrup Top! I adore how it came out. There are several features that I am proud of:
– The back with the yoke and the original front button placket.
– The sleeve with the non-conventional placing of the border.
– The vintage fabric used for the lining of the sleeves.

Conclusion
Kastrup Top - How to do Fashion
This is how I look after a full day of sewing.

I am super satisfied with my first restyle project ever. Now I hope that Elisabete likes what I’ve done with her husband’s shirt. I want to thank Amy and Pilar for this great challenge. I enjoyed every minute of it. More restyling projects will definitely follow.

*** Update ***

When I was finishing this post, the message came through that Elisabete finally received my restyled top. She liked it and, moreover, the top fits! I am a happy woman now.

restyling Kastrup Top - How to do Fashion
©photos: Elisabete Carvallo


Eye-catchers #13

An eye-catcher is a person or a thing that attracts the attention

The online sewing community is very visual. So, every day I see heaps of sewing related images on social media and blogs. Some of them catch my eye because they make me think or they give me inspiration. Here, I want to share these eye-catchers with you.

online sewing community

Follow below what caught my eye recently.

The Gertie dress made by ThatBlackChic
B6453
Those who read my blog know already that I have a weak spot for clothes made in African wax print. So this lovely version of B6453—designed by Gertie—sewed by Michelle for her daughter Mori, immediately got my attention.So far I only sewed two garments for me in African wax but I have some more fabric in my collection waiting. I bought the pattern already!
The skirt from _handmadekate_
African wax skirt
When you have a lot of African was print you have a lot of scraps. Tryntsje used them to make a pleated skirt. She stitched the pleats inside to keep them a little hidden. Such an inspiring idea.
The dress in Alexander Henry fabric
B6094
Not only clothes in African Wax get my attention but in fact any extraordinary design catches my eye. Look at this amazing Alexander Henry fabric. Sarah from the Wanderstitch used it to sew this stunning summer dress, designed by Gertie as well: the B6094.
The vintage 1930’s McCall’s dress
I don’t have any white garment but this elegant dress of Julie, @csewchicasewww gave me some ideas.
The little black dress from Amalie
Little Black Dress
Neither do I have a (little) black dress. Again was I intrigued by this graceful one made by Amalie. She designed the pattern herself.
Did anything catch your eye this week?

A little cheating for Project SewMyStyle: a pocket skirt

When I saw that the May entry for Project SewMyStyle was a gathered pocket skirt I decided not to buy the pattern from Callie Faye Collection but draft it myself. Why? Because since last September I am following pattern drafting lessons and the scope this year is skirts. I learned to draft a  pattern block for a straight skirt and use this pattern block as a base for all kind of skirt designs. Furthermore, my fabulous teacher stimulates me to draft a skirt pattern myself whenever I see a model that I like.  So I dared myself to do it!

Pocket Skirt

The pocket skirt pattern

Drafting a pattern for a gathered skirt turns out to be rather easy. First I measured the hem of the gathered skirt of a dress that I liked. In this case, my Sureau dress.  To gain the same width I  added 5 cm at the center front and the center back of my pattern blocks. I calculated the proportions of the pockets on the picture. Although they are big enough they tend to look smaller than the ones on the original design. Probably because I lengthened the skirt until the hem was on my knees. So I ended with three pattern pieces: the front, the back and a pocket.

pocket skirt


The sewing process

I used a soft printed cotton chambray from Dress Fabrics. I bought it last September. This fabric worked like a dream.
Because I didn’t buy the pattern I didn’t have instructions for sewing the skirt. So I studied the pictures on the website, relied on my know-how of skirt sewing and made my own instructions!


1. Pockets

Put on the pockets first as they are also slightly gathered. To accentuate the pockets I used the wrong side of the fabric as the right side.

Iron the seam allowances of the pockets and stitch the three seams at 1 cm.

Pin the pockets on the skirt and stitch 2mm from the sides.

Pocket Skirt
The pockets are gathered together with the skirt.


2. Gathers

Make the gathers by stitching two lines in the seam allowance. I use a different thread colour for the front and back to make it easy to pull at the thread.

Mark the center front with a pin and divide the gathers proportional between the two sides.

Stitch with a short stitch length between the two lines to fix the gathers.


3. Waistband

For the waistband I used preformatted interfacing for waistbands. I cut out the length of my waist and here I made an error. The original pattern asks for an elastic in the back waist. So you have to provide the same extra width for the back waist. This I forgot. So I also gathered the back. In hindsight, this made the further construction even easier.

Before sewing on the waistband close the left side seams of the skirt.

Pocket Skirt
View from a strange angle: the back gathers.

4. Blind zipper

Put in a blind zipper. After sewing in one side of the zipper, I close it. Then I make little notches on both sides of the tape at the waistband. This helps to pin the second side of the zipper at the right place.

Pocket Skirt
A perfectly matched waistband

4. Finish

Sew the side seam under the zipper. Finish the waistband and hem the skirt.

Pocket Skirt
Conclusion

I am happy with my pocket skirt. I wore it a lot already. Drafting the pattern myself gave me a lot of satisfaction. It means that I learned something in the pattern drafting lessons. Although I did not buy the pattern suggested by the Project SewMyStyle I sewed the skirt. More, I enjoyed the whole process. That is what SewMyStyle is all about, isn’t it?

Pocket Skirt


Eye-catchers #12

An eye-catcher is a person or a thing that attracts the attention

The online sewing community is very visual. So, every day I see heaps of sewing related images on social media and blogs. Some of them catch my eye because they make me think or they give me inspiration. Here, I want to share these eye-catchers with you.

eyecatcher

Follow below what caught my eye recently. Some of them are garments which other sewists wore during the Me-Made-May’17 challenge.

The Sophie Swimsuit from Andrea

Sophie Swimsuit

I was immediately taken by this stunning version of the Sophie Swimsuit made by Andrea from Fair Fit Studio. I simply love this golden colour. Summer is near and I need some swimming suits. This pattern could be the one.

Not a Primary Color’s Mitchell Dress

Mitchell Dress

I am always glad when sewists I follow alert me to pattern designers I didn’t know before. So did Siena when she showed this gorgeous Mitchell Dress from Paddleboat Studio on Instagram. She did some modifications on the pattern but most of all the way she used the different blocks of the fabric is breathtaking.

Yumi’s linnen blouse

Solid Blouse

One of my reflections of Me-Made-May’17 is that I need more solids and more tops. This kind of linen blouse would be perfect.  I think it is from a Japanese pattern book (?) because the comments on @jpn.winterberry’s IG were all in Japanese. In particular, I love the design of the collar.

Sewvanilla’s shorts

Border Shorts

Lately, I am into border fabric. Look at the dress I sewed for my daughter. More, I printed my own border fabric but I can’t show it yet because it is for my #restylingexchange2017 challenge. So, when I saw this shorts by Sewvanilla I was intrigued by the placement of the border. Very inspiring.

The maxi dress sewed by Mokosha_II

So far I only made one maxi dress. Then I saw this smashing maxi from @Mokosha_II and I immediately wanted to sew another one. Originally it was a Burda pattern but she changed almost everything about it. Also, isn’t that a gorgeous fabric she used. On top of that, this is a great picture too! I l love everything about it.

Did anything catch your eye this week?

MMMay 17 – It’s a wrap!

Me-Made-May’17 is finished! I am happy because I reached my goals: wearing a different me-made garment every day. More, I also pledged to wear at least 10 new me-made’s—sewed between June 2016 and May 2017. I succeeded.
I already wrote about the first half of my MMMay 17. Below, I’ll tell you about the second half and some further general observations.

Me Made May 17
31 May 2017, my husband repaired an old little bench and I am wearing me- made’s.
New garments

MMMay 17 overview

Two Rushcutters — In the Folds  //  Simplicity 1355 // Daphne Day Dress —Sew This Pattern


MMMay'17

DKNY Vogue 1349 // Toaster Sweater #2 — Sew House Seven // Nanöo Top and Brooklyn Skirt — Seamwork

Old garments

MMMay'17

New Look 6106 // Seafarer Top — Sew Much Ado and Versatile Wrap Skirt  — Make it perfect // Crepe Dress — Colette
Zippy Top — See Kate Sew and Skirt from Allemaal rokjes // Box Pleat Skirt from Allemaal rokjes // Rachel Wrap Dress — Maria Denmark

Some observations about the second half of MMMay

There are only little changes in my observations in comparison to the first half of MMMay.

  • Still a LOT of prints! I definitely have to sew some solids.
  • A variety of colours.
  • No repeats, at all.
  • An eclectic style.
  • We had some ‘tropical’ weather so I was happy to wear my Summer clothes.
  • Two old rtw-tops. The others I made myself.
  • Taking a picture of yourself every day is quite confronting.
  • I enjoy the challenge to search my wardrobe every day to look for a new me-made!
Conclusion

I enjoyed MMMay’17. I am thrilled that I am able to wear unique me-made clothes 31 days in a row. On top of that, I’m really pleased that half of them are recent makes. Though I must confess that I didn’t wear some of the old makes since last May, I was happy with the excuse to wear them again.

This challenge also makes me reflect on my wardrobe. There are some gaps:
*  tops
*  trousers – I only wore some comfy pants last month
*  garments in solid colours
*  an in-between seasons coat or jacket
*  bra’s

MMMay'17
My Me-Made-May’s from 2017

It was also fun and inspiring to see all the beautiful makes from other sewists on Instagram and on the blogs. Again I met some new amazing and creative people.

I am already looking forward to MMMay 2018!

MMMay 2016
My Me-Made-May’s from 2016.