What I sewed in 2020 — Top 5 || the hits!

What!? 2020 is over! I still can’t believe it. It feels like yesterday that our government on 13 March’20 announced the first lock-down. I then thought it would only take a week or four. Oh Boy, was I wrong. As we speak, we are still in lock-down and probably will be for a significant time!
I guess we will forever remember 2020 as a strange year so my sewing overview will probably also be unusual.

The one steady thing is the infographic that I now use for five years to collect my sewing data.

sewing overview 2020
Look here for my 201620172018, and 2019 infographics.

What do these numbers say?

Well, you can’t miss it: I most of all sewed facemasks in 2020! For myself, my family and some good friends. I used the free, approved by the Belgium government, pattern from Maakjemondmasker. I used only fabric leftovers or recycled some old clothes.
Originally the mask closes with four ribbons but after wearing it most of us are more comfortable with the elastic closures around the ears. So I modified nearly all of them

sewing overview 2020 - Facemasks
Some facemasks!

#16 sewing projects

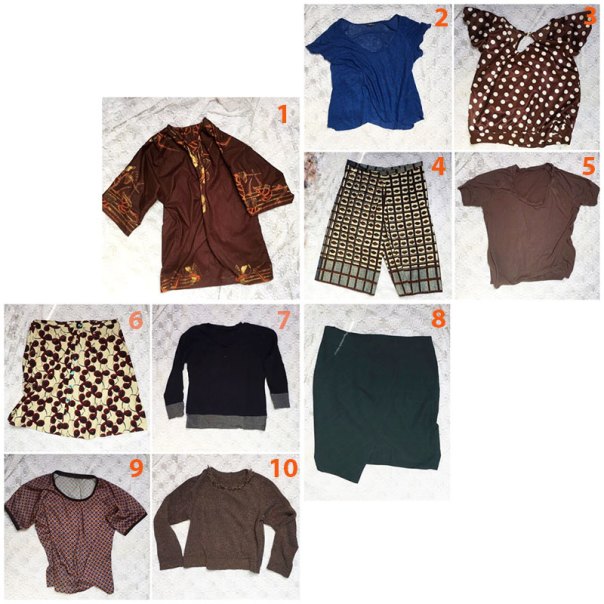
When I look at my other sewing projects they are not much different than last year. I sew mostly for women, using a pdf-pattern from an Indie Pattern Designer.
There are two shifts though:
1) I used more free patterns (gifted, available on the net, or self-drafted).
2) I sewed nearly all of the time with fabrics from my stash!

The three utilities are:

  • an e-reader sleeve
  • a giant pouf, filled with thons of scraps and leftovers
  • a Maxi-Cosi cover for our newborn second grandson
sewing overview 2020
E-reader sleeve in boiled wool, pouf made and filled with leftovers, Maxi-Cosi cover made from leftovers of a sweater.

Sewjo? What Sewjo?

When I first heard about a possible lockdown in our country I thought that it would give me some more sewing-time. But I was wrong. The longer we were in lockdown the more my sewjo shrunk. I think it was because I had to take a 180 degrees turn for my teaching job. In no time I had to reform all my courses in online courses and this took all my energy.
Although I didn’t sew much during the first lockdown I did a deep tidy-up of my sewing room and a thorough organisation of my fabrics and patterns. This still gives me a very satisfying feeling whenever I enter my sewing room nowadays.

During summer my sewjo came back and I really enjoyed sewing again. It was a productive summer. The last quarter of the year it was in a downward spiral again: more stringent measures, the second lockdown, a heavy workload, etc… so not much sewing was done, alas!

But as we speak, I feel that this new year will give me tons and tons of sewjo!

sewing room
A part of the reorganised sewing room.

Sewing overview 2020 || Top 5

Like the previous years, I’m joining the sewcialists series of the #SewingTop5 of 2020. I find this a nice format to reflect on the last sewing year and get some goals for the next year. It starts with the “Sewing Hits”

sewing overview 2020

My Top 5 Hits

A sewing hit for me is a project that gives me joy! And this joy can be caused by a lot of things: from the pleasure of wearing it, to the challenge of sewing, the first time tackling a particular technique or a new type of fabric, or the gratitude you receive from the person you sewed for…

Here is my top 5 of what I sewed in 2020.

#1 The Blanca Flight Suit from Closet Core Patterns

Blanca Flight Suit

How I love this flight suit! In February, I got the pattern for free from Closet Core Patterns to test it. Unfortunately, I could not finish it in time. I got the flu (not COVID 19) and then everything went down as I told already. But I’m so glad I finished it at the begin of July. I used this amazing vintage cotton with a denim feeling from 1974.

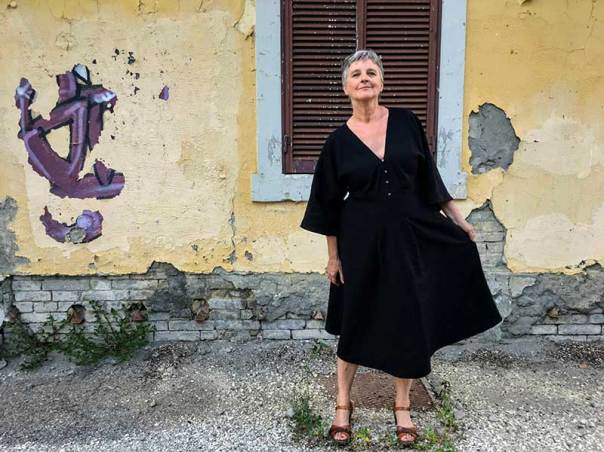
#2 The V9253-dress with the deep V

V9253

In August 20019 I went to the Sewing Weekender in Cambridge. That was so much fun and I was determined to go again in 2020. Then came the pandemic! Luckily the ladies of the Foldline and Charlotte had the most brilliant idea to organise a Sewing Weekender Online. So, at 13-14 June, I retreated in my sewing room and made this famous dress in this fabulous African Wax.

#3 The Sirocco Jumpsuit for my daughter

Deer & Doe Sirocco jumpsuit
It fits like a glove!

Oh boy, this was a labour of love 😍. It took me nearly 1,5 years from start to finish. My daughter’s measurements are not included in the available pattern measurements so I had a lot of adjustments and tweaking to do. Then when she tried it on she was not able to get the bodice over her shoulders. I fixed it by sewing in two blind zippers of 60 cm in the side seams! Can you see she is very happy with it?
I’m planning to blog about this project (and my other projects of 2020) soon.

#4 The black linen Fremantle pants for my husband

fremantle pants elbe textiles

My husband loves wide legs pants with a loose-fitting. Especially in linen. And black, always black! He was asking to sew him a pair for several years now and I finally did last summer. I used the Fremantle pants from Elbe Textiles and made several adjustments as he requested:
* scoop pockets
* wide legs
He loves them and he already wore them a zillion times. Now he’s asking for a woollen version for winter!!!

#5 The Closet Core Patterns Pouf

pouf sewing overview 2020
Sewing is my superpower!

This free pouf pattern from Closet Core Patterns is grandiose. It’s announced as the ultimate scrap busting project and I can only confirm this. It ate all my fabric scraps from the last six years and a lot of threadbare clothes. It’s a giant also because I increased the side panel to 40 cm. No new fabric was used. I even made my own piping with used curtain strings!⁣ I’m very happy with my pouf!⁣ And a huge thanks to my hubby who cut all the scraps!

So this was my, a bit unusual?, sewing overview of 2020. But I have a strong feeling 2021 is going to be a good year! I will come back to check this a year from now!

I wish you all a very inspiring sew year!

Sewing Top 5 of 2019: misses & highlights & reflections & goals

Okay! I started to write this post on the 22nd of January and then there was life! So, now that we are in this strange pandemic atmosphere I thought this is an excellent time to finish my ‘Sewing Top 5 of 2019

sewing

As it’s mid-July 2020 now I’m going to make one blogpost of part #2 and #3 of the #SewingTop5 series from ‘The Sewcialists‘. So here are the 2019 misses, highlights, reflections, and goals.

Sewing M i s s e s

“Misses” is a very elastic concept! It could be some projects that totally went wrong, or that you didn’t wear. It’s also possible that you have sewed your garment ok but that when you wear it doesn’t feel like you. Or maybe you destroyed it by accident!

fives on it
fives on it – poem by a friend (alligatorzine).

Looking at my sewing of last year here are some of my misses in random order.

#1 The Mary Quant dress in Mahlia Kent fabric

I started sewing the Mary Quant dress, a free pattern from the V&A museum which was designed by Alice & C° patterns, with the brand new Mahlia Kent fabric I bought in Paris in February ’19. (Look below in the highlights.)
Man, was this fabric hard to work with. Due to the woven geometric print, it frayed like hell. So it was hard labour to cut and sew it. But in the end, I managed and I even got as far as the construction of the collar and the neckline. Unfortunately, I cut out the undercollar and the neckline facing from the main fabric. I should have used lining fabric that would have made the construction doable. Now it just was bulky!
I hope to find the courage to unpick it and finish it in a neat way. A perfect project for next fall.

sewing
The “frayed” inside of the Mary Quant dress.
Mahlia Kent fabric
The beautiful Mahlia Kent fabric. Prewashed!!
sewing
Print Matching Pocket!

#2 The shrinking of the Zadie Jumpsuit.

Although “The joy of prewashing your fabric” was one of my reflections of 2018 I did not always act on it. So you can imagine the horror when I got my Zadie Jumpsuit out of the washing machine and even immediately felt that it had shrunk! I CRIED.
After this debacle, I prewashed EVERY, EVERY piece of fabric I used for sewing.

Zadie Jumpsuit.
I guess I cannot raise my arms anymore now!

#3 The tearing of my first culottes

I was so happy with my first complete self-drafted culottes pattern. I was even happier that I could sew it out of a piece of fabric I bought at the small fabric stall on a local Tuscan market. It was only 3 €! In retrospect, this should have warned me because when I wore the culottes for the first time on a dinner date the fabric just ripped at unexpected places. The tears are beyond repairable because the fabric is in fact exhausted! Luckily I made already a new pair of culottes this time out of brand new fabric.

sewing
Exhausted fabric!
Culottes
Second pair of culottes in brand new fabric.

#4 Being a scatterbrained sewist!

I guess this title needs no further comments. The main reason for not finishing my ongoing sewing projects is that I’m always so inspired by all the fabulous projects and challenges I see every day within the sewing community. So, I easily abandon the project I’m working on and start a new one. I love starting a new project so that’s how I create a lot of WIPs and UFOs.

sewing
A scatterbrained sewist!

H i g h l i g h t s

Life isn’t only about sewing! Or is it? So here are my non-sewing highlights of 2019. No surprise that these highlights are not so different from those of 2018 and 2017.

#1 Our grandson M.

From January ’19, when his mother went back to work after her maternity leaf, our grandson M. stays with us every Wednesday. Needless to say that this day is the highlight of our week.

grandson
The cutest!

#2 Podere Santa Pia

Also in 2019 was staying at our holiday home in the South of Tuscany the best thing of our life. And being there with our family and friends makes it even better.
It is a tradition to take a goodbye picture every time we leave. We call it the #ciaosantapia photo session.

ciaosantapia

#3 Spending time with family & friends

The special highlight for our family in 2019 was the diamond wedding anniversary of my parents. Even more special was that we could celebrate it on the farmhouse where my father was born and where they lived until my father moved to an elderly home.

Greatgrandparents
My parents with our grandson M.

A special family gathering was the celebration of four generations within my husband’s family.

Four generations
Four generations on the red couch.

Always a highlight for me is when we have a Sunday pizza night with our out-of-the-house living children. These are great nights with a lot of laughter and love.

pizza night
Pizzanight!

Days spent with friends are also happy days. Even more when we visit together museums or art shows (which is my highlight #4)

#4 Visiting museums

I said it before I can be totally flabbergasted by seeing a good art show. This year I had the pleasure to see again a good show at my favourite Musem De Pont in Tilburg (Ann Veronica Janssens & Richard Long).

Ann Veronica Janssens
Standing in awe for the work of Ann Veronica Janssens.

We also saw a very interesting show of René Heyvaert at the Museum M in Leuven.

René Heyvaert
Work of René Heyvaert.

#5 City trip to Paris

Paris is only a two and a half-hour drive away from our house. So once and a while we go there for a day. We went the 16th of February ’19 which was an exceptional sunny day. Paris is always fun but being able to buy some fabric at the Mahlia Kent store (see misses #1) made it even more enjoyable.

Paris
Stravinsky Fountain of Niki de Saint Phalle

Sewing R e f l e c t i o n s

When I reflect on my sewing in 2019 two happy facts pop up and they are both related to the sewing community. I attended The Sewing Weekender in Cambridge and I started going to a sewing class.

#1 The Sewing Weekender in Camebridge, UK

Sewing Weekender
Where is Wis?
Photo from the Foldline

I was over the moon when I scored tickets for The Sewing Weekender, 31st August – 1st September ’19 in Cambridge, UK. The Sewing Weekender is an informal meet-up of sewists organised by The Foldline and English Girl at Home. It’s two days of unlimited sewing, whilst chatting with sewists, and listening to very passionate speakers from the sewing community.

sewing
I started and nearly finished my green perth dress at The Sewing Weekender.

What I liked the most was finally meeting all these fabulous sewists I know from the online sewing community IRL.
Attending the Sewing Weekender was so inspiring and gave me a lot of energy. I hope to go to many, many Sewing Weekenders in the future.

#2 Sewing Class

More than three years ago I started following patternmaking classes. Although I learned a lot, these classes were more on a theoretical level. In September’19 I enrolled in two other classes which were more practical orientated: Making Pattern Trousers for yourself & Sew Your Selfmade Patterns. These are great classes which I enjoy deeply. And I already have good results: my culottes and a basic trousers pattern.

sewing

Sewing G o a l s

Sewing goals for 2020!

Just like last year I’m going to be very brief here. As I did not reach my goals for 2019 I’m going to repeat them for 2020.

  1. Finish all the UFOs and WIPs
  2. Don’t create new WIPs!
  3. Keep on sewing whenever you feel it!
sewing
The last picture of 2019, taken on 31st December – sewing at my happy place, Podere Santa Pia.

My Me-Made-May 2020 |It’s a wrap

It’s the 1st of June today so that is the end of My Me-Made-May 2020. It felt a bit weird this morning that I could freely choose something from my closet to wear. Unlike the last 30 days when I had to choose something from the wardrobe capsules I composed for this Me-Made-May 2020.

My Me-made-may 2020

So this weird month—I call it the one-and-a-half meter month— is over. That means I finished my third wardrobe capsule of this year. Read below how it went!

My third capsule: ‘Everything goes!’

Oops! I did it again! I managed to dress 10 days with 10 different outfits using 10 garments from the ‘Everything goes!’ capsule.

wardrobe capsule
A 100% me-made ‘Everything goes!’ capsule

I documented my outfit every day with a photo on Instagram. Below you see them with Day 1 in the right bottom corner.

My Me-made-may
10 ‘Everything goes!’ outfits

How did I feel about the ‘Everything goes!” capsule?

I enjoyed this capsule! I had no problem finding pairings and I felt good with every outfit. The fact that it was 100% me-made capsule brought me even more joy!
Also, because there were two one-pieces in this capsule the outfit choices didn’t become tedious like with the previous capsule.

New combinations?

Except for the days that I only wore my dress or my jumpsuit, all the other outfits were new combinations. How am I so sure about that? In hindsight, I think it’s because I mostly paired an older garment with a newer sewed garment.

Top sewed in 2016 paired with the mashup skirt from 2019.

My Me-Made-May 2020 Wrap

Just like last year, I loved my approach to Me-Made-May. As I wear me-made clothes for 99% of the time I need a bit of a challenge for this month. So creating 3 wardrobe capsules with my me-made clothes turns it into the right challenge for me.

I’m satisfied with how it went. And I’m even excited about the bonuses the challenge brought.
* The discovery of new, and for me good, pairings. 26 days of 30 I wore a never worn before combination and I loved it.
* A renewed love for garments I lost interest in. I think especially of the woolen cache-coeur and the Kabuki Tees.

New Love!

I also learned a bit more about putting together a capsule. It is important to differentiate the type of garments. Like in the second capsule I didn’t include a one-piece (a dress or a jumpsuit) and that makes the possible combinations less exciting.

The it garment: the Venus robe

When I was selecting the pieces for the third capsule I needed a layering top. I have some self-made cardigans but they are too warm to wear them in May. That’s when my eye caught the Venus robe again. It had already been in both previous capsules and I thought it would be fun to make it a part of every capsule.

My Me-made-may
Venus Robe x6


Conclusion

Although we are living in these weird corona times now I loved Me-Made-May 2020. Creating three new wardrobe capsules and trying out all these new outfits made me happy. So happy that I’m now absolutely convinced I will do it again next year.
Come and see me in Me-Made-May 2021!

My Me-made-may
Me-Made-May 2020 Best Nine


My Me-Made-May 2020 | Second wardrobe capsule round-up

2/3rd of May is finished! This means 2/3 of my wardrobe capsules for My Me-Made-May 2020 are done. Just like last year, I created three wardrobe capsules for me-made-may.
Below you can read how it went with my second wardrobe capsule and how my third capsule looks.

My Me-Made-May 2020

My second capsule “Blue & Brown”: it worked!

Yes! I managed to dress 10 days with 10 different outfits using 10 garments. In fact, it wasn’t difficult at all because I had plenty of combination choices. More about this later.

Blue & Brown capsule wardrobe
Blue & Brown

I documented nine outfits with a post on Instagram. Click on the links of the days. Below you see my overview starting with day 1 in the right bottom corner.

My Me-Made-May 2020

How did I feel about the “Blue & Brown” capsule?

Well, I have some mixed feelings about this capsule. First, I am enthusiastic about the mix of the two colours. Like I said when I composed this capsule I don’t naturally gravitate to blue but I was surprised how good the blue garments were combinable with the brownish. Also, the “dress like a crayon” blue outfit pleased me a lot!

Dress like a crayon
Dress like a crayon 💙

Secondly however, I am not so thrilled about the capsule an-sich. More specific about the type of garments I selected. Although there are no strict rules on how you compose your capsule I experienced now that selecting only tops and bottoms makes it less exciting.
The putting together of my capsule is always a quick job. I select some candidates of garments around a theme and make up some possible combinations in my head. Then, when I reach 10 I go for it.
Being in the daily flow of this Blue & Brown capsule with 3 skirts and 7 tops it became a little dull. Because it was not really a challenge to make new looks and I felt like I had to repeat ( 5x the faux wrap skirt!) some items a lot! A good lesson for my next capsule: select at least 1 one-piece (dress or jumpsuit).

New combinations?

All these outfits are new combinations! I’ve never worn them before. How am I so certain about that? Because most of these garments have some kind “I am a poor lonesome cowboy”-status in my wardrobe. I did wear them in the past but always in other fixed combinations. So, bringing together “two lonesome cowboys” is absolutely the win of this Blue & Brown capsule.
My favourite is wearing the Venus Robe as a top!

Venus Robe Sew That Pattern

My third capsule: Everything goes!

For the third capsule of My Me-Made-May 2020, I made up two rules.
1. It has to be 100% me-made.
2. As I have my lesson learned, it has to contain at least 1 dress or jumpsuit.

My Me-Made-May 2020

For the top layer, I selected the Venus Robe (n° 2). I thought that was fun that this garment was part of every capsule for this year’s me-made-may.

Bonus

Again, I give myself permission to change any of these garments with a freshly new made one within the next 10 days! Unfortunately, I didn’t manage sewing something new during the last capsule but maybe now…

Sloppy Josephine Tee Papercut Patterns

On the first day of my ‘Everything goes’ capsule, I wear my fresh-off-the-machine Sloppy Josephine Tee with one of my oldest A-line skirts.

How is your Me-Made-May 2020 going?

My Me-Made-May 2020 | First wardrobe capsule round-up

In these weird corona times, it seems like time crawls and sprints at the same time. It feels like Me-Made-May 2020 only started and yet, I’ve already finished my first wardrobe capsule for this year! This means I’ve worn 10 different outfits created out of the 10 items I chose to fill my ‘A little orange 🍑’ capsule.
Below, below you can read how it went and how my second wardrobe capsule for Me-Made-May 2020 will look.

Me-Made-May Wardrobe Capsule
A glimpse of my second wardrobe capsule for Me-Made-May 2020

Did I succeed in my ‘A little orange 🍑’ capsule?

I did! I managed to dress 10 days with 10 different outfits using 10 garments.

Me-Made-May Wardrobe Capsule

I documented my outfit every day with a photo on Instagram. Below you see them with Day 1 in the right bottom corner.

Me-Made-May Wardrobe Capsule
Nine ‘A little orange 🍑’ outfits

How did I feel about it?

It took me some time to get used to this capsule. Why? I see two reasons:
1) This is the 4th capsule I created so I had to dig deep into my closet to find 10 pieces that I could coordinate around a ‘not-used-before’ theme. Although I did a quick check when I selected the garments I didn’t feel very confident I could make it work for 10 days.
2) The month started with some cooler days (the weather in Belgium is fickle). So, on these days I had to wear several layers to keep myself warm. This meant wearing the soft pinkish-orangish cache-coeur with which I have a love-hate relationship. But due to the many compliments I received, it grew on me and I even selected it 3 times.

After a few days, I got really enthusiastic about this capsule and in my head, I was preparing a lot of combinations to wear. A thing that helps is that you put your selected garments on a separate clothing rail so that, in the morning, you see all your options in a blink of the eye.

The selected items for the ‘A little orange 🍑’ wardrobe capsule

New combinations?

Except for the 2 days I wore my one-pieces (dress or jumpsuit), all the other combinations were new for me. Really, I never wore them together before. So this whole wardrobe capsule exercise sets indeed a new eye on your wardrobe. Mission accomplished!

Me-Made-May Wardrobe Capsule
A new favourite combination: cachecoeur and pleather Hollyburn skirt.

My second capsule: Blue & Brown

For my second capsule of this year’s Me-Made-May, I selected 10 items within the ‘Blue & Brown’ theme. Brown is a colour I prefer but blue not so much so I’m a bit excited about the outcome.
As I am the ‘master’ of my wardrobe capsule, in other words, I make the rules 😉 I selected the Venus kimono (n° 1) again. This time for its brown colour.

This capsule is 90% me-made. The short-sleeve blue top (n° 2) is the only rtw garment. But I hope to replace it with a new-made one!

Blue & Brown
Joker!

I’m allowed to replace one of the selected garments with a newly made garment during this period. I may have some sewing-time in the next ten days!

On the first day of the Blue & Brown capsule, I wore my Seamwork Astoria Top with the blue faux wrap skirt from Knipmode.

My Me-Made-May 2020

Even in corona times, a new month starts. So it’s the beginning of May and that means that the sewing community is celebrating one of it’s finest challenges: Me-Made-May. It’s the 11th edition this year and I’m happy that Zoe, the founder and hostess, decided to go through with it even if the world is upside-down at the moment. You can read what she means by a “Gentle-Me-Made-May” on her blog!

Me-Made-May 2020

My Me-Made-May history

This is my fifth Me-Made-May (hurray!). Why do I love participating?
* I enjoy wearing and sharing my makes!
* I love seeing what all of you in this sewing community has been making.

Back in 2016, when I didn’t have this blog yet, I documented my MMMay16 only on IG. But from 2017 onwards you can read all about my MMMay17, MMMay18, and MMMay19 on this blog.

As I already wear at least one me-made garment every day I decided to level up my pledge last year. So, I created three wardrobe capsules to wear during May 2019. And I could only select garments out of these capsules. I loved this so much last year so I decided to give it another shot this year.

My Me-Made-May 2020 pledge

I, Wis from www.whatisew.be and @wis_g, sign up as a participant of Me-Made-May 2020. I endeavour to wear at least one me-made garment each day for the duration of May 2020.
I do not pick random garments each morning but I select garments out of wardrobe capsules I create especially for this May 2020.

Me-Made-May 2020

What is a wardrobe capsule?

The Me-Made-May wardrobe capsule I use is based on the 10 x 10 style challenge from Lee Vosburgh from StyleBee. “The concept is essentially a mini capsule closet of 10 items that you work with for 10 days, creating new looks and styling your clothes in ways you might not otherwise try.

The rules are simple:

  1. 10 pieces
  2. 10 outfits
  3. 10 days

Create 10 outfits with the 10 pieces you selected to wear the next 10 days. Just what I need to take my Me-Made-May 2020 challenge to the next level. I’m going to create three consecutive capsules with outfits to wear between 2-11 May, 12-21 May, and 22-31 May. More, these capsules will be different than those from last year. Will I succeed?

My first capsule: A little orange 🍑

Me-Made-May 2020
A “little” orange 🍑

I browsed through my closet and came out with 10 garments that could fill my ‘A little orange’ capsule. As I am the master of these capsules I can interpret ‘orange’ however I want!
For the next 10 days, there aren’t that many parameters I had to think about as I am working from home. Only the weather is a little unpredictable so some warmer layers should be selected.
This capsule is 80% me-made. There are two (very old) rtw tops. This no surprise for me because (solid) tops are the big gap in my self-made wardrobe.

On the first day of my ‘A little Orange’ capsule, I wear my Moneta dress and the two rtw tops to keep warm on this chilly day.

Me-Made-May 2020

And, how are you living your Me-Made-May 2020?

What I sewed in 2019 — Top 5: the hits!

Welcome to 2020, a new sewing year. I love the start of a new year because it gives me the possibility to look back on my sewing exploits of the year that’s gone by. Like the previous years, I collected all my data in an infographic and here below you see the result of “What I Sewed in 2019“.

Sewed in 2019

Here you find my 2016, 2017, and 2018 infographics.

What do these numbers say?

I sew mostly for women (this year for myself!), using a pdf pattern from an Indie Pattern Designer. This is my conclusion for the fourth time in a row. So, no drastic changes there although I would like to add some nuances.

# 31 sewing projects

This is a significantly smaller number than last year (54 projects)! Although I know I shouldn’t be, I’m disappointed with this number. Why? Because I have this silly idea in my head that I want to sew something new every week. Stupid idea, I know!
The reason why I sewed fewer projects last year is that life was a bit rough. I had a lot of worry about my father whose Alzeihemer’s aggravated rapidly and he had to be admitted into a nursing home. It took me a long time to process this. Time in which I didn’t sew. It got better to the end of the year and now my sewing-mojo is back.

Stitch in the ditch with a walking foot

What’s different?

In 2019 the balance between fabric from my stash and new fabric was fifty fifty. This is a little more than in 2018. I still bought new fabric though but mostly to use immediately and not to hoard.

I still use quasi only pdf-patterns but now 75% of them are free. Some of them were gifted to test, some I found on the web, and some were self-drafted! And I guess there will be more of these in 2020.

As a direct result of me sewing less, I posted less on Instagram and I blogged less! Last year I only wrote 14 blogposts! That means I didn’t write something about every finished project and I didn’t even celebrate my third blogiversary! It makes me a little sad because I love blogging. So it is my intention to blog more in 2020.

There has been some action in my sewing room!

What I sewed in 2019: Top 5!

As a sewcialist, I am joining the sewcialists series of the #SewingTop5 of 2019. I find this a nice format to reflect on the last sewing year and get some goals for the next year. It starts with the “Sewing Hits”

sewed in 2019

My Top 5 Hits

A sewing hit for me is a project that gives me the most joy! And this joy can be caused by a lot of things: from the pleasure of wearing it, to the challenge of sewing, the first time tackling a particular technique or a new type of fabric, or the gratitude you receive from the person you sewed for…

Here is my top 5 of what I sewed in 2019 in order of when I finished the projects.

#1 The copper pleather Hollyburn skirt

sewed in 2019

It was the first time I sewed with pleather and although it was a little laborious at the beginning I am thrilled with the result. The pleather feels nice and I love wearing it. I was even surprised that I could wear it in every season. So joy all year round.

#2 The Madrid dress from Coffee & Thread

sewed in 2019

I received the pattern of the Madrid dress from Coffee & Thread to write a post for a blog tour. There were several firsts here: it was my first dress with tiers, it was my first time participating in a blog tour, and I was able to reuse the fabric of a failed project within a year!
Unlike what you would think, it is pleasant to wear a maxi dress on a hot day. So I wore it all the time last summer and I enjoyed it a lot!

#3 The V9253 with the deep V!

sewed in 2019

I wanted to sew this dress for a long time and I’m super happy that I realised it this summer. The black linen was in my stash for several years and it was the perfect fabric for this model. I’m glad I choose black for this dress because it makes it stylish and classy. Perfect for wearing it at my parent’s 60th-anniversary party.

#4 The Zéphyr dress with flutter sleeves

sewed in 2019

Last year I sewed a Zéphyr Dress for my daughter and it was a perfect fit. So she wanted a second one but this time with sleeves. As this is a pattern for a sleeveless dress I had to draft them myself. I used the knowledge of my patternmaking and the flutter sleeves were born! They came out perfectly and my daughter is delighted.

#5 The self-drafted culottes

sewed in 2019

Drafting your own patterns based on your measurements is pure joy. So far I made only one pattern for these culottes but I’m convinced more will follow in 2020.

Next up in the #SewingTop5 are Misses & Highlights, and Reflections & Goals

My first self-drafted pattern: my culottes

26 December 2019 will forever be ingrained in my sewing brain because that’s the day I finished sewing my first ever self-drafted pattern! My first pair of culottes.

culottes

They are the first result of following three years of patternmaking lessons. Yeah, Yeah!, I hear you thinking: “Does it take three years of patternmaking lessons to come up with your first pattern?”. It did for me!
At our sewing school, we follow the Rundschau method of M. Müller & Sohn. It’s a patternmaking method that works with body measurements and calculated measurements. The previous years I learned all the theory about patternmaking. I drew a lot of patterns of skirts, dresses, blouses, coats, types of collars, and sleeves. But all these drawings were at a scale of 1:2. Now, this year is different because of the topic of the class is Making Pattern Trousers for yourself. And we started with culottes!

Culottes

Culottes? Skirt trousers? Pantskirt? Palazzo Pants?

In Dutch, my native language, the first assignment for my trousers patternmaking class was to make a pattern for a “rokbroek”. Literally it means ‘skirt trousers’. Which is, in fact, a correct English term for this kind of garment, although less commonly used. When you do a search on Google, Pinterest, Instagram, etc. your result is a lot higher for culottes. And when I found the definition for culottes on the Collins dictionary: “Culottes: women’s flared trousers cut to look like a skirt ” I went for culottes as the name of my pattern.

culottes

How the Culottes pattern was born

The base of a culottes pattern is a skirt pattern. First, you make a straight skirt pattern based on your measurements and sew it in calico fabric. After a thorough fitting, you transfer all the needed modifications on your skirt pattern. Now you have a skirt block or sloper: a custom-fitted, basic pattern for a straight skirt. This master pattern is the starting point for the making of the culottes pattern. Here you see the difference between culottes and trousers. A culottes pattern comes from a skirt pattern.

Calico
The fitting of the skirt in calico fabric.

From skirt to culottes

Start with tracing your skirt block on pattern paper with all the necessary lines. Depending on your body type and taste you reduce 1,5cm at the centre back and front at the waistline. This is helpful to make one dart of the two darts both in the front and back.
As I mentioned hereabove the Rundschau method uses body measurements and calculated measurements. To determine the crotch level you use 1/4 of your hip-width + 2 cm. To determine the position of the inseam for the front you take 1/8 of your hip-with and for the back 1/8 hip-with + 2,5 cm. Now you can draw the curved lines of the centre front and centre back.
Again you sew it in calico fabric and after a thorough fit, you can transfer the necessary modifications on your pattern. Tadaa! Here is your culottes sloper.

My Culottes pattern

Now that I had my sloper I needed to use it as a starting point for the design model I wanted. The assignment was to let you get inspired by a model of a rtw culottes. And now all the knowledge I gathered the previous years came in handy.

culottes

To create the width in the legs I closed the darts. Then I cut off a waistband of 5,5 cm. After drawing a slant pocket on the front I inserted a pleat of 28 cm. This makes a leg width of 168 cm.

culottes

My culottes pattern has 6 pattern pieces. A front and back leg, a front and back curved waistband, a pocket, and a pocket lining. As I drew the pattern pieces directly on the pattern paper I did not have to glue countless pdf-tiles! One of the perks of making a pattern yourself. A minor disadvantage is that generally, you don’t draw the seam allowance on your pattern, so you have to keep that in mind when cutting your fabric. The upside is that this allows you to vary your seam allowance whenever you cut your pattern.

culottes

The Culottes Fabric

I bought this piece of dark brown shiny fabric at my favourite fabric stall at Castel del Piano. If you are a regular reader of my blog then you will know that I found already some real treasures there.

Castel Del Piano Fabric Stall
Here you see that I already have my brown fabric selected and a kind Italian lady is checking the red viscose I have also on my arm!

At this fabric stall, you can only buy remnant pieces of unidentified fabric. So I don’t know what kind of fabric this dark brown shiny fabric is. It’s a middleweight fabric that has some structure, due to woven stripes. The colour changes a lot with the light. It goes from gold to dark chocolate. But it only cost 5€ and the piece was big enough for my pattern. And it sewed like a dream. So it was a perfect piece to make my test culottes which came out very wearable

culottes
View from over my shoulder. The slant pocket and the pleat.

The sewing process

As I drafted the pattern myself there were no sewing instructions available! Sewing culottes is the same as sewing trousers, which is not that complicated. I sewed already some trousers and jumpsuits so I have enough confidence to follow my own order of construction.

  1. Mark the pleat fold lines at the waist and the hem. I used tailer’s tacks and I also marked the front waistline. I might get a little overboard here but hey I had to show it to my sewing teacher!
  2. Stitch a small non-elastic ribbon in the seamline of the pocket line of the front leg. Make the ribbon 4mm shorter than the pocket opening this prevent stretching it.
  3. Sew the pockets. After sewing the pocket lining understitch the seam to prevent them from peeping up.
  4. Fold and press the pleats. Affix the pleats in the seam allowance of the front.
  5. Stitch both seams of the legs.
  6. Turn one leg to the right side and slide this leg in the other leg right sides together. Now you can stitch the crotch seam.
  7. Sew on the (interfaced) waistband.
  8. Put in the blind zipper.
  9. Finish the inside of the waistband with the waistband lining.
  10. Hem the trouser legs!
    Et voilà, les nouvelles culottes sont arrivées!
culottes

Conclusion

There is only one conclusion. I’m SEW proud with myself that I was able to see a garment somewhere and could recreate that for me from scratch!
Will I sew more of these culottes? Of course, I will. In fact, I’m working on one now with the fabric I bought especially for this pattern.

And you? Do you have experience with patternmaking?

culottes

The Green Perth Dress

Sometimes you see a pattern, you buy it and you sew it up in a blink of an eye. Well, this did not happen with the Perth dress. It only took me 7 months from buying the pattern to finish it.
I can’t remember when I saw the Perth dress for the first time but I remember that I was immediately intrigued by the design of it. Especially by the front closure. A search through my pattern files learnt me that I bought the pattern last March. I intended to sew it for my late spring wardrobe but other projects interfered with that plan!

Perth dress


Eventually, I cut out the pattern in June. I took the pieces with me to the Sewingweekender at the end of August and I nearly finished it there; except for the collar and front closure. During the mid-term break at the beginning of November, I could finally finish this beautiful dress. Alas, we are in Autumn now, therefore, I have to wear it with a layer underneath. But I don’t care because I love my green Perth dress.

Perth Dress

The Perth dress pattern

The Perth dress is a Carolyn & Cassie pattern. It’s an unlined, loose-fitting dress with some nice design features: the folded front, inset sleeves, a close-fitting collar on a collar stand, a back yoke AND inseam pockets! All these features tick my boxes. There’s also a blouse version.

Perth Dress

The Perth dress has 9 pattern pieces. Luckily the pattern is available in A0 format so I could let it print by Paternsy.

Based on the finished garment measurements I cut out size 44. Except for the neckline as I didn’t want it to be too tight, so I used size 46 and graded to size 44 on the shoulder line. The fit of the collar is now perfect for me.

The green fabric

This radiant green fabric was a gift from my sister-in-law so I don’t know exactly what it’s composition is. I guess it’s 100% cotton. It has medium weight and a little structure which is ideal to hold the pleats.
Plus! It is solid which is not my standard as “print” is my middle name. But I love it! Even more so because it is green, which is my favourite colour.

The sewing process

Along with the pattern of the Perth dress comes a booklet with instructions. There’s one page with “quicky instructions”: a list of the order of construction. Very handy for the more experienced sewists. I followed these quickies until I reached the part of the collar construction. Then I jumped to the more detailed instructions which are sufficiently illustrated with designs.
The collar and collar stand need interfacing. To avoid bulky seams I cut out the interfacing without seam allowance. This also makes it easier to turn the collar and form the pointed tips.

Perth Dreess

Following the steps, I didn’t bump into difficulties. Even the unusual front closure with the tap is not difficult. Just take care of copying all the notches on your pattern pieces. In fact, while sewing the Perth dress I never had to unpick any seams. It was pure sewing joy.

Conclusion

Do I love my green Perth dress? I do! Even though it is a short-sleeved dress I already wore it several times with this colder weather. And I got a lot of compliments.
Will I sew another one? I would love to because I love everything about this pattern.

Perth Dress

A black linen Vogue V9253 dress*

* Yes, the one with the deep V!

The first V9253 I wowed about was the stunning version of Catherine from Thread Snips. I featured her in my eye-catchers. Although I loved the pattern I thought it would never be something for me because ‘Yes, that real deep V!’

Vogue V9253
Then, at the beginning of June, I saw Nikki G’s absolute breathtaking version and I was sold! More, doing some research I read somewhere that the pattern was sold out. So it became a dare to find it which wasn’t difficult at all! One-click at naaipatronen.nl and it was mine. That’s how I found myself sewing the legendary V9253 dress with the deep V!

Vogue V9253


The V9253 pattern

The V9253 dress pattern has only four main pattern pieces. The sleeves are cut from the same piece as the body. Further, there are pattern pieces for the pockets and the belt.

Vogue V9253

Based on the finished garment measurements—which you find on the pattern pieces of Vogue patterns—I cut out the L for the upper bust part and graded to XL for the waist and XXL for the hips. Traditionally I lengthened the bodice with 4,5 cm.  Which I reduced with 1,5 cm after I basted the bodice to the skirt and I could try it out.

Vogue V9253

Further, I eliminated the centre back seam of the bodice. I wasn’t going to put a zipper in when the dress has this huge front opening.
Don’t forget to fold over the seam allowance of the back bodice pattern when you put it against the foldline of your fabric.


What about the deep V?

This is, of course, the key feature of the design of the dress. And I love this very much. When I pinned the skirt to the bodice and tried it on for the first time I thought the V was doable.  But when the dress was finished and pressed, it was too deep. I also want to be able to wear a bra underneath it because, although the linen is on the soft side, it still would cause nipple burn. So I closed the front with 4 buttons. Once in a while, you see a glimpse of my (fuchsia) bra but I don’t mind.


The black linen

I bought this beautiful black linen in Paris in September 2016 at the Sacrés Coupons, together with the viscose I used for the Rosa Shirt Dress and some other coupons that are still waiting in my fabric closet.
It was a precut coupon from 3 m on a 1,50 m width. This made that for once I could place my pattern pieces on the fabric without playing Tetris. I have a little leftover for the belt which I have omitted for now.

I should say it’s midweight linen with enough fluidity for the skirt. It washes, irons and sews like a dream! I immediately want to drive to Paris and buy this linen in all the colours. But no, Wis, you are on a fabric buying fast this year!!

The sewing process

Vogue itself categorizes the V9253 as ‘Very Easy’. But is it an easy sew? Yes and no!
First, the included instructions are concise and don’t tell you how to finish your pleats, seams, etc. This is not easy for beginning sewists. Also, the followed order is not logical for me. So I ignored the instructions and followed my usual work sequence.

  1. Staystitch the front opening, back neckline and pocket openings.
  2. Prepare and sew all the pleats and darts on the bodice and the skirt. I folded the pleats to the sideseams (which I like more) and stitched them flat.
  3. Stitch the shoulder seams until the seam allowance (1,5 cm) of the neckline. This makes it easier to finish the neckline later.
  4. Sew a narrow hem at the front opening of the bodice. (I confess, here I followed the instructions. But if there will be more V9523s I will finish the bodice with bias binding all around.)
  5. Finish the back neckline with bias tape.
  6. Stitch the side seam and the underarm seam of the bodice.
  7. Hem the sleeves.
  8. Stitch the pockets to the skirt pieces. I used the technique I learned from sewing the Laneway Dress. I want to point out here that the pockets of the V9253 have a strange shape due to the raised skirt pattern.
  9. Sew all the skirt seams.
  10. Pin the bodice and the skirt with right sides together at the waist seam. Stitch the waist seam.
  11. Hem the skirt. Et voilà, the dress is finished!
  12. Optional: close the front opening as you wish. I hand-sewed 4 buttons on the front edges.

As a more experienced sewist, this is an easy construction. Alas, I did some stupidities. I think because I was sewing with black thread on black fabric and with no difference in view between the right side and wrong side. So I managed to sew the side seams of the skirt to the centre back and centre front ?!! No real harm was done here, only the unpicking took some time because of, remember,  black on black!


Conclusion

I am over the moon with my V9253 dress!! It’s a multilevel success: the design, the black linen, the fit, the sexy and glamorous feel. I’m genuinely happy that I sewed it even though there are already more than 1000 versions in the world. But that doesn’t matter because mine is unique!

Will I sew another one or two? I would love to do it if only to reduce the cost of the bought pattern. Which wasn’t cheap. But also because I love this dress so much. So yes, I wouldn’t be surprised if there would come more!

***  We were able to shoot some great pictures at the abandoned train station of Sant’Angelo Scalo***