Tag Archives: wgsewing19

Sewing Top 5 of 2019: misses & highlights & reflections & goals

Okay! I started to write this post on the 22nd of January and then there was life! So, now that we are in this strange pandemic atmosphere I thought this is an excellent time to finish my ‘Sewing Top 5 of 2019

sewing

As it’s mid-July 2020 now I’m going to make one blogpost of part #2 and #3 of the #SewingTop5 series from ‘The Sewcialists‘. So here are the 2019 misses, highlights, reflections, and goals.

Sewing M i s s e s

“Misses” is a very elastic concept! It could be some projects that totally went wrong, or that you didn’t wear. It’s also possible that you have sewed your garment ok but that when you wear it doesn’t feel like you. Or maybe you destroyed it by accident!

fives on it
fives on it – poem by a friend (alligatorzine).

Looking at my sewing of last year here are some of my misses in random order.

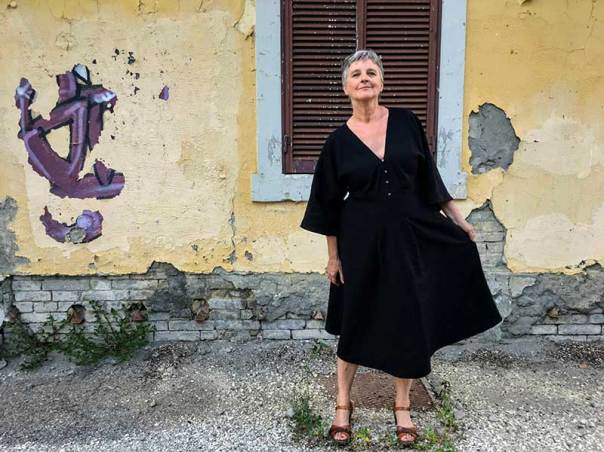
#1 The Mary Quant dress in Mahlia Kent fabric

I started sewing the Mary Quant dress, a free pattern from the V&A museum which was designed by Alice & C° patterns, with the brand new Mahlia Kent fabric I bought in Paris in February ’19. (Look below in the highlights.)
Man, was this fabric hard to work with. Due to the woven geometric print, it frayed like hell. So it was hard labour to cut and sew it. But in the end, I managed and I even got as far as the construction of the collar and the neckline. Unfortunately, I cut out the undercollar and the neckline facing from the main fabric. I should have used lining fabric that would have made the construction doable. Now it just was bulky!
I hope to find the courage to unpick it and finish it in a neat way. A perfect project for next fall.

sewing
The “frayed” inside of the Mary Quant dress.
Mahlia Kent fabric
The beautiful Mahlia Kent fabric. Prewashed!!
sewing
Print Matching Pocket!

#2 The shrinking of the Zadie Jumpsuit.

Although “The joy of prewashing your fabric” was one of my reflections of 2018 I did not always act on it. So you can imagine the horror when I got my Zadie Jumpsuit out of the washing machine and even immediately felt that it had shrunk! I CRIED.
After this debacle, I prewashed EVERY, EVERY piece of fabric I used for sewing.

Zadie Jumpsuit.
I guess I cannot raise my arms anymore now!

#3 The tearing of my first culottes

I was so happy with my first complete self-drafted culottes pattern. I was even happier that I could sew it out of a piece of fabric I bought at the small fabric stall on a local Tuscan market. It was only 3 €! In retrospect, this should have warned me because when I wore the culottes for the first time on a dinner date the fabric just ripped at unexpected places. The tears are beyond repairable because the fabric is in fact exhausted! Luckily I made already a new pair of culottes this time out of brand new fabric.

sewing
Exhausted fabric!
Culottes
Second pair of culottes in brand new fabric.

#4 Being a scatterbrained sewist!

I guess this title needs no further comments. The main reason for not finishing my ongoing sewing projects is that I’m always so inspired by all the fabulous projects and challenges I see every day within the sewing community. So, I easily abandon the project I’m working on and start a new one. I love starting a new project so that’s how I create a lot of WIPs and UFOs.

sewing
A scatterbrained sewist!

H i g h l i g h t s

Life isn’t only about sewing! Or is it? So here are my non-sewing highlights of 2019. No surprise that these highlights are not so different from those of 2018 and 2017.

#1 Our grandson M.

From January ’19, when his mother went back to work after her maternity leaf, our grandson M. stays with us every Wednesday. Needless to say that this day is the highlight of our week.

grandson
The cutest!

#2 Podere Santa Pia

Also in 2019 was staying at our holiday home in the South of Tuscany the best thing of our life. And being there with our family and friends makes it even better.
It is a tradition to take a goodbye picture every time we leave. We call it the #ciaosantapia photo session.

ciaosantapia

#3 Spending time with family & friends

The special highlight for our family in 2019 was the diamond wedding anniversary of my parents. Even more special was that we could celebrate it on the farmhouse where my father was born and where they lived until my father moved to an elderly home.

Greatgrandparents
My parents with our grandson M.

A special family gathering was the celebration of four generations within my husband’s family.

Four generations
Four generations on the red couch.

Always a highlight for me is when we have a Sunday pizza night with our out-of-the-house living children. These are great nights with a lot of laughter and love.

pizza night
Pizzanight!

Days spent with friends are also happy days. Even more when we visit together museums or art shows (which is my highlight #4)

#4 Visiting museums

I said it before I can be totally flabbergasted by seeing a good art show. This year I had the pleasure to see again a good show at my favourite Musem De Pont in Tilburg (Ann Veronica Janssens & Richard Long).

Ann Veronica Janssens
Standing in awe for the work of Ann Veronica Janssens.

We also saw a very interesting show of René Heyvaert at the Museum M in Leuven.

René Heyvaert
Work of René Heyvaert.

#5 City trip to Paris

Paris is only a two and a half-hour drive away from our house. So once and a while we go there for a day. We went the 16th of February ’19 which was an exceptional sunny day. Paris is always fun but being able to buy some fabric at the Mahlia Kent store (see misses #1) made it even more enjoyable.

Paris
Stravinsky Fountain of Niki de Saint Phalle

Sewing R e f l e c t i o n s

When I reflect on my sewing in 2019 two happy facts pop up and they are both related to the sewing community. I attended The Sewing Weekender in Cambridge and I started going to a sewing class.

#1 The Sewing Weekender in Camebridge, UK

Sewing Weekender
Where is Wis?
Photo from the Foldline

I was over the moon when I scored tickets for The Sewing Weekender, 31st August – 1st September ’19 in Cambridge, UK. The Sewing Weekender is an informal meet-up of sewists organised by The Foldline and English Girl at Home. It’s two days of unlimited sewing, whilst chatting with sewists, and listening to very passionate speakers from the sewing community.

sewing
I started and nearly finished my green perth dress at The Sewing Weekender.

What I liked the most was finally meeting all these fabulous sewists I know from the online sewing community IRL.
Attending the Sewing Weekender was so inspiring and gave me a lot of energy. I hope to go to many, many Sewing Weekenders in the future.

#2 Sewing Class

More than three years ago I started following patternmaking classes. Although I learned a lot, these classes were more on a theoretical level. In September’19 I enrolled in two other classes which were more practical orientated: Making Pattern Trousers for yourself & Sew Your Selfmade Patterns. These are great classes which I enjoy deeply. And I already have good results: my culottes and a basic trousers pattern.

sewing

Sewing G o a l s

Sewing goals for 2020!

Just like last year I’m going to be very brief here. As I did not reach my goals for 2019 I’m going to repeat them for 2020.

  1. Finish all the UFOs and WIPs
  2. Don’t create new WIPs!
  3. Keep on sewing whenever you feel it!
sewing
The last picture of 2019, taken on 31st December – sewing at my happy place, Podere Santa Pia.

What I sewed in 2019 — Top 5: the hits!

Welcome to 2020, a new sewing year. I love the start of a new year because it gives me the possibility to look back on my sewing exploits of the year that’s gone by. Like the previous years, I collected all my data in an infographic and here below you see the result of “What I Sewed in 2019“.

Sewed in 2019

Here you find my 2016, 2017, and 2018 infographics.

What do these numbers say?

I sew mostly for women (this year for myself!), using a pdf pattern from an Indie Pattern Designer. This is my conclusion for the fourth time in a row. So, no drastic changes there although I would like to add some nuances.

# 31 sewing projects

This is a significantly smaller number than last year (54 projects)! Although I know I shouldn’t be, I’m disappointed with this number. Why? Because I have this silly idea in my head that I want to sew something new every week. Stupid idea, I know!
The reason why I sewed fewer projects last year is that life was a bit rough. I had a lot of worry about my father whose Alzeihemer’s aggravated rapidly and he had to be admitted into a nursing home. It took me a long time to process this. Time in which I didn’t sew. It got better to the end of the year and now my sewing-mojo is back.

Stitch in the ditch with a walking foot

What’s different?

In 2019 the balance between fabric from my stash and new fabric was fifty fifty. This is a little more than in 2018. I still bought new fabric though but mostly to use immediately and not to hoard.

I still use quasi only pdf-patterns but now 75% of them are free. Some of them were gifted to test, some I found on the web, and some were self-drafted! And I guess there will be more of these in 2020.

As a direct result of me sewing less, I posted less on Instagram and I blogged less! Last year I only wrote 14 blogposts! That means I didn’t write something about every finished project and I didn’t even celebrate my third blogiversary! It makes me a little sad because I love blogging. So it is my intention to blog more in 2020.

There has been some action in my sewing room!

What I sewed in 2019: Top 5!

As a sewcialist, I am joining the sewcialists series of the #SewingTop5 of 2019. I find this a nice format to reflect on the last sewing year and get some goals for the next year. It starts with the “Sewing Hits”

sewed in 2019

My Top 5 Hits

A sewing hit for me is a project that gives me the most joy! And this joy can be caused by a lot of things: from the pleasure of wearing it, to the challenge of sewing, the first time tackling a particular technique or a new type of fabric, or the gratitude you receive from the person you sewed for…

Here is my top 5 of what I sewed in 2019 in order of when I finished the projects.

#1 The copper pleather Hollyburn skirt

sewed in 2019

It was the first time I sewed with pleather and although it was a little laborious at the beginning I am thrilled with the result. The pleather feels nice and I love wearing it. I was even surprised that I could wear it in every season. So joy all year round.

#2 The Madrid dress from Coffee & Thread

sewed in 2019

I received the pattern of the Madrid dress from Coffee & Thread to write a post for a blog tour. There were several firsts here: it was my first dress with tiers, it was my first time participating in a blog tour, and I was able to reuse the fabric of a failed project within a year!
Unlike what you would think, it is pleasant to wear a maxi dress on a hot day. So I wore it all the time last summer and I enjoyed it a lot!

#3 The V9253 with the deep V!

sewed in 2019

I wanted to sew this dress for a long time and I’m super happy that I realised it this summer. The black linen was in my stash for several years and it was the perfect fabric for this model. I’m glad I choose black for this dress because it makes it stylish and classy. Perfect for wearing it at my parent’s 60th-anniversary party.

#4 The Zéphyr dress with flutter sleeves

sewed in 2019

Last year I sewed a Zéphyr Dress for my daughter and it was a perfect fit. So she wanted a second one but this time with sleeves. As this is a pattern for a sleeveless dress I had to draft them myself. I used the knowledge of my patternmaking and the flutter sleeves were born! They came out perfectly and my daughter is delighted.

#5 The self-drafted culottes

sewed in 2019

Drafting your own patterns based on your measurements is pure joy. So far I made only one pattern for these culottes but I’m convinced more will follow in 2020.

Next up in the #SewingTop5 are Misses & Highlights, and Reflections & Goals

My first self-drafted pattern: my culottes

26 December 2019 will forever be ingrained in my sewing brain because that’s the day I finished sewing my first ever self-drafted pattern! My first pair of culottes.

culottes

They are the first result of following three years of patternmaking lessons. Yeah, Yeah!, I hear you thinking: “Does it take three years of patternmaking lessons to come up with your first pattern?”. It did for me!
At our sewing school, we follow the Rundschau method of M. Müller & Sohn. It’s a patternmaking method that works with body measurements and calculated measurements. The previous years I learned all the theory about patternmaking. I drew a lot of patterns of skirts, dresses, blouses, coats, types of collars, and sleeves. But all these drawings were at a scale of 1:2. Now, this year is different because of the topic of the class is Making Pattern Trousers for yourself. And we started with culottes!

Culottes

Culottes? Skirt trousers? Pantskirt? Palazzo Pants?

In Dutch, my native language, the first assignment for my trousers patternmaking class was to make a pattern for a “rokbroek”. Literally it means ‘skirt trousers’. Which is, in fact, a correct English term for this kind of garment, although less commonly used. When you do a search on Google, Pinterest, Instagram, etc. your result is a lot higher for culottes. And when I found the definition for culottes on the Collins dictionary: “Culottes: women’s flared trousers cut to look like a skirt ” I went for culottes as the name of my pattern.

culottes

How the Culottes pattern was born

The base of a culottes pattern is a skirt pattern. First, you make a straight skirt pattern based on your measurements and sew it in calico fabric. After a thorough fitting, you transfer all the needed modifications on your skirt pattern. Now you have a skirt block or sloper: a custom-fitted, basic pattern for a straight skirt. This master pattern is the starting point for the making of the culottes pattern. Here you see the difference between culottes and trousers. A culottes pattern comes from a skirt pattern.

Calico
The fitting of the skirt in calico fabric.

From skirt to culottes

Start with tracing your skirt block on pattern paper with all the necessary lines. Depending on your body type and taste you reduce 1,5cm at the centre back and front at the waistline. This is helpful to make one dart of the two darts both in the front and back.
As I mentioned hereabove the Rundschau method uses body measurements and calculated measurements. To determine the crotch level you use 1/4 of your hip-width + 2 cm. To determine the position of the inseam for the front you take 1/8 of your hip-with and for the back 1/8 hip-with + 2,5 cm. Now you can draw the curved lines of the centre front and centre back.
Again you sew it in calico fabric and after a thorough fit, you can transfer the necessary modifications on your pattern. Tadaa! Here is your culottes sloper.

My Culottes pattern

Now that I had my sloper I needed to use it as a starting point for the design model I wanted. The assignment was to let you get inspired by a model of a rtw culottes. And now all the knowledge I gathered the previous years came in handy.

culottes

To create the width in the legs I closed the darts. Then I cut off a waistband of 5,5 cm. After drawing a slant pocket on the front I inserted a pleat of 28 cm. This makes a leg width of 168 cm.

culottes

My culottes pattern has 6 pattern pieces. A front and back leg, a front and back curved waistband, a pocket, and a pocket lining. As I drew the pattern pieces directly on the pattern paper I did not have to glue countless pdf-tiles! One of the perks of making a pattern yourself. A minor disadvantage is that generally, you don’t draw the seam allowance on your pattern, so you have to keep that in mind when cutting your fabric. The upside is that this allows you to vary your seam allowance whenever you cut your pattern.

culottes

The Culottes Fabric

I bought this piece of dark brown shiny fabric at my favourite fabric stall at Castel del Piano. If you are a regular reader of my blog then you will know that I found already some real treasures there.

Castel Del Piano Fabric Stall
Here you see that I already have my brown fabric selected and a kind Italian lady is checking the red viscose I have also on my arm!

At this fabric stall, you can only buy remnant pieces of unidentified fabric. So I don’t know what kind of fabric this dark brown shiny fabric is. It’s a middleweight fabric that has some structure, due to woven stripes. The colour changes a lot with the light. It goes from gold to dark chocolate. But it only cost 5€ and the piece was big enough for my pattern. And it sewed like a dream. So it was a perfect piece to make my test culottes which came out very wearable

culottes
View from over my shoulder. The slant pocket and the pleat.

The sewing process

As I drafted the pattern myself there were no sewing instructions available! Sewing culottes is the same as sewing trousers, which is not that complicated. I sewed already some trousers and jumpsuits so I have enough confidence to follow my own order of construction.

  1. Mark the pleat fold lines at the waist and the hem. I used tailer’s tacks and I also marked the front waistline. I might get a little overboard here but hey I had to show it to my sewing teacher!
  2. Stitch a small non-elastic ribbon in the seamline of the pocket line of the front leg. Make the ribbon 4mm shorter than the pocket opening this prevent stretching it.
  3. Sew the pockets. After sewing the pocket lining understitch the seam to prevent them from peeping up.
  4. Fold and press the pleats. Affix the pleats in the seam allowance of the front.
  5. Stitch both seams of the legs.
  6. Turn one leg to the right side and slide this leg in the other leg right sides together. Now you can stitch the crotch seam.
  7. Sew on the (interfaced) waistband.
  8. Put in the blind zipper.
  9. Finish the inside of the waistband with the waistband lining.
  10. Hem the trouser legs!
    Et voilà, les nouvelles culottes sont arrivées!
culottes

Conclusion

There is only one conclusion. I’m SEW proud with myself that I was able to see a garment somewhere and could recreate that for me from scratch!
Will I sew more of these culottes? Of course, I will. In fact, I’m working on one now with the fabric I bought especially for this pattern.

And you? Do you have experience with patternmaking?

culottes

The Green Perth Dress

Sometimes you see a pattern, you buy it and you sew it up in a blink of an eye. Well, this did not happen with the Perth dress. It only took me 7 months from buying the pattern to finish it.
I can’t remember when I saw the Perth dress for the first time but I remember that I was immediately intrigued by the design of it. Especially by the front closure. A search through my pattern files learnt me that I bought the pattern last March. I intended to sew it for my late spring wardrobe but other projects interfered with that plan!

Perth dress


Eventually, I cut out the pattern in June. I took the pieces with me to the Sewingweekender at the end of August and I nearly finished it there; except for the collar and front closure. During the mid-term break at the beginning of November, I could finally finish this beautiful dress. Alas, we are in Autumn now, therefore, I have to wear it with a layer underneath. But I don’t care because I love my green Perth dress.

Perth Dress

The Perth dress pattern

The Perth dress is a Carolyn & Cassie pattern. It’s an unlined, loose-fitting dress with some nice design features: the folded front, inset sleeves, a close-fitting collar on a collar stand, a back yoke AND inseam pockets! All these features tick my boxes. There’s also a blouse version.

Perth Dress

The Perth dress has 9 pattern pieces. Luckily the pattern is available in A0 format so I could let it print by Paternsy.

Based on the finished garment measurements I cut out size 44. Except for the neckline as I didn’t want it to be too tight, so I used size 46 and graded to size 44 on the shoulder line. The fit of the collar is now perfect for me.

The green fabric

This radiant green fabric was a gift from my sister-in-law so I don’t know exactly what it’s composition is. I guess it’s 100% cotton. It has medium weight and a little structure which is ideal to hold the pleats.
Plus! It is solid which is not my standard as “print” is my middle name. But I love it! Even more so because it is green, which is my favourite colour.

The sewing process

Along with the pattern of the Perth dress comes a booklet with instructions. There’s one page with “quicky instructions”: a list of the order of construction. Very handy for the more experienced sewists. I followed these quickies until I reached the part of the collar construction. Then I jumped to the more detailed instructions which are sufficiently illustrated with designs.
The collar and collar stand need interfacing. To avoid bulky seams I cut out the interfacing without seam allowance. This also makes it easier to turn the collar and form the pointed tips.

Perth Dreess

Following the steps, I didn’t bump into difficulties. Even the unusual front closure with the tap is not difficult. Just take care of copying all the notches on your pattern pieces. In fact, while sewing the Perth dress I never had to unpick any seams. It was pure sewing joy.

Conclusion

Do I love my green Perth dress? I do! Even though it is a short-sleeved dress I already wore it several times with this colder weather. And I got a lot of compliments.
Will I sew another one? I would love to because I love everything about this pattern.

Perth Dress

A black linen Vogue V9253 dress*

* Yes, the one with the deep V!

The first V9253 I wowed about was the stunning version of Catherine from Thread Snips. I featured her in my eye-catchers. Although I loved the pattern I thought it would never be something for me because ‘Yes, that real deep V!’

Vogue V9253
Then, at the beginning of June, I saw Nikki G’s absolute breathtaking version and I was sold! More, doing some research I read somewhere that the pattern was sold out. So it became a dare to find it which wasn’t difficult at all! One-click at naaipatronen.nl and it was mine. That’s how I found myself sewing the legendary V9253 dress with the deep V!

Vogue V9253


The V9253 pattern

The V9253 dress pattern has only four main pattern pieces. The sleeves are cut from the same piece as the body. Further, there are pattern pieces for the pockets and the belt.

Vogue V9253

Based on the finished garment measurements—which you find on the pattern pieces of Vogue patterns—I cut out the L for the upper bust part and graded to XL for the waist and XXL for the hips. Traditionally I lengthened the bodice with 4,5 cm.  Which I reduced with 1,5 cm after I basted the bodice to the skirt and I could try it out.

Vogue V9253

Further, I eliminated the centre back seam of the bodice. I wasn’t going to put a zipper in when the dress has this huge front opening.
Don’t forget to fold over the seam allowance of the back bodice pattern when you put it against the foldline of your fabric.


What about the deep V?

This is, of course, the key feature of the design of the dress. And I love this very much. When I pinned the skirt to the bodice and tried it on for the first time I thought the V was doable.  But when the dress was finished and pressed, it was too deep. I also want to be able to wear a bra underneath it because, although the linen is on the soft side, it still would cause nipple burn. So I closed the front with 4 buttons. Once in a while, you see a glimpse of my (fuchsia) bra but I don’t mind.


The black linen

I bought this beautiful black linen in Paris in September 2016 at the Sacrés Coupons, together with the viscose I used for the Rosa Shirt Dress and some other coupons that are still waiting in my fabric closet.
It was a precut coupon from 3 m on a 1,50 m width. This made that for once I could place my pattern pieces on the fabric without playing Tetris. I have a little leftover for the belt which I have omitted for now.

I should say it’s midweight linen with enough fluidity for the skirt. It washes, irons and sews like a dream! I immediately want to drive to Paris and buy this linen in all the colours. But no, Wis, you are on a fabric buying fast this year!!

The sewing process

Vogue itself categorizes the V9253 as ‘Very Easy’. But is it an easy sew? Yes and no!
First, the included instructions are concise and don’t tell you how to finish your pleats, seams, etc. This is not easy for beginning sewists. Also, the followed order is not logical for me. So I ignored the instructions and followed my usual work sequence.

  1. Staystitch the front opening, back neckline and pocket openings.
  2. Prepare and sew all the pleats and darts on the bodice and the skirt. I folded the pleats to the sideseams (which I like more) and stitched them flat.
  3. Stitch the shoulder seams until the seam allowance (1,5 cm) of the neckline. This makes it easier to finish the neckline later.
  4. Sew a narrow hem at the front opening of the bodice. (I confess, here I followed the instructions. But if there will be more V9523s I will finish the bodice with bias binding all around.)
  5. Finish the back neckline with bias tape.
  6. Stitch the side seam and the underarm seam of the bodice.
  7. Hem the sleeves.
  8. Stitch the pockets to the skirt pieces. I used the technique I learned from sewing the Laneway Dress. I want to point out here that the pockets of the V9253 have a strange shape due to the raised skirt pattern.
  9. Sew all the skirt seams.
  10. Pin the bodice and the skirt with right sides together at the waist seam. Stitch the waist seam.
  11. Hem the skirt. Et voilà, the dress is finished!
  12. Optional: close the front opening as you wish. I hand-sewed 4 buttons on the front edges.

As a more experienced sewist, this is an easy construction. Alas, I did some stupidities. I think because I was sewing with black thread on black fabric and with no difference in view between the right side and wrong side. So I managed to sew the side seams of the skirt to the centre back and centre front ?!! No real harm was done here, only the unpicking took some time because of, remember,  black on black!


Conclusion

I am over the moon with my V9253 dress!! It’s a multilevel success: the design, the black linen, the fit, the sexy and glamorous feel. I’m genuinely happy that I sewed it even though there are already more than 1000 versions in the world. But that doesn’t matter because mine is unique!

Will I sew another one or two? I would love to do it if only to reduce the cost of the bought pattern. Which wasn’t cheap. But also because I love this dress so much. So yes, I wouldn’t be surprised if there would come more!

***  We were able to shoot some great pictures at the abandoned train station of Sant’Angelo Scalo***


Jumpsuit fever: the one with the border fabric!

border print jumpsuit

Hello, my lovely readers,  I’m very thrilled to show you my border print jumpsuit.

Technically, I sewed it before the Zadie Jumpsuit but I could only reveal it to you now. This border print jumpsuit is my first contribution for the Minerva Maker Blog and it went online today.

border print jumpsuit

This gorgeous border print viscose jersey was sent to me free from Minerva Crafts, in exchange for a blog post. So head over to the Minerva blog and read all about the fabric, the pattern I used, the sewing process, and more photos.

You can not NOT  jump wearing a jumpsuit!

jumpsuit

How could I not sew a Zadie Jumpsuit?

Only if you’ve been living on a desert island for the last six months you are not aware of the sewing storm the Zadie Jumpsuit from Paper Theory Pattern has caused. On Instagram alone, there are at this moment about 1700 posts with the #zadiejumpsuit!

Zadie Jumpsuit

When I first saw the pattern, I was intrigued by it but at that time I was sewing another jumpsuit for the Minerva Crafts Blogger network. (This post will come online on July 10!) So the need to sew a Zadie Jumpsuit got a little diffused.

Zadie Jumpsuit

Then the ‘Sew Together for Summer 2019‘ challenge opened and guess what was the focus? A jumpsuit of course! This brought the idea of sewing the Zadie back to live. But the thing that really got me started was the message I received from Gerda, @three_eight_cake to sew together a Zadie Jumpsuit with some other Belgian sewists (Melissa, @floating_sewist, and Kirstin, @smallbobbins). We even talked about meeting and shooting some pictures together with our Zadies. Unfortunately, it was a bit difficult to find a date. But I sewed a Zadie Jumpsuit and I am super thrilled with it!

Zadie Jumpsuit


The Zady Jumpsuit pattern

Why is this such a good pattern? First of all, no need for buttons or a zip! The jumpsuit wraps around the body and fastens with a tie at the waist. Secondly, it has a relaxed fit. These two features make it an uncomplicated sew.

Zadie Jumpsuit

Due to the relaxing fit and based on the finished garment measurements, I cut out size 16 and didn’t grade between sizes.
The pattern is drafted for the height of 170 cm and I’m 180 cm so I had at least to lengthen the bodice. I did so with 2 cm at the provided line on the pattern piece and I took  1 cm extra seam allowance at the hem of the bodice.

Zadie Jumpsuit

To check if the crotch depth was long enough I pinned together (half) the pattern and tried it on. I raised my arms and the tissue paper tore a bit at the crotch. The message was clear:  I also had to lengthen the crotch line with 2 cm.

Zadie Jumpsuit
Yep! I can raise my arms without hurting myself!

At last, I lengthened the legs with 10 cm because I want to be able to wear this jumpsuit in the colder seasons.


The Fabric

One of my sewing goals for 2019 is to shop my fabric stash. So I browsed through my collection and found this eggplant crèpe that I bought last September at ‘The Fabric Sales‘. I remember now that I bought it with a jumpsuit in mind.

Zadie Jumpsuit
The texture of the crèpe fabric. Also, the eggplant colour is very difficult to capture.

I only had 2,50 m of this fabric and with all the lengthening I had to do there wasn’t enough fabric for the pockets. So I used a remnant of the silk of the Kingfisher Top for the pocket facings. And even these remnant pieces weren’t big enough so I had to divide the pocket pattern into 3 pieces.

Zadie Jumpsuit
Sometimes the pocket facing is peeking!


The sewing process

Paper Theory Patterns itself announces the sewing of the Zadie Jumpsuit as a quick and an easy sew and they are right. The instructions are concise and clear. I followed the work sequence except for one step! I always immediately staystitch all the curved and slanted seams. In the instructions, it happens after already having manipulated the bodice a few times.

After sewing the bodice and the trousers part separately I pinned it to form the jumpsuit and the fit was spot on. This asked for a happy dance!

Zadie Jumpsuit

To attach the binding I used a zillion pins and this also worked perfectly.

Conclusion

It’s a cliché but I am JUMPING of joy for my Zadie Jumpsuit! Everything is great about it: the design, the feel, the fit, the comfort when you wear it, the compliments people give you, the sewing… In short, a sewing project that only gives you happiness!

Zadie Jumpsuit

Will I sew more Zadies? I am really tempted but my sewing queue is SEW long so I think it is not going to happen in the foreseeable future.

Are there still people who haven’t made a Zadie Jumpsuit? If you are hesitating I can strongly commend to go for it!


Blog Tour: The Madrid Dress from Coffee and Thread

Hello, my lovely readers!

Can you believe it? This is my 100th blog post! I never would have thought that I would reach this milestone when I pushed that publish button for the first time in December 2016.
Although it wasn’t intentional, it is kind of fun that this 100th post is part of a blog tour which is a first for me. So reviewing the Madrid Dress from Coffee and Thread is the birthday party for my 100th blog post.

Madrid Dress

The Madrid Dress pattern

The Madrid dress is a Bohemian inspired faux wrap dress or tunic with a tiered skirt. It offers three length options and three sleeve variations and comes in sizes 2-20. It is designed for woven fabrics with drape.
I particularly love the faux wrap bodice of the design and I went for the maxi dress with straight sleeves, not the flared ones.

For the maxi dress, there are 5 pattern pieces and two facing pattern pieces. The pattern is available in A0 format so I let it print by Paternsy.

Based on the finished garment measurements I cut out size 18 and didn’t grade between sizes. Being a tall girl I lengthened the bodice with 3,5 cm. There’s a line on the front and back pattern piece to indicate the best place to lengthen (or shorten) your pattern. But don’t forget you have to lengthen the front facing too, for which there is no line indicated. You can draw it yourself by putting it on the front piece.
To be absolutely sure the maxi dress was a maxi dress I lengthened every tier with 1 cm.

Madrid Dress
Why does it always start to rain when you want to take pictures?

The fabric

I bought this special African Wax fabric at Goldhawk Road in April 2017. Last year I tried to make a maxi skirt out of it but this went wrong completely. So I’m glad I could recuperate this fabric for the bodice and I had enough left for the tiers. Because, boy you need a lot of fabric for these.

The sewing process

Sewing the Madrid Dress is not difficult. The instructions are concise and clear. Every step is illustrated with crisp designs. I never had to scratch my head to figure out how to go on.
After sewing the bodice I tried it on and I was able to get it over my head although I accidentally closed both side seams. So I decided to omit the blind zipper.

Madrid Dress
Yes, you can go grocery shopping wearing the Madrid Dress!

One thing that takes time is the gathering and the sewing of the tiers. Like I said hereabove these tiers are magnum!! You stitch two rows of gathering stitches, one inside and one outside the seam allowances. I use a different colour in my bobbin when I stitch gathering stitches. This makes it easy to know which thread to pull to make the gathers, always the bobbin thread!


Conclusion

I’m SEW happy with my Madrid Dress! It’s the first time in my life that I have a dress with a tiered skirt. And I love it! I wore it already and the width and the fluidity of the skirt make it a dream to whirl. I’m convinced this dress is going to see a lot of wear this summer.


One thing though to be careful about is when you descend stairs to be aware that your husband isn’t close behind you because he already stepped twice on the third tier!!

If you are looking for a Bohemian inspired faux wrap dress or tunic with a tiered skirt go for the Madrid Dress from Coffee & Thread.

So thank you, Olga and Claudia, for taking me in on this blog tour.

During the tour, Olga offers 25% off on any of the
Coffee & Thread patterns with the code ‘madridtour’

The story of the Mashup Skirt

Many many moons ago, somewhere in 2013, I pinned a picture of a skirt on Pinterest. I loved it so much that I made it the front picture of my ‘Skirts Board’. Also many moons ago, in March 2014, I bought two pieces of fabric to recreate this skirt. And then this project got buried in my sewing queue…. until two weeks ago.
Then Me-Made-May 2019 came along and I created three wardrobe capsules. With my third wardrobe capsule, I gave myself a bonus: “I could replace any of the selected garments with a freshly sewed garment.” And boom! Out came the idea of sewing this Mashup Skirt out of the depths of my sewing queue!

Mashup Skirt

The Mashup Skirt pattern

Although the example skirt is an A-line I decided to make a flared skirt because I  love flared skirts just a tiny bit more. I used one of my oldest flare skirt patterns that I sewed already a zillion times!

The original skirt that inspired me.

The only adjustments I had to do to the pattern was to divide the front and back pattern piece in two to be able to get it out of the limited fabric I had. Only 0,5 m of each colour!!

The divided pattern pieces of the front and the back.

I cut the pieces out the two fabrics to achieve an even coloured left and right side.Mashup Skirt

A scallop button placket

The one thing I had to draw myself—and alas drawing is not my strongest feature—was the scallop button placket. How did I do it?  I drew a template of one scallop and used this to compose a string of scallops on tracing paper. I included an 0,75 cm (presser foot width) seam allowance. Then I had a scallop button placket pattern!

Mashup Skirt
The model of the scallop button placket on tracing paper.

mashup skirt
Positioning the button placket on the front piece.


The Mashup Skirt fabric

Like I said hereabove I bought this midweight linen at the Stoff Schnäppchenmarkt in Cologne in March 2014! So this project definitely counts as a stash buster project! I bought two pieces of the same quality in two different colours. I think this helped with the success of this project. But what was I thinking when I bought only 0,5m of each colour!?!

Mashup Skirt
The wrinkles in the fabric after a 2-hour flight and a 2-hour drive. I find this one of the charms of working with linen.

For the button placket and waistband, I used a leftover from the curtain fabric of my Seamwork Brooklyn skirt. For the back of the button placket, I took some black lining. This reduced the thickness.

mashup skirt

The Sewing Process

Sewing a flared skirt is rather easy. The new thing and the feature to focus on here is the scalloped button placket.
I cut out two plackets: one in fabric and one in black lining. I stitched them together using my presser foot as a guide.
scallop button placket

scallop button placket

Before turning the scallops I clipped and notched the curves. Then I placed the button placket between the two centre front seams. So you stitch through 4 layers of fabric. Here you experience the advantage of using lining for the back of the placket. At the inside, I graded the seams and pressed them open (two seams at each side).

The buttons have a vintage vibe but I bought them new at my local haberdashery shop. I sewed them on with my machine after stabilizing them with wonder tape at the placket.

mashup skirt

Some sewing hickups

When you’re sewing not everything always goes as planned. Sometimes it’s the sewing gods that let you down. Sometimes you just make stupid mistakes. Both happened during sewing this rather simple skirt.

After perfectly putting in the new blind zipper it broke when I closed it for the first time!! This never happened to me before. The only thing you can do then is rip it out and put a new one in!

When I serged the hem the last scallop got to the wrong side. Totally my own fault! Not enough focus.

mashup skirt

At first, I hemmed the skirt as narrow as I could. Remember the small pieces of fabric I had. Then, when I saw the pictures I found it a bit ridiculous to hem through half a scallop. So I cut off about 3 cm and rehemmed the skirt. This gave a much better look.

Mashup Skirt
Do you spot the difference?

Conclusion

I’m SEW  happy with my Mashup Skirt! I’m a little proud of myself f I or realising a design today that I had in my mind since 2014! And it came out just as I imagined. It’s been two weeks now since I finished the skirt and I already wore it a lot. It’s a pleasure wearing it and it’s suitable for many occasions.
Will I make another one? Maybe? I don’t know if I want a second or more Mashup Skirts in my wardrobe.

***  We were able to shoot some great pictures at the Pieve di San Giovanni in Campiglia Marittima.  ***

mashup skirt

mashup skirt

mashup skirt

mashup skirt mashup skirt