The end of December is nearing and that means my blog is turning 2 years old. I thought it would be fun to celebrate this second blogiversary with a Q&A session. So, I would love to hear any of your questions about my sewing… and I will answer them on my blog on the 30th of December!
Last Tuesday Sew DIY launched a new pattern: the Ali Sweatshirt. It’s a casual and comfy sweatshirt with some interesting design features. The design of the back yoke just asks for experimenting. I was one of the lucky sewists to test the pattern back in July. Although it was high summer at that time, the testing was a joyful ride.
The Ali Sweatshirt pattern
The Ali Sweatshirt comes in two versions: one with a crewneck a one with a scoop-neck. I choose view B, the scoop-neck. The pattern consists of 7 pieces. Based on my measurements I cut out the XL but in hindsight, I should have cut out the L because there is a lot of ease at the bust. I understand Beth updated the pattern now with more narrow sleeves. I assume that I would prefer this option.
As usual, I lengthened the bodice by 4 cm. This is easily done because of the lengthen/shorten line on the pattern piece.
The red striped fabric
After sewing the maternity dress for my daughter-in-law I had still enough of this beautiful Red and White Stripe Cotton Knit from Girl Charlee UK. It’s soft and I had already experienced that, even though being a knit, that it behaved very well under the machine! This and the possibilities the stripes give for some experimenting with the placement of the back yoke, are the reasons why I choose this fabric. Because usually, I am so NOT a striped-garment-wearing person. I think my latest striped sweater dated from 1975!
The sewing process
Sewing the Ali Sweatshirt is a joyful ride. Nearly all the seams are straight seams and Beth wrote very clear instructions. I sewed the sweater totally on my overlocker and I topstitched the seams on my regular machine with a walking foot and a very small zig-zag stitch.
The one thing of the construction that took some thinking was the chevron I had in my head for the back yoke. How did I do it?
I drew a 45° line (the green one) on the pattern piece of the yoke. I transferred some of the red stripes on the pattern piece too. This would make it more easy to cut out the second part of the yoke.
I cut out one piece of the yoke in a single layer.
Then I transferred the 45° line and the red stripe marks to the back side of the pattern piece and checked the placement on the fabric.
After, I put the already cut out piece with right sides together on the fabric to cut out the second piece of the yoke. I carefully matched the stripes.
Then I basted the yoke and stitched it with my overlocker. For the topstitching, I used the small zig-zag stitch on my sewing machine
I love my Ali Sweatshirt. I already wore it a lot, especially on colder evenings when it makes me feel all comfy and cozy. I’m even wearing it now! If you are looking for an easy to sew sweatshirt where the pattern design still hands you some possibilities to give it a personal touch, don’t hesitate. There is a launch discount for this pattern until Sunday.
It’s the third of September today and that means August is definitely finished. Which means that the latest Theme Month, the Sew Style Hero, of the Sewcialists is over.
If you want to discover all the amazing makes sewists from all over the world made to honour their personal Sew Style Hero, head over to the Sewcialists blog. I’m super excited that I could write the round-up of this theme.
My personal Sew Style Hero is Becky from ‘I Sew Therefore I Am‘. I love her Kabuki Tee so much that I just had to sew one myself. I featured her version in my last Eye-catchers.
An eye-catcher is a person or a thing that attracts the attention
The online sewing community is very visual. So, every day I see heaps of sewing related images on social media and blogs. Some of them catch my eye because they make me think or they give me inspiration. Here, I want to share these eye-catchers with you.
Follow below what caught my eye the last months:
Tiina’s Japanese Dress
Thanks to the fun summer photo challenge #sewingagogo I discovered this beautiful dress made by Tiina. It’s a pattern from the Japanese sewing magazine Cotton Friend. I was immediately attracted by the sharp design of the front. The instructions are only in Japanese but apparently well illustrated. So far I’ve neversewed a Japanese pattern but this dress really inspires me to give it a try.
The Frances top from @maxantonia
The simple line of the design of this top combined with the remarkable finish of the sleeves immediately caught my attention. I love this version by @maxantonia in blush pink cupro. Also, this Frances top is a free pattern from Fibre Mood, a new pattern book/magazine company. Once you register you can download it and more, the instructions are available in 4 languages (Dutch, French, English & German). When I searched through the site some more I discovered Fibre Mood is stationed in my town. It’s always great to discover some sewing souls in the neighbourhood.
Beck’s Kabuki Tee
When you don’t have enough fabric but you’ve got your mind set on using this specific fabric for the pattern you want to sew; you have to go right to the limit. That is what Beck did with the Kabuki Tee from Paper Theory. The result is stunning and totally my thing. The way Beck placed the fabric accentuates the absolute crisp design of the Kabuki Tee. Look at these square shoulders! I was so in awe that I immediately started sewing a Kabuki Tee myself and designated Beck as my Sew Style Hero.
The Kobe top made by @katilulemakes
When you look at the front of the Kobe top from Papercut patterns you may think it’s a classic top, but the back gives away the unexpected and stunning design. I was instantly taken by this version by @katilulemakes. A perfect combination of fabric and pattern! Maybe I could still make one for these warm fall days that are coming…
@sewingblue’s sewing
@sewingblue is a Swedish sewist who I admire tremendously. She has great sewing skills and everytime she posts on Instagram I am totally in awe. So I was not surprised when I read the capture of this photo that it told the story of a great—and yet new for me—sewing technique. It’s about a clear finish on the inside. She uses a seam allowance of 2,5 cm. After stitching the seams the seam allowance is folden and then stitched to the body about 1 cm from the seam. You will see the stitching on the bodice but this gives also a neat effect. Hats off for this kind of sewing!
I have been nominated by the lovely Diane, from Dream. Cut. Sew, for The Mystery Blogger Award. As she is a sweet lady and an inspiring sewist and blogger I’m thrilled to join in. Thank you, Diane, for the nomination.
The Mystery Blogger Award: how does it work?
“Mystery Blogger Award is an award for amazing bloggers with ingenious posts. Their blog not only captivates; it inspires and motivates. They are one of the best out there, and they deserve every recognition they get. This award is also for bloggers who find fun and inspiration in blogging, and they do it with so much love and passion.” Created by: Okoto Enigma
The rules are as follows:
Thank whoever nominated you and include a link to their blog.
Tell your readers three things about yourself.
Answer the questions from the person who nominated you.
Nominate 10 – 20 bloggers you feel deserve the award.
Ask your nominees 5 questions of your choice, with one weird or funny one.
Notify your nominees by commenting on their blog.
Three random facts about myself
FACT ONE
In August I’m going to be a grandmother, of a little boy, for the first time. I’m so looking forward to this, you can’t imagine. Also, this will give me a reason to sew all of the cute baby clothes.
FACT TWO
My husband and I met in 1979 behind the dishwasher at the student restaurant where we both had a student job. Two months after that moment we kissed for the first time and we still do.
FACT THREE
I hate doing sports because I have a.b.s.o.l.u.t.e.l.y no talent for it. I once was a goalkeeper for a benefit football game with the youth movement of which I was a member. We lost with 0-20! And I made one of the goals.
Diane’s Questions for me
Do you have a bad habit and if so what is it?
Procrastination, I guess.
If money was no object, where would you fly to in the whole world?
Seychelles!
What food do you hate?
Warm red cabbage! This is a real childhood trauma.
How many sewing machines/overlockers have you got?
I have a 38-year old orange Toyota, a 2-year old Brother and a 1,5-year old Juki overlocker.
Name 3 famous people you would love to share a dinner table with.
Tilda Swinton, Frida Kahlo & Nick Cave.
On 25 Juli 2015, I posted my first Instagram photo and today—almost three years later— I posted my 1000th. Say what? Yes, I posted 1000 photos on Instagram! Just like when I reached 1000 followers, I find it difficult to comprehend what this number means. But I love the interaction and sharing of photos and experiences with this wonderful online sewing community.
Below I share with you my 5 most liked and my 5 most commented on photos, ever! I go to Squarelovin to get this information. And my most used tag is #isew! No surprise here, I guess.
First post on July 25th 2015Reenactment of the first post aka post 1000!
Top 5 of my most liked photos
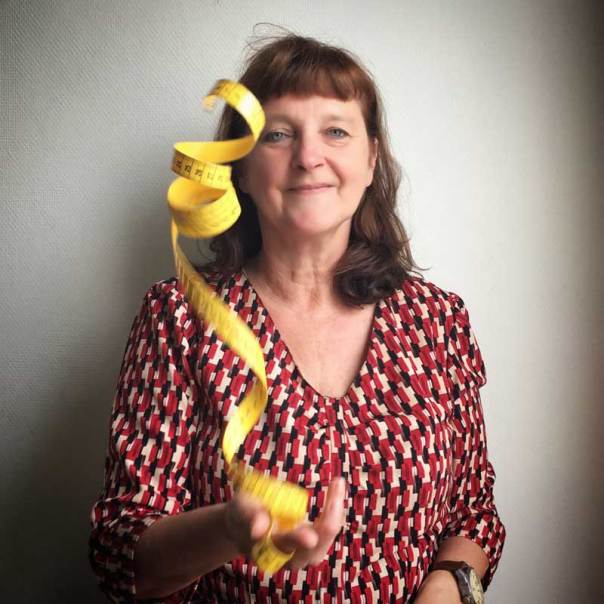
#5 The measurement tape!
I posted this photo for Day 1 of #sewphotohop September 2017: Intro! I thought it would be nice to show a typical sewist’s attribute for the introduction photo of this challenge.
It took a lot of practice to throw the measurement tape; even my husband had to demonstrate it!
#4 The Vogue 9075 Jumpsuit
This photo is taken, and posted, on 25 May 2018 at the South wing of the Sint-Baafs Cathedral in Ghent. We were on our way to the official celebration of the diamond wedding anniversary of my parents-in-law. I justed finished this jumpsuit and wanted to show it off!
#3 The DKNY V1349 Dress
I took these photos for #mmmay17 but I made this collage, and posted it, for the ‘Curvylicious’ theme of #sewapril2018. I made this dress two years ago from a vintage curtain. There were some serious fitting issues (gaping armholes) the first time I tried it on but at the end I made it work. I love wearing it!
#2 The African Wax Selvedge Statement Sleeve!
Posted on Instagram on 10 April 2017 as an entry for #sewapril2018 for the ‘Statement Sleeves’ theme. I took the photo in August 2017, when I was working on the Laneway Dress. I love this African Wax selvedge and that’s why I use it as a natural hem!
#1 Sewing at Podere Santa Pia
This is my most liked photo on Instagram ever! My husband took it at our holiday home, Podere Santa Pia. I remember it took only a minute to make the photo. I posted it on 1 April 2017 for the last week of #dressmakers52: Happy place. “When I am behind my sewing machine I am in my happy place. But when I am behind my sewing machine at our holiday house I am in my happy happy place.”
Top 5 of my most commented photos
#5 Memories
A photo from 1986, I was heavily pregnant with my firstborn. I’m wearing my self-made bathrobe and nightdress. I posted the photo on Instagram on 15 November 2016 for the Memories prompt from #bpsewvember.
I only posted this photo two days ago, 10 July 2018 for my 58th birthday. Thank you for all your birthday wishes.
#1 A photo for my 57th birthday
This photo was taken on my 20th birthday in 1980. I posted it on 10 July 2017 for my 57th birthday. I loved that I got a lot of birthday wishes even if I was knitting, not sewing. The sewing community is the best!
1000 photo posts on Instagram!
Thanks for all the love and comments, here’s to 1000 more Instagram photo’s!
When Amy and Pilar launched the second annual restyling exchange I was very excited. Last year, my first restyling project was such a fun and challenging project that I didn’t hesitate signing on again.
What is the annual restyling exchange? In short, you get a garment from someone to restyle and you send a garment to someone to restyle! So I received this summer dress from Rebecca and restyled it into a kimono.
Restyling a summer dress in a kimono.
Restyling: the start
When I opened the package that I received from Rebecca I was pleasantly surprised that it contained this bright summer dress with the floral embroidery. It was still new, barely worn, and it had gathered skirts. So I had a significant piece of fabric for my restyling project but not an idea yet. Initially, I wanted to go for the Kastrup top again because that pattern has several smaller pattern pieces. More, I could play with the placement of the embroidered border, which is something I like a lot. It was not until Diane, from ‘Dream. Cut. Sew.‘, posted her kimono made out of two scarfs that I had a lightbulb moment. I could restyle this dress in a kimono. I even had already the Venus Kimono pattern from ‘Sew This Pattern‘, so no extra costs were made for this challenge!
The Venus Kimono pattern
The Venus Kimono consists of 2 pattern pieces: the front and the back piece. I had the pattern already printed on A0 format so that was a huge timesaver. Although this kimono comes as a one size pattern with a relaxed fit you want to check the finished measurements. For Rebecca, the Venus kimono would have been far too big the way it is designed. So I shortened it with 14 cm and took about 1,5 cm off from the center front. These alterations were also necessary to make the pattern fit on the fabric I had available. I traced the customized pattern on to tissue paper because I wanted to keep the original pattern for a future kimono for myself.
Restyle: fitting the pattern on the dress
The first thing you do when you begin your recycle project is unpicking the seams. I started with the gathered skirt because this would give me the biggest fabric pieces. I also unpicked the hems as I needed every mm of fabric I could get. It takes a while to unpick all the overlocked seams and I was a surprised how much thread it gave.
After unpicking I gave the big pieces a good press to smooth the gathers. Then the most challenging part started, the pattern Tetris!
I put the pattern piece of the back, center back to fold line, on the front piece of the skirt. The pattern is designed with a center back seam but I cut off the 1,5 cm seam allowance. The arms were not covered but I marked this on the tissue paper and cut the pattern on this line. Also, you can see that the curve of the hem did not fit; so I adjusted that later when I hemmed it.
The front piece of the pattern went on the back piece of the skirt. Here, the length of piece fitted but for the arm, I had again to make a mark and cut the pattern piece.
To cut out the rest of the arm I lengthed the back and the front piece with other fabric fragments. Herefore I unpicked the bodice of the dress; also the shoulder straps.
Lengthen the front piece with the unpicked shoulder straps.
After lengthening the front piece with two fragment pieces of fabric the arm I was able to cut the arm piece of the front.
For the back, I worked the same way. First, I lengthened the pattern with fragments of the dress bodice. Here I kept the side seams of the bodice.
Then I put the pattern piece of the arm on the assembled fabric. You will notice that it didn’t fit totally. As I didn’t have any substantial piece of fabric anymore I shortened the front piece to make it match.
The assembled front piece with the shoulder straps and fragments of the bodice.Finished back sleeves.
The sewing process
After putting together the pieces of the kimono, sewing it was a piece of cake. Annie, from Sew this Pattern, has a very good sewalong on the website with clear instructions and pictures.
For the french seams, I used my 1/4 inch foot to have a guide and this helped a lot.
I finished the back neck line with bias binding because that is easier than a rolled hem.
Conclusion
I am super satisfied with this restyle project. It gave me a taste for more. I loved sewing a kimono, my first ever, and that also gave me a taste for more.
Thank you Amy and Pilar, for organizing this great challenge.
An eye-catcher is a person or a thing that attracts the attention
The online sewing community is very visual. So, every day I see heaps of sewing related images on social media and blogs. Some of them catch my eye because they make me think or they give me inspiration. Here, I want to share these eye-catchers with you.
Follow below what caught my eye the last months:
Sara’s cape
Sewing a cape for myself is one of my secret wishes. I even don’t know if it would be something that would suit me but I like the shape of it. Also, I think it would very wearable here in Belgium as an in-between-seasons coat. Definitely something my wardrobe is lacking as made clear by Me-Made-May ’18. So I was immediately taken by Sara’s beautiful version of the Woodland Stroll Cape from Oliver + s. This pattern somehow escaped me but it is definitely on my sewing list now.
Martina’s refashioned sweater
The Annual Restyling Exchange of Amy and Pilar is running to its end. With the big reveal weekend coming the 22nd, 23rd, & 24th of June. The sweater Martina refashioned is not for the restyling exchange but something she made for herself. She made a new Sewhouse 7 Toastersweater #1 out of two old sweaters she didn’t wear anymore. I find this a brilliant idea and very inspiring.
Izzy’s pencil skirt
I think we, sewists, all have been there, at least I have. You have some leftover fabric from a sewing project and you have this particular idea of what to sew from it. Then you don’t have enough! Izzy resolved this in a very creative way. For a pencil skirt, she added a lace band and cut out the bottom section the other way. A very clever idea with a stylish result!
The blouse from @fragmentid
Hacks or tweaks do not have to be complicated. @fragmentid lengthened the sleeves of this Burda blouse and finished the hem with gathers. She said that she didn’t wear it with the original elbow length sleeves. Again a brilliant idea with a stylish outcome. Very inspiring.
Giorgia’s African Wax culottes
Giorgia just combined two of my favourite things: African Wax print and culottes. A golden combination. I already made the Velo Culottes in African Wax but seeing this version of Giorgia makes me want to sew several more.
Tilda Swinton by Tim Walker
Wow! This picture of Tilda Swinton by Tim Walker is a real eye-catcher, isn’t it? When it popped up in my IG-feed (@the_red_list) I couldn’t stop looking at it. The movement of the fabric is just mesmerizing. I wished I could make garments like that!
I’ve just finished my third Me-Made-May and I’m feeling happy and a little sad at the same time. Happy because I managed to wear me-mades every single day of May 2018. A little sad because it’s over now and I have to wait another year for a new Me-Made-May!
Standing in front of Anish Kapoor’s Sky Mirror on day 30 of Me-Made-May ’18.
Me-Made-May ’18: Day 19-Day 31
I already showed my first 18 wears of MMMay’18 before, below you see my 13 last wears (blog post linked where the me-mades have been blogged).
19. Seamwork Oslo Cardigan.
20. Seamwork Brooklyn skirt and Sew Much Ado Seafarer top; new combo!
21. Maria Denmark Rachel Wrap dress.
22. In the Folds Rushcutter dress.
23. Newlook 6106 skirt with Burda Turtleneck Top; new combo!
24. Zippy top from See Kate Sew with box pleated skirt from Allemaal Rokjes.
Me-Made-May is all about setting a personal challenge regarding your me-mades, you can read all about this on Zoe’s blog. So the big question is: “Did I reach my challenge?”
I wore at least one me-made garment every day.
I wore every garment only once; so I had no repeats!
I wore 12 garments I didn’t wear last May 2017. So I reached my challenge here as I pledged to wear at least 10 garments I didn’t wear last year. I made 3 new garments this month.
All my combinations of two garments were different than the previous years.
Was it hard? No, not really. After nearly 5 years of sewing clothes for myself I have a considerable wardrobe to go through each morning and make a selection. Also, a bonus was the nice weather we had here in Belgium because I have a lot of summery clothes.
So it wasn’t hard, although I have to confess that towards the end of the month I would have loved to wear something I already wore this month.
Reflections
First of all, I am proud of myself because I’m able to wear 31 different garments that were self-made and appropriate to the situation, in a row. I didn’t give this feeling a lot of consideration the previous years.
Still, there are some serious gaps in my me-made wardrobe. Where are thou: solid tops? trousers? bras? in-between-seasons coat? And I sound like a broken record here.
So, I am going to make that my challenge for the coming year: focus on sewing these types of garments.
See you at Me-Made-May 2019!
PS. An enormous thanks to my husband who took all the photos this month. I love you, baby.
We are more than halfway through Me-Made-May ’18 and I wanted to let you know how the first 18 days of the challenge went.
As you can see in this little fragment— where I listen to my husband giving some posing instructions— the challenge is going smoothly. Even though I already wear my me-made clothes all the time throughout the year, I’m enjoying it a lot. Mostly, because I hadn’t worn some of the clothes I wore the last 18 days for a long time. Wearing them again made me happy, and probably (hopefully) these garments will come more in the rotation now.
18 days of Me-Made-May
Here’s what I’ve worn so far (blog post linked where the me-mades have been blogged).
1. Odette dress – Blue Gingerdoll.
2. Seamwork Brooklyn skirt; new combo with very old RTW blouse and cardigan.
3. Seamwork Wren Dress.
4. New! Seamwork Eliza skirt.
5. True bias Hudson Pants; new combo with very old RTW tunic.
6. Colette Moneta dress.
I wore every garment only once; so I had no repeats!
I wore 7 garments I didn’t wear last May 2017. So I am on track here as I pledged to wear at least 10 garments I didn’t wear last year. Only one skirt came fresh from the machine.
All my combinations of two garments were different than the previous years.
When I look back at which garments I wore it strikes me that 10 out of 18 are dresses. And I always thought I was skirt kind of girl.
Was it difficult to select my clothes? No, it wasn’t. Partly because it is only the first half of the challenge and there are still a lot of options. Also, partly because we were blessed with some very sunny weather last week. So I could wear some of my summer clothes.
Overall I am very pleased with how MMMay18 is going and I am really looking forward to the next weeks. Are you too?


 It took a lot of practice to throw the measurement tape; even my husband had to demonstrate it!


 It takes a while to unpick all the overlocked seams and I was a surprised how much thread it gave.


