Tag Archives: sewing

What I sewed in 2017-Top 5: the hits

There are two reasons why I love a new year. One, you can start a lot of things with a clean slate, and two, you can look back and reflect on the past year.
Like last year I collected all my sewing data in an infographic and here below you see the result of my 2017 sewing!

2017 sewing

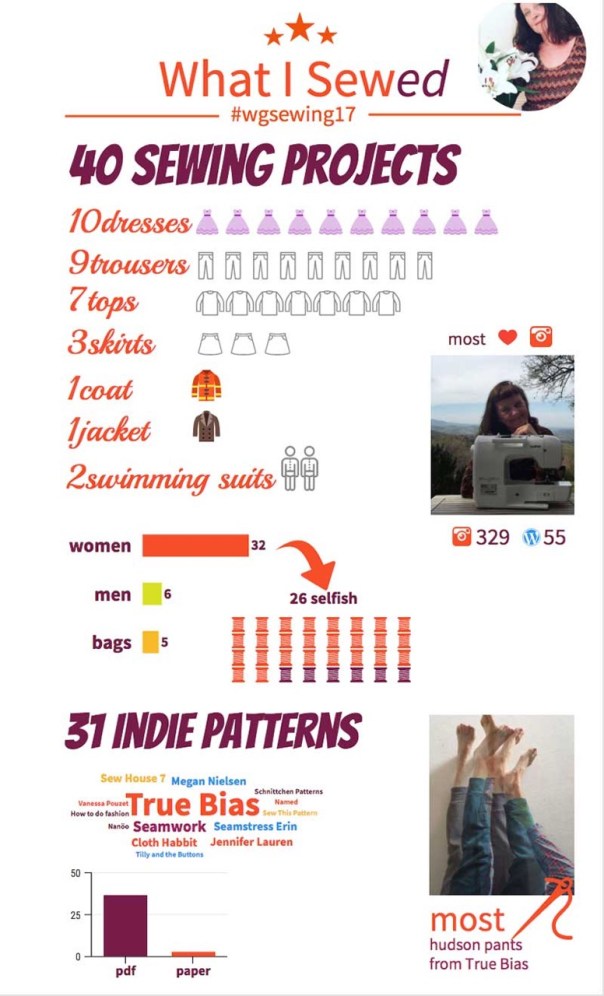
What do these numbers say?

In one sentence: I sew for women, using a pdf pattern from an Indie Pattern Designer. No drastic changes here in comparison with last year.

40 sewing projects

These 40 sewing projects are all finished ones. (I may have a few UFOs also). That’s one less than in 2016. Like last year I am a little disappointed with this number because I have this irrational idea in my head that I want to sew something new once a week. I knew I didn’t succeed at this because last September and October I totally lost my sewing-mojo.


Top 5 of 2017

I am joining Gillian from ‘Craftingarainbow’ for the #SewingTop5 of 2017. It’s already the 5th time she launches this annual blog series. Like she says: “It’s a chance to review what worked or didn’t, celebrate the highlights, reflect and get some goals for the next year.”  All the things I like about starting a new year.  So, here I start with my Top 5 Hits.

Top 5 Hits

My hits are sewing projects that gave me the most joy. This joy can be derived from various sources: from the pleasure of wearing it, the challenge of the sewing, the first time of tackling that particular technique, or the gratitude you receive from the person you sewed for…

Here are in random order my 5 Hits of 2017.

1. The Vogue DKNY  V1235 Dress
The Vogue DKNY V1235 Dress1. The Vogue DKNY  V1235 Dress

I sewed this dress for my daughter to attend the wedding of her best friend. I worked very hard on this dress: I made two muslins for it and executed my first FBA—that still sounds like a medical procedure ;). It was also the first time I sewed with border fabric. I love how the placing of the border I had in my head came out. My daughter received a lot of compliments on the dress and she loves wearing it. This makes me sew happy!


Toaster sweater 2 Sew House 7
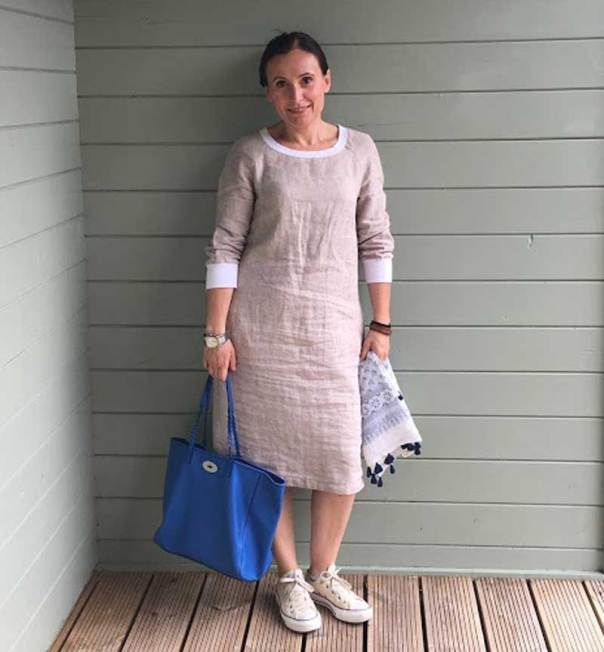
2. The Toaster Sweater#2 from Sew House Seven

Thanks to the SewMyStyle project I sewed this Toaster Sweater and I am so glad I did. It was a quick sew with instant gratification. I wore it a lot and I would never have thought that I could pair it with a variety of clothes, old and new ones, like the A-line skirt and the plissé skirt.


Chari Dress Schnittchen Patterns
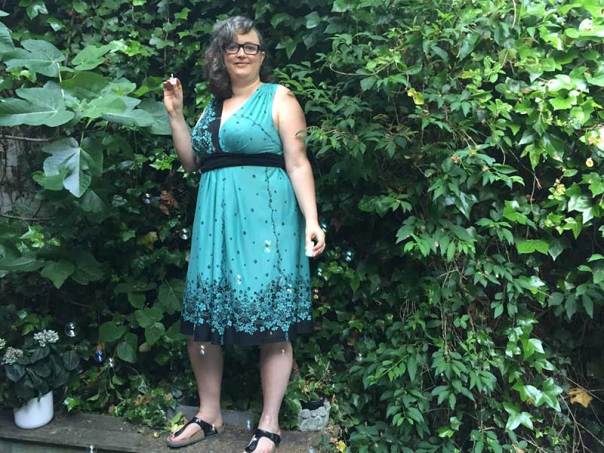
3. The Chari Dress from Schnittchen Patterns

I was a pattern tester for Schnittchen Patterns new collection and though I am not a ruffle kind of girl, I’m glad I picked this pattern. It turned out that ruffles could be stylish for me.
This dress also proved to be the ultimate summer dress when we had temperatures around 40°C last August. So, no surprise here that I wore it A LOT!


restyle refashion
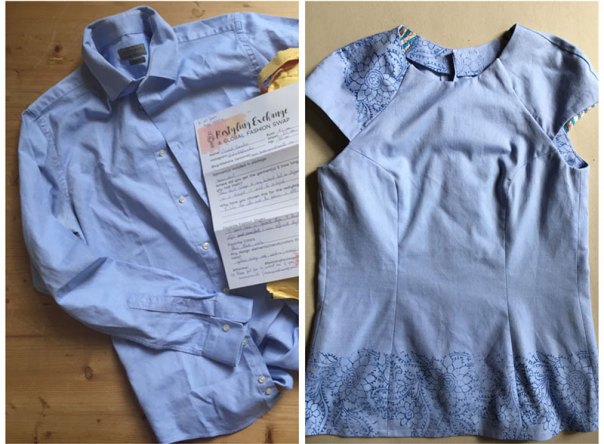
4. The restyling of a men’s shirt

Wow! This project had several firsts for me! I never restyled/refashioned something before and I never hand-printed fabric. I succeeded in both new skills and I am very proud of the result. Extra exciting was that this project was for the First Restyling Exchange. So it was not for me but for Elisabete, who sent me her husband’s shirt and received a top for her. It was thrilling to wait whether the top would suit her and if she would like it. I got two yesses!


plissé skirt Lotte Martens5. My Plissé Skirt

I only sewed this skirt on Christmas Eve but it feels like my best sewing project of 2017. The fabric is exquisite and it took only half an hour to transform it into a skirt. More, I feel like a queen when I am wearing it. A fabulous project to finish my 2017 sew year.

Next up are  Misses & Highlights, and Reflections & Goals.


How to make a-made-in-a-blink festive skirt

Plissé Skirt

Two days before Christmas it looked like I wouldn’t have a new garment for the annual family Christmas dinner. That’s nothing new because last year I didn’t sew one either. Then I went to ‘De Stoffenkamer’ to buy some fabric for presents when this lovely black plissé caught my eye. Immediately, the image of a new skirt—a plissé skirt— popped up in my mind. More, this was going to be a very easy sew, so I bought the fabric right away.

A plissé skirt: how did I do it?

A panel of plissé fabric

Lotte Martens Fabric

The black plissé panel is from Lotte Martens, a Belgian fabric designer. In fact, it is a semi-plissé, which means the pleats aren’t as deep as in a regular plissé. The panel is hand printed with a Bremen gold design. This is Lotte Martens’ trademark. She hand prints all of her fabrics and you know that I love hand printing. Since long I yearned to sew something with a Lotte Martens fabric.

This plissé fabric also reminded me of my visit to the Fortuny Palace in Venice for the Biennale 2015. There I learned that the plissé was invented by Mariano Fortuny, a Spanish fashion designer who lived in Venice. He opened a couture house in 1906 and continued until his death in 1946. Fortuny rebelled against the fashionable styles that were popular during his time. Together with his wife, Henriette Negrin, who was an experienced dressmaker, he created the Delphos gown in 1907. The Delphos gown is a shift dress made of finely pleated silk weighed down by glass beads that held its shape and flowed on the body. The pleating was all done by hand and the process was kept secret. Today these dresses are seen as works of art and many survive, still pleated, in museums and personal collections. (Source: Wikipedia)

Delphos gown
On the left: Clarisse Coudert, who married Condé Nast, wearing a Fortuny tea gown. ca. 1909 – On the right: (Isadora) Duncans three adopted daughters (Lisa, Anna, and Margot) in Delphos dresses c.1920
One side-seam

The panel is 70 cm with a 150 cm fabric width. For this type of skirt, you don’t need a pattern. Double the fabric, right sides together, pin and stitch.

The elastic waistband

Measure a piece of broad elastic around your waist. Sew the ends together to create a circular form.

Divide the waistband and the skirt into four even parts and mark them with chalk and/or pins. Now pin the waistband to the skirt. I placed the side of the waistband with the mini ruffles atop the top of the skirt. This makes the stitching of the elastic easier.

The whole sewing process took me about 20 minutes.

Conclusion

We had to leave for the family party at twelve and I finished it at 11 o’clock! I love wearing it and I got a lot of compliments. Who doesn’t like that?!

Will I make more plissé skirts? When I find the right plissé fabric I probably will. Or maybe another type of garment like the Fortuny tea gown. Who knows?

The A-line skirt that brought my sewing mojo back!

After going on holiday, I think my sewing mojo went on a holiday as well. I don’t know how it happened but I didn’t touch my sewing machine for more than a month. I just couldn’t bring myself to sew. Then I remembered how long it had been that I sewed a skirt for myself. Although I have several WIP’s gazing at me I went for a new A-line skirt and it gave me back my sewing joy!
A-line skirt

The A-line skirt pattern

When I was wearing the Laneway Dress from Jennifer Lauden I noticed how nice the design and the fit of the skirt felt. I love the A-line and it has pockets. The decision to use this pattern for the skirt was quickly made.
The pattern didn’t need any modifications. For the dress, I had lengthened the skirt with 5 cm but I took it back to the original length. The fit was good so I let it fall on my natural waist.

The fabric

A few months ago I got a bag with fabrics from my sister-in-law; all from unknown origin and unknown composition. This small piece is probably upholstery fabric. It is medium weight and both sides are useable. I opted for the side with the dark background and blue-ish flowers. I love that it has some art nouveau vibe. The fabric feels a little rough that’s why I lined the skirt with some green lining that I had left from sewing my husband’s jacket.

I had only 1,10 m of this fabric so I could not place the front and the back piece in the same direction.

Luckily the line of the drawing is not that strong so you have to look really closely to notice that the front and the back are not in the same direction.

The sewing process

Sewing this skirt was easy and quick. Having sewed already more than 20 skirts the last years I had no difficulties putting this one together. However, for the pockets, I followed Jennifer Lauren’s method and it proved again to give very neat ones.

For the waistband, I used preformatted interfacing band, a handy prop. This band has three punched lines to make it easy to sew it on and fold it over.

A-line skirt
Lining, waistband, skirt and neat pocket. Also, that’s not a tuck between the lining and the waistband but a loose thread!

Conclusion

I love this A-line skirt. Not only for making me happy when I’m wearing it but also for bringing back my sewing mojo. Give me more of these kinds of skirts!

A-line skirt

Eye-catchers #18

An eye-catcher is a person or a thing that attracts the attention

The online sewing community is very visual. So, every day I see heaps of sewing related images on social media and blogs. Some of them catch my eye because they make me think or they give me inspiration. Here, I want to share these eye-catchers with you.

DIY sewing


Follow below what caught my eye last August:

Catherine’s  V9253 dress

DIY sewing

This was the first V9253 dress I saw in my feed and this version by Catherine from Thread Snips left me speechless. She searched for the perfect fabric and ended up with silk noil. More, she dyed it herself in this gorgeous colour. The result is a stunning dress that fits her perfect! I should really start to dye my fabric too.

@mokosha_ll’s  dress

Burda Dress

There are sewists out there who can work wonders. @mokosha_ll squeezed this Burda Racer Tank Dress out of 0,8m (where 1,8m was suggested!) As usual she combined two different patterns for the bodice and the skirt. That’s something I want to do more.

Bianca’s caftan

Simplicity 5313

The summer of 2017 was certainly the summer of the caftan. A lot of them popped up in my feeds but look at the brilliant version Bianca sewed. She used a 1970s vintage pattern, Simplicity 5313. I totally adore how she played with her striped fabric. Very inspiring!

Beth’s striped dress

Burda dress

Beth proved that there is more than one way to play with stripes. Although I am not a big fan of striped garments— I only have a few myself — I like the way how the stripes are put here. The pattern is the Asymmetric Sheath Dress from Burda. Beth posted this on her Instagram although she made it a year ago. She herself is not that convinced of it but I find it beautiful.

The tribute blouse of Meris

M6436 Blouse

August 2017 was the Sewcialist’s Tribute Month. It was all about paying tribute to inspiring sewists. I wrote a post about it but I didn’t get to sewing a tribute piece. But a lot of sewists did. You can read all about it on the Sewcialist’s blog.
I was immediately taken by this blouse by Meris of The Fabric Alchemist. The pattern is M6436. Meris made a tribute to Morgan from Craft & Bee, who made not less of 10 versions of this pattern. What I found striking is that Meris used this beautiful fabric from a kimono gown of her husband’s grandmother. That makes it a double tribute and a total lovely project.

Did anything catch your eye recently?

Laneway Dress Jennifer Lauren

The Laneway Dress from Jennifer Lauren Handmade

A month ago Jennifer Lauren called out for pattern reviewers. She is the driving force behind Jennifer Lauren Handmade, a New Zealand Indie Pattern company. She wants to show people with a variety of body types wearing her designs. Hence the call out for reviewers. I volunteered and I’m happy that I am an official Laneway Dress Reviewer!

Laneway Dress Jennifer Lauren Handmade

The Laneway Dress pattern

I was pleased that there is an A0 format of the Laneway Dress pattern because I try to avoid assembling pdf-patterns. One of the advantages of the Laneway Dress is that it comes with different cup sizes (B, C, and D). To prevent unnecessary prints and costs Jennifer made a different page for every bodice pattern with the facing. So you have only to print the page with your cup size. This is very economical and much appreciated.
After grading between the 20 for the bust and 22 for the waist I cut out the pattern pieces. Here I found that the difference between the lines for the different sizes was not always that clear, especially on the curves. To distinguish them I marked them.

Laneway Dress

With 14 cm difference between my full bust and my under bust, I went for the B-cup and the fit was right.

The pattern is designed for an average height of 170 cm. Being 181 cm I lengthened the bodice and the skirt each with 5 cm. On the bodice pattern there are no lengthen/shorten lines but in the instructions is explained how you can do it.
I didn’t lengthen the skirt at the seam but I put 5 cm in the middle because I wanted to hold the original width of the skirt.

Laneway Dress Jennifer Lauren Handmade

The Fabric

I had this African Wax Print in my collections since September 2016. I bought it in Paris in the Sacre Coeur neighbourhood where there are a lot of great fabric stores. When I bought the fabric I just went for the colours. I didn’t notice that the balls were, in fact, all kind of sports balls! Although the Laneway Dress has a 1940s A-line silhouette which is not immediately associated with African Wax Print I went for it and it worked perfectly!
For the contrasting collar, I used some gingham from an old table cloth.

Laneway Dress Jennifer LaurenThis  100 %  African Wax was a dream to sew but very difficult to photograph. The colours change all the time. I also used the selvedge as a ‘natural’ hem.

The sewing process

This is the first pattern I sewed from Jennifer Lauren Handmade and it was a very satisfying experience. The accompanying instructions are detailed and illustrated with clear designs. The order of the steps is logical and there is nothing confusing.
A little different from my usual method was the way the pockets were sewn. It was described and illustrated in detail and they came out neat and smooth. For sure a technique that I will adopt now.
Laneway Dress Jennifer Lauren Handmade
What I also like in the instructions is that every step includes how to press the sewed seams.

Due to the grading between sizes, the fit was ok but could be more perfected. In hindsight, it would be better for me to grade between 18 for the shoulders and armscye, to 20 for the bust and 22 for the waist. Another minor mistake was that I had lengthened the bodice too much. I was able to take off 1 cm but for the future, I better lengthen the bodice only with 3,5 cm.

Laneway Dress Jennifer Lauren Handmade

Is this a quick sew?

I would not say that sewing the Laneway Dress is a quick sew. The sewing, however, is really satisfying. It is not difficult and after every step, you immediately see your progress. That makes that you are sitting there sewing with a smile on your face.

Laneway Dress Jennifer Lauren Handmade

Conclusion

I only finished my Laneway Dress today but I am positive that I am going to wear it a lot. It feels comfortable. The design of this dress is exquisite and the use of non-obvious fabric choice only confirms this. So, thank you, Jennifer Lauren, for letting be me a Laneway Dress Reviewer!

A sewing secret

We all have secrets, don’t we?  These secrets can also be sewing secrets. I am going to reveal you a small sewing secret about the dress I am wearing today: the Rushcutter from In the Folds.

Rushcutter In the Folds


The Rushcutter from In the Folds

Last summer I sewed two Rushcutter dresses from ‘In the Folds’ because I like this pattern a lot. The design is ingenious: the A-line shape, the raglan with the front insert, the side panels, and it has pockets!

The grey one with the colour streaks was the first one I sewed. Because I loved it so much I immediately sewed another one. The two contrasting pieces of this black & white fabric I had were ideal for this pattern. I love both versions and they are in my top 5 of last year’s sewing.

wear both dresses a lot, both at work and on holiday when the weather is hot. Below are some pictures that were taken in the Tuscan city San Gimignano last summer.

Rushcutter In the FoldsHere I am standing in front of a work of Ilya & Emilia Kabakov in Galeria Continua in San Gimignano.

At the Palazzo Comunale, San Gimignano.

The sewing secret

What is now my sewing secret about this dress? Well, I am a little ashamed but I never finished the back closure. I never sewed the buttonholes. I put in a pin and every time I wore it I closed it with the same pin. There is no specific reason why I didn’t do it. I started to wear it with the pin and I never came to finish it. Every time I put it on I think that I should finally sew these buttonholes, if only for my husband because he did hurt himself a few times when he hugged me.  And again I didn’t do it today.

Rushcutter It doesn’t show that the closure isn’t properly finished, does it?

Do you have sewing secrets? I would love to know what they are.

The floral Ogden Cami Dress from True Bias

Wow, this is the Summer of the Ogden Camis. I so enjoy wearing my Cami and my Maxi Cami Dress that I decided to make another one. This time I would go for another hack. I wanted to use the bodice of the Cami and combine it with the skirt part of the Chari dress. I hoped that would give a whirly, summery dress. However, it turned out a little different ;).

Ogden Cami Dress
The floral fabric

Like the fabrics for my other Camis, I also found this one at the market in Castel del Piano. It is soft, silky, and drapey. Normally I’m not a great fan of floral and blue but I liked this piece. It has a bit of an oriental vibe, hasn’t it?

Ogden Cami Dress

All these market fabrics are pre-cut and this one was only 1,60 m with a width of 1,50m. So I knew that I had to cut both the front and back piece in two pieces. I even had to put a seam in the back lining.

Ogden Cami
Stitching two pieces of fabric together to be able to cut out the lining.
The planned dress hack

In one of her latest video posts, Johanna LU from ‘The Last Stitch‘ called for sewists to show more sewing struggles. Well here is my struggle.

First I measured on my Ogden Cami where would be the good spot to put the tunnel for the elastic (about on my natural waist). I put the mark on my pattern pieces, folded them, pinned them on the fabric and cut the fabric.
Next, I cut the skirt pieces as wide and as long as the rest of the fabric allowed. After sewing everything together and only with the first fit, I noticed my mistake. I cut a straight seam on the bodice pieces and not a curved one! I totally forgot that I have boobs. So the desired straight seam was now curved. More, it was not possible to use this seam as a guide for the tunnel for the elastic.

Ogden Cami Dress
Forget to draw a curved seam for the bodice.

Luckily I saw that it was possible to wear the dress as it was. Due to the floral print and after a good press you don’t notice this curved seam.

Ogden Cami Dress

The sewing process

For this Cami I used the construction method from ‘What Katie Sews‘ and it worked well. She has a good tutorial on her blog. Although following True Bias’s instructions was not complicated I found Katie’s way easier. It simplified the attachment of the straps and made it a quick sew.

Ogden Cami Dress

Conclusion

It’s no secret that I, again, love my Ogden Cami Dress. Even if it turned out different than I planned.  I wore it already several times and it is absolutely a much-needed garment for hot weather. I am even more pleased that I can layer it up with a linen jacket or a cardigan. So it will be suitable for colder days.

Ogden Cami Dress

Will I make more Ogden Camis? Not immediately but someday I will.


Eye-catchers #17

An eye-catcher is a person or a thing that attracts the attention

The online sewing community is very visual. So, every day I see heaps of sewing related images on social media and blogs. Some of them catch my eye because they make me think or they give me inspiration. Here, I want to share these eye-catchers with you.

sewing dresses

Follow below what caught my eye recently:

Jenny’s Eden dress

Eden La Maison Victor

Isn’t this lovely finished back of the La Maison Victor Eden dress an eye-catcher? The dress has a beautiful back decolletage but the way Jenny embellished it with the white ribbon is exquisite. Very inspiring.

Sewionista’s red-white striped dress

sewing dresses

I only have a few striped garments but when I saw this amazing dress of Sewionista I decided I want some more. This is the 05/2014 #104 Burdastyle dress. The pattern design is not that complicated but Julia did a sublime stripe placing that took sewing a striped garment to a higher level.

Shar’s Jazz Jumpsuit

ready to sew Jazz

She has a serious look in this picture—she says she can’t do selfies ;)— but the Shar’s version of the Ready to Sew Jazz jumpsuit is simply delightful. The use of Ikat fabric works excellently for this pattern. Picking a non-obvious fabric for a pattern is also something  I always try to aspire.

Anne’s keyhole blouse

Anne’s keyhole blouse reminded me of the Knip blouse I featured in Eye-catchers #4.  Both blouses consist out of several pattern pieces so you can mix and match fabrics. Anne did a great job here using a different fabric for the sleeves and back yoke.

Mirella’s dress

sewing dresses

This amazing fabric used by Mirella immediately caught my eye.  It’s a knit fabric but I could not read more about it on Mirella’s IG (@mirei_71). She used it to sew a dress from the Rosa P. book. This is an unknown designer for me. I always like it when I discover new designers, patterns,…  So thank you, Mirella, for sharing.

And, did anything catch your eye recently?

The Ogden Cami & Ogden Cami Maxi from True Bias

Ever since I featured the Tiffany’s Ogden Cami Maxi in my Eye-catchers I wanted to sew one myself. I only have one maxi dress and I love wearing it, especially when it’s baking outside. So I tried a small pattern hack to turn the Ogden Cami in an Ogden Cami Maxi and I am thrilled with the result. Both of them are going to have a lot of wear!

Ogden Cami

Ogden Cami Maxi

The Ogden Cami pattern

I again enjoyed that I printed the pattern in A0-format at the copy shop. The different lines for the different sizes are very clear. I cut out the 5 pattern pieces after I graded between the bust and the waist. As always I lengthened the front and back pieces with 5 cm. On the front and back pattern piece is a line indicated for lengthening/shortening. I find this a plus for a pattern. The alterations came out perfectly.

Ogden Cami

The fabric

I bought both pieces of fabric at the monthly market in Castel del Piano. There is this cute market stall where you can buy all kind of cut fabric pieces for 5€ per piece and 10€ for 3 pieces. I got these two pieces together with the black knit for my daughter’s swimsuit I sewed in July. The downside is that you can’t decide the length of the pieces; they are all pre-cut. This caused no problem for the camisole but it was for the maxi dress (see below). Also, these pieces have no labels. The olive green is probably viscose and the black & white feels and looks like crêpe.

Ogden Cami Maxi

The sewing process

I sewed a True Bias pattern before,  the Hudson Pants that I love so much. So I knew that the accompanying instructions would be clear and so they were for the Ogden Cami. The successive steps come logically and every step is illustrated with straightforward designs. I had no difficulty putting the top together and the fit was from the first try spot on!
I loved the tip to sew a label at the back neckline to distinguish it from the front because indeed you can’t see it with the naked eye.

Ogden Cami


Making the Maxi Dress

To draft the maxi dress I copied the measures of the maxi dress I have.

  1.  The total length from the underarm to the hem = 130 cm.
  2.  The width of the hem = 200 cm. For me, skirts of a maxi have to be wide because I am not a fan of vents.

I didn’t draft new pattern pieces but I lay the pieces of the cami on the fabric. I folded the side seams and drew with chalk the desired length from the underarm to the hem. Ahem, this is what I wanted to do but my fabric was too short!! (I only had 175 cm of 140 cm width). So I drafted a front and back piece, both on the fold line, as long as I could. To make my desired length I cut two pieces cross grain. Luckily the design of the fabric is very forgiving so you have to look real close to see where the seam is. In the end, I reached a hem width of 180 cm.

Ogden Cami Maxi
Can you spot the seam between the two pattern parts?

To reach the desired length I had to use a back piece with a hole at the side seam. I patched it up!  Again, you have to look real close to see it!

On the left the hole at the side seam. On the right the patching!

Because there was no fabric left for the lining I used some vintage cotton from my collection.

Conclusion

I am over the moon with my Ogden Cami and even more with my Ogden Cami Maxi Dress. What I like in particular about this pattern is the delicate balance between the soft v-neck and the straps. And wow, I can wear them without a bra!
At this moment the sewing world is booming with Ogden Camis. So a lot of you have yet discovered the sublimeness of this pattern. For those who haven’t yet sewed one, do it!

Eye-catchers #16

An eye-catcher is a person or a thing that attracts the attention

The online sewing community is very visual. So, every day I see heaps of sewing related images on social media and blogs. Some of them catch my eye because they make me think or they give me inspiration. Here, I want to share these eye-catchers with you.

inspiration sewing

Follow below what caught my eye recently:

The Fielder sewed by Sal

Sewing something from the Merchant & Mills Workbook is on my 2016MakeNine and 2017MakeNine. But so far I didn’t get around to it. When I saw this amazing Fielder Dress (not from the Workbook but a separate pattern) from Sal (@sewingunlimited) it inspired me again to sew something from M&M.

Renee’s Frida Kahlo skirt

inspiration sewing

One skirt, two pockets, and no pattern. That’s what Renee calls free style sewing. She says it is fun to do and I believe her. Especially when you have such exciting Frida Kahlo fabric.

The 1930s waitress dress from Vintage Gal

inspiration sewing

I did not participate in #vpjuly—the vintage pledge challenge on Instagram— but I saw a lot of beautiful vintage outfits in my feed. This genuine 1930s waitress dress from Vintage Gal stood out. She found it at a sale of a theater company and paid £1 for it. On her blog, you can read the whole story. I find it astonishing that she found this marvelous dress and that it fits. She put on red 1930s buttons and sewed a belt with a 1930s buckle. The result is dazzling.

The coat with a character

inspiration sewing

Alfia Galimova needed a coat. She made one from two vintage jackets. Isn’t this creative? The result is marvelous.  For me, this is the pinnacle of upcycling. Hats off!

Dana’s Dress

inspiration sewing

Again a successful example of pattern hacking. Dana (@sewingbassoonist) took the Annie A-line skirt from Sew This Pattern and added the Emery Dress bodice to it. The result is a cute and unique dress.

Did anything catch your eye this week?